Within your React Native project, open up a new terminal window and install the module:
$ npm install react-native-eid-reader --save
React Native requires linking native dependencies, excute the following in the terminal:
$ react-native link react-native-eid-reader
Manual installation
iOS
In XCode, in the project navigator, right click Libraries ➜ Add Files to [your project's name]
Go to node_modules ➜ react-native-eid-reader and add EidReader.xcodeproj
In XCode, in the project navigator, select your project. Add libEidReader.a to your project’s Build Phases ➜ Link Binary With Libraries
Run your project (Cmd+R)<
Android
Open up android/app/src/main/java/[...]/MainApplication.java
Add import com.reactlibrary.EidReaderPackage; to the imports at the top of the file
Add new EidReaderPackage() to the list returned by the getPackages() method
Append the following lines to android/settings.gradle:
include ':react-native-eid-reader'
project(':react-native-eid-reader').projectDir = new File(rootProject.projectDir, 	'../node_modules/react-native-eid-reader/android')
Insert the following lines inside the dependencies block in android/app/build.gradle:
compile project(':react-native-eid-reader')
Usage
importEidReaderfrom'react-native-eid-reader';// TODO: What to do with the module?EidReader;
Roadmap
See the open issues for a list of proposed features (and known issues).
Contributing
Contributions are what make the open source community such an amazing place to be learn, inspire, and create. Any contributions you make are greatly appreciated.
Fork the Project
Create your Feature Branch (git checkout -b feature/AmazingFeature)
Commit your Changes (git commit -m 'Add some AmazingFeature')
Push to the Branch (git push origin feature/AmazingFeature)
Open a Pull Request
License
Distributed under the Apache License 2.0 License. See LICENSE for more information.
We are pleased to announce the official release of “8bit-bomb,” an exciting remake of the classic game Bomberman. Get ready to experience explosive action, tactical strategy, and endless fun!
Project Description
“8bit-bomb” is an exciting remake of the classic game Bomberman, developed to provide an engaging and nostalgic gaming experience in 8-bit style. The main goal of the project is to recreate the atmosphere and excitement of the original game, enriching the experience with graphical enhancements and modern features.
It was developed as part of a video game programming assignment.
Installation Instructions
To copy from GitHub and build a Unity project without installing additional files, follow these general steps:
Clone the Repository:
Open the GitHub repository page containing the Unity project.
Click on the green “Code” button and select “Download ZIP” if you don’t have Git installed, or use Git to clone the repository if you have it installed.
If you downloaded the ZIP file, extract its contents to a dedicated folder on your computer.
Open Unity Hub:
Ensure you have Unity Hub installed on your machine. Unity Hub is a management tool for Unity projects.
Open Unity Hub and click on the “Add” button to add a new project.
Select the Project:
Navigate to the folder where you extracted or cloned the Unity project.
Select the project folder and click “Open” or “Select Folder.”
Install Unity Version (if needed):
If the Unity project requires a specific Unity version that you don’t have installed, Unity Hub will prompt you to download and install the required version. Follow the prompts to install it.
Open the Project:
Once the Unity version is installed, click on the project thumbnail in Unity Hub to open the project.
Resolve Dependencies (if needed):
Unity projects may have dependencies or plugins. Check the project documentation or readme for any specific instructions on resolving dependencies. You might need to import certain assets or packages from the Unity Asset Store.
Build the Project:
Once the project is open, go to “File” -> “Build Settings.”
Choose the target platform for your build (e.g., PC, Mac, Android, iOS).
Click on “Switch Platform” if necessary.
Click on “Build” to generate the executable or project files.
Run the Project:
After building, you can run the project by executing the generated executable or running it directly from the Unity Editor.
These steps should allow you to copy a Unity project from GitHub, set it up in Unity Hub, and build it without needing to install additional files beyond Unity Hub and the required Unity version. Note that specific projects may have unique requirements, so always check the project documentation for any additional instructions.
memheap is a simple, general purpose memory heap. It has single-thread and multi-thread modes.
The only difference is that the multi-thread one is guarded with a mutex. The trivial API could be found in include/memheap/memheap.h.
A standard std::allocator interface is provided in include/memheap/allocator.h, that could be used with STL containers, etc..
Depending on your application, it could be much faster than calling malloc/free directly.
See the benchmark section. For some allocation patterns, memheap is about 100 times faster. Having said that, memheap isn’t a malloc replacement by any means.
Build
Requirements
C++11 or later
Steps
Suppose you have cloned the source to [HOME]/work/memheap
For out-of source, create a build folder in [HOME]/work, and go there.
$mkdir build
$cd build
Run cmake (make sure the build Release for speed).
This project focuses on predicting customer churn using various machine-learning techniques. The analysis involves data preprocessing, exploratory data analysis (EDA), feature engineering, model selection, hyperparameter tuning, and interpretability using SHAP values.
The dataset was checked for missing values, and appropriate actions were taken to handle them. Missing values in the TotalCharges column were imputed using the median.
Encoding Categorical Features
Categorical features were encoded using LabelEncoder and OneHotEncoder to convert them into a format suitable for machine learning models. This step was crucial for ensuring that the categorical data could be effectively used in the models.
Data Normalization
Numerical features were normalized using MinMaxScaler to ensure that they were on the same scale, which is particularly important for models like SVM and K-Nearest Neighbors.
Exploratory Data Analysis (EDA)
Visualizations
Histograms: Distribution of numerical features.
Box Plots: Comparison of numerical features across churned and non-churned customers.
Count Plots: Distribution of categorical features.
Bar Plots: Proportion of churn within each category of the categorical features.
Insights
Age and Tenure: Older customers and those with longer tenure showed different churn rates.
Service Usage: Features like OnlineSecurity, TechSupport, and Contract type were significant in determining churn.
Payment Method: Certain payment methods showed higher churn rates.
Feature Engineering
Several new features were engineered to capture more complex relationships:
Tenure Group: Categorized customers based on their tenure.
Monthly Charges Bin: Binned monthly charges into intervals.
Total Charges to Tenure: Ratio of total charges to tenure.
Number of Services Subscribed: Count of services a customer is subscribed to.
Payment Method Encoding: One-hot encoded different payment methods.
Model Selection
Four different models were trained and evaluated:
Support Vector Machine (Linear Kernel)
K-Nearest Neighbors (KNN)
Linear Discriminant Analysis (LDA)
XGBoost
Training Set Results
Model
Accuracy
Precision
Recall
F1 Score
Support Vector Machine (Linear)
0.5757
0.5824
0.5775
0.5799
K-Nearest Neighbors
0.6500
0.6528
0.6620
0.6573
Linear Discriminant Analysis
0.5700
0.5726
0.6000
0.5860
XGBoost
1.0000
1.0000
1.0000
1.0000
Conclusion: XGBoost was selected as the best-performing model due to its ability to handle the complexity of the dataset and its superior performance metrics.
Hyperparameter Tuning and Model Evaluation
Hyperparameter Tuning
Hyperparameters for XGBoost were optimized using RandomizedSearchCV. The following hyperparameters were selected:
alpha: 0.5266
colsample_bylevel: 0.9004
colsample_bynode: 0.9895
colsample_bytree: 0.9199
gamma: 4.3350
lambda: 1.8159
learning_rate: 0.1755
max_depth: 5
min_child_weight: 8
n_estimators: 492
scale_pos_weight: 5.1551
subsample: 0.7975
Test Set Results
The model was evaluated on the test set with the following results:
Accuracy: 0.5200
Precision: 0.5140
Recall: 0.9671
F1 Score: 0.6712
Analysis: The model exhibits high recall, indicating it is effective at identifying churners, but at the cost of precision, leading to many false positives.
Feature Importance
Feature importance was evaluated using XGBoost’s built-in feature importance scores.
Top Features
OnlineBackup_Yes
Dependents_Yes
TechSupport_Yes
PhoneService_Yes
DeviceProtection_Yes
Interpretation: Features related to customer dependencies and service support are the most influential in predicting churn.
SHAP Analysis
SHAP (SHapley Additive exPlanations) was used to interpret the XGBoost model:
Summary Plot: Showed the impact of each feature on model output.
Dependence Plot: Illustrated the relationship between the most important feature and churn prediction.
Conclusion: SHAP provided insights into how specific features contributed to the likelihood of churn, enhancing the interpretability of the model.
Conclusion and Recommendations
Business Implications
Targeted Retention Strategies: The model identifies key features that contribute significantly to customer churn, such as OnlineBackup, Dependents, and TechSupport. These insights can be leveraged to develop targeted retention strategies. For example, customers who are not using TechSupport or OnlineBackup might be more likely to churn, suggesting that promotions or educational campaigns focused on these services could help in reducing churn rates.
Service Improvements: The analysis highlights that services such as TechSupport and OnlineBackup have a strong influence on whether a customer will churn. Investing in improving these services and ensuring they are effectively marketed to customers could lead to higher customer satisfaction and lower churn rates.
Customer Segmentation: By understanding the different factors that drive churn among various customer segments (e.g., those with Dependents, those using MultipleLines), the company can develop more personalized marketing and service strategies. This segmentation can help in allocating resources more efficiently, targeting the right customers with the right offers.
Proactive Measures: The high recall rate of the model suggests that it is particularly effective at identifying customers who are at risk of churning. This allows the business to take proactive measures to retain these customers, such as offering discounts, enhancing service levels, or engaging with them more personally to address any concerns.
Future Work
Additional Features: Incorporate customer satisfaction scores, competitor analysis, and social media sentiment to further enhance the model’s accuracy and the insights derived from it.
Advanced Models: Explore deep learning models and ensemble techniques for potentially better performance.
Real-Time Predictions: Implement the model in a real-time environment to provide actionable insights for customer retention efforts.
Deployment Considerations
Monitoring: Regularly monitor the model’s performance to ensure it continues to perform well over time.
Updating: Periodically retrain the model with new data to capture evolving customer behaviors.
Integration: Deploy the model within customer management systems for real-time churn prediction.
(define fib (lambda (n) (if (< n 2) 1 (+ (fib (- n 1)) (fib (- n 2))))))
(fib 1)
(fib 2)
(fib 3)
(fib 10)
Square roots
;; Compute square roots using Newton's method as in SICP
;; See https://mitpress.mit.edu/sicp/full-text/sicp/book/node12.html

(define abs (lambda (x) (if (< x 0) (* -1 x) x)))

(define square (lambda (x) (* x x)))

(define good-enough? (lambda (guess x) (< (abs (- (square guess) x)) 0.001)))

(define average (lambda (x y) (/ (+ x y) 2)))

(define improve (lambda (guess x) (average guess (/ x guess))))

(define sqrt-iter (lambda (guess x) (if (good-enough? guess x) guess (sqrt-iter (improve guess x) x))))

(define sqrt (lambda (x) (sqrt-iter 1.0 x)))

(sqrt 4)
(sqrt 256)
Compiler
The compiler will try to output a JavaScript file with the core functions and your program in its own JavaScript object (as a namespace) so it can be used in other projects.
The namespace is inferred from the name of the file being compiled. For instance, compiling the fileexamples/roots.scm results in the namespace roots in an output file called roots.js in the current directory:
A script to easily set up a SteamOS-like gaming environment on Arch Linux.
This script is designed to bring SteamOS-style session switching to Arch Linux. It automates the installation and setup of a Gaming Mode (Gamescope) and a Desktop Mode (Wayland session), along with configuration for SDDM and several optional components.
📌 Features:
Wayland Session Selector: Allows you to choose a desktop session for your system.
Gamescope Gaming Mode: Switch to a full-screen gaming experience similar to SteamOS. It uses gamescope-session-steam (Thanks to ChimeraOS team for this).
GUI Helper: Easy configuration with GUI made with Zenity.
SDDM Configuration: Automatically configures SDDM for autologin.
Shortcut Creation: Adds a desktop shortcut for easy switching to Gaming Mode.
Optional Tools: Offers installation of Flatpak, Decky Loader.
Session Switcher: Shortcuts to easily switch between desktop and game mode.
⛓️ Requirements:
Arch Linux (or an Arch-based distribution)
SDDM display manager
A compatible GPU (NVIDIA hardware may face issues)
A gamepad for best UI experience
KDE Plasma Desktop (Other desktops are also supported, but KDE Plasma is recommended for the best experience.)
🧭 How to install?
Run this code in your terminal and follow the instructions:
Please note that running this script may modify important system configurations, files, and settings. In some cases, it could lead to system instability, configuration loss, or make the system unbootable. Restoring the system to a working state may require advanced technical knowledge. Before executing directly, check the content of the script.
By using this script, you acknowledge that you are fully responsible for any issues that arise, including but not limited to data loss, system corruption, or any unforeseen consequences. It is highly recommended that you back up your important data and configurations before proceeding. Use this script at your own risk.
⚙️ What this script does:
1.Prompts you to choose a default session for desktop mode.
2. Installs yay from AUR if neither yay/paru is not installed.
3. Enables the multilib repository, updates the system, and installs Steam if it’s not already installed.
4. Installs gamescope-session-steam-git from the AUR (includes gamescope and other dependencies).
5. Generates an sddm.conf file in /etc/ to enable autologin and session switching.
6. Adds a sudoers rule to allow session switching without a password.
7. Creates a steamos-session-select file, allowing switching back to desktop mode from within Steam.
You can update the system in Steam by adding the ~/arch-deckify/system_update.sh file to Steam as a non-Steam game while in desktop mode.
In order for the system update script to work, at least one of the supported terminals (konsole, gnome-terminal, kitty, alacritty) must be installed.
Unfortunately, system updates are not possible through Steam settings.
Decky Plugin Loader
The Decky Loader is an unofficial community-driven tool that allows you to install and manage plugins for your Steam interface. While not essential for system functionality, it provides additional customization options for SteamOS. (https://decky.xyz/)
Please note that it is not an official tool and may cause issues. Any potential risks or problems are the user’s responsibility.
All logos, trademarks, and names related to Steam, SteamOS, Steam Deck, Valve, Deckify and other software such as Plasma and Arch are the property of their respective owners. These logos and names are used for reference and informational purposes only. This project is not affiliated with, endorsed, or sponsored by Valve, Steam, SteamOS, Steam Deck, Plasma, Arch Linux, Flatpak, Decky Loader, Deckify or any of their respective organizations. All rights reserved to the original trademark holders.
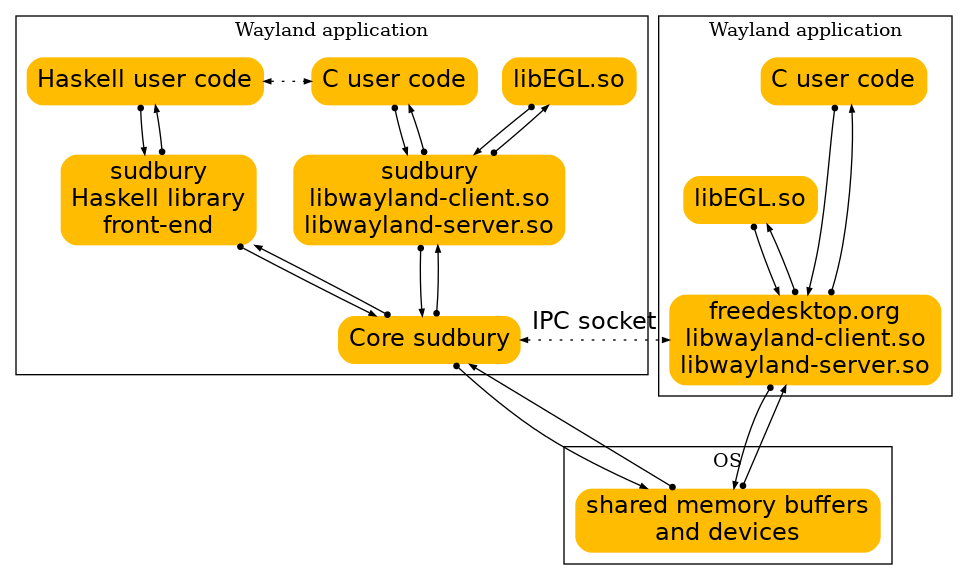
A haskell implementation of the Wayland protocol. Any implementation of the Wayland protocol needs to support some C ABI calls if it wants to support EGL, so we just aim to implement the entire C ABI.
FAQ: Where’s the sample code of this Haskell library?
At this stage, most work has gone into preliminaries and supporting the C client ABI. That means that this is a piece of really elegant Haskell code that can only really be used by C wayland clients. In other words, this project is currently a drop-in replacement of libwayland-client.so (as of commit 24e5b89, all weston clients seem to run correctly).
However, the aim is to write a really nice Haskell interface so that you can write all your Wayland programs in elegant Haskell. See issue #2 for progress on the usability of this code in Haskell. See issue #3 for progress on the C ABI for compositors (making this a drop-in replacement of libwayland-server.so, thus a replacement of the original C wayland code).
FAQ: This won’t work because the libwayland C library assumes it’s in charge
This library builds its own dynamic object (see the foreign-library section in sudbury.cabal). If you have a piece of C code which calls into C libwayland code, and it doesn’t do e.g. hacky pointer arithmetic, then it will work equally well with sudbury. If not, report a bug.
In other words, this project is supposed to be an ABI-compatible drop-in replacement to the C project.
(Currently, it’s client side only, because developer time is finite. But the server side should be doable as well.)
Philosophy
The Haskell bindings to the C wayland library are ugly and are not able to satisfy every need.
Ultimately, this seems to be due to the nature of the libwayland API: it hides as many implementation details as it can, and only exposes a minimal API, for a specific use case (namely compositors and windowed clients).
Let’s develop a more friendly and inviting library.
Sudbury is an attempt to serve many usages of the wayland protocol: desktop applications, compositors, protocol dumpers, test utilities, …
In addition, we would like to support many different programming paradigms – especially since in Haskell there are many different approaches to streaming IO (lazy IO, conduit, pipes, io-streams, …) and event handling (polling, callbacks, FRP, …).
While libwayland hides implementation details, sudbury exposes implementation details.
To that end, as a rule of thumb, the haskell modules in this library expose all the (top-level) variables that they define.
In particular, we minimize the amount of code that is considered “internal”.
Indeed, the philosophy is that we should not decide what API should be used, but merely offer users a safe API by making that component the most friendly and inviting API.
We intend to place unsafe code in self-contained modules, separated from the Haskell code we intend users to use directly.
Building and running
The package should be buildable using a development version (i.e. >=1.25) of cabal (development version as of 27 November 2016).
As the moment, 27 November 2016, it does not seem to be buildable using stack.
To build with cabal, clone this repository and run
$ cabal sandbox init
$ cabal install
(It is installed locally in a subdirectory of the repository.)
If you installed the project with cabal, you can use it directly. Fire up your favorite wayland compositor, and use cabal exec to run existing executables with the sudbury implementation of the wayland client library:
Portability: The wayland protocol works via unix domain sockets that support passing file descriptors. That means that even if this builds on non-Linux systems, it will likely not work.
(Planned) features
Implement the libwayland ABI to support running existing wayland applications without modification.
client-side (mostly done)
server-side (not started yet)
Write a flexible Haskell API.
We can use inspiration from the implementation of the ABI to see which components should be exposed and how.
The wayland objects all have a corresponding “interface” which is much like a type. Hence, we should use some fancy Haskell features to make the API more strongly typed than libwayland’s.
Organise the code so that we can do extensive testing and benchmarking.
Because of the functional coding style, we will be able to test many more aspects of our code than libwayland.
Contributing
Most things that require attention should be documented somewhere: either in this readme file, or as an issue on github.
Any feedback on your experience using this library is welcome. Usage here encompasses:
simply building the library on system X with build system Y
running a wayland client using the instructions above:
are you able to make it use the sudbury implementation?
does the client connect?
does the client function as it does with libwayland?
For contributing code, you will probably want to get a bit more familiar with wayland. Some notes on understanding wayland are in NOTES.md. To work on:
work on any of the outstanding issues.
use sudbury to write tools to e.g. query wayland compositors, or to debug wayland connections. can we rewrite existing debug tools into haskell, using fewer lines of code? can we rewrite the weston client demos?
Related projects
hayland: haskell bindings to libwayland (deprecated)
wayland-wire: alternative haskell implementation of the wayland protocol
wayland-tracker: haskell utility for tracking what happens between a wayland client and a wayland compositor
Simplicity was my goal. I wanted different indicators of various countries shown
in an overview to explore relations not normally considered. Something like illegal mining and drug trade in neighbouring countries, for example.
once installed and in the right folder app.py ran be run with python app.py
the dashboard should run on a specified server adress or better still it opens in a browser tab, if you’ve a Server Extension like Five Server installed.
🤝 Contributing
Feel free to open issues or submit pull requests if you find any bugs or have suggestions for improvements.
📝 License
This project is licensed under the MIT License – see the LICENSE file for details.


 https://github.com/Boukhtam/react-native-eid-reader