Modeling and control of underwater vehicle : Sparus
Objective of this project work is
To estimate all added mass and drag matrices for SPARUS AUV (Main body, Antenna, Thrusters).
Analysing these at CG and CO of the body.
Simulation and validation of these results.
Group Members:
Madhushree Sannigrahi
Abhimanyu Bhowmik
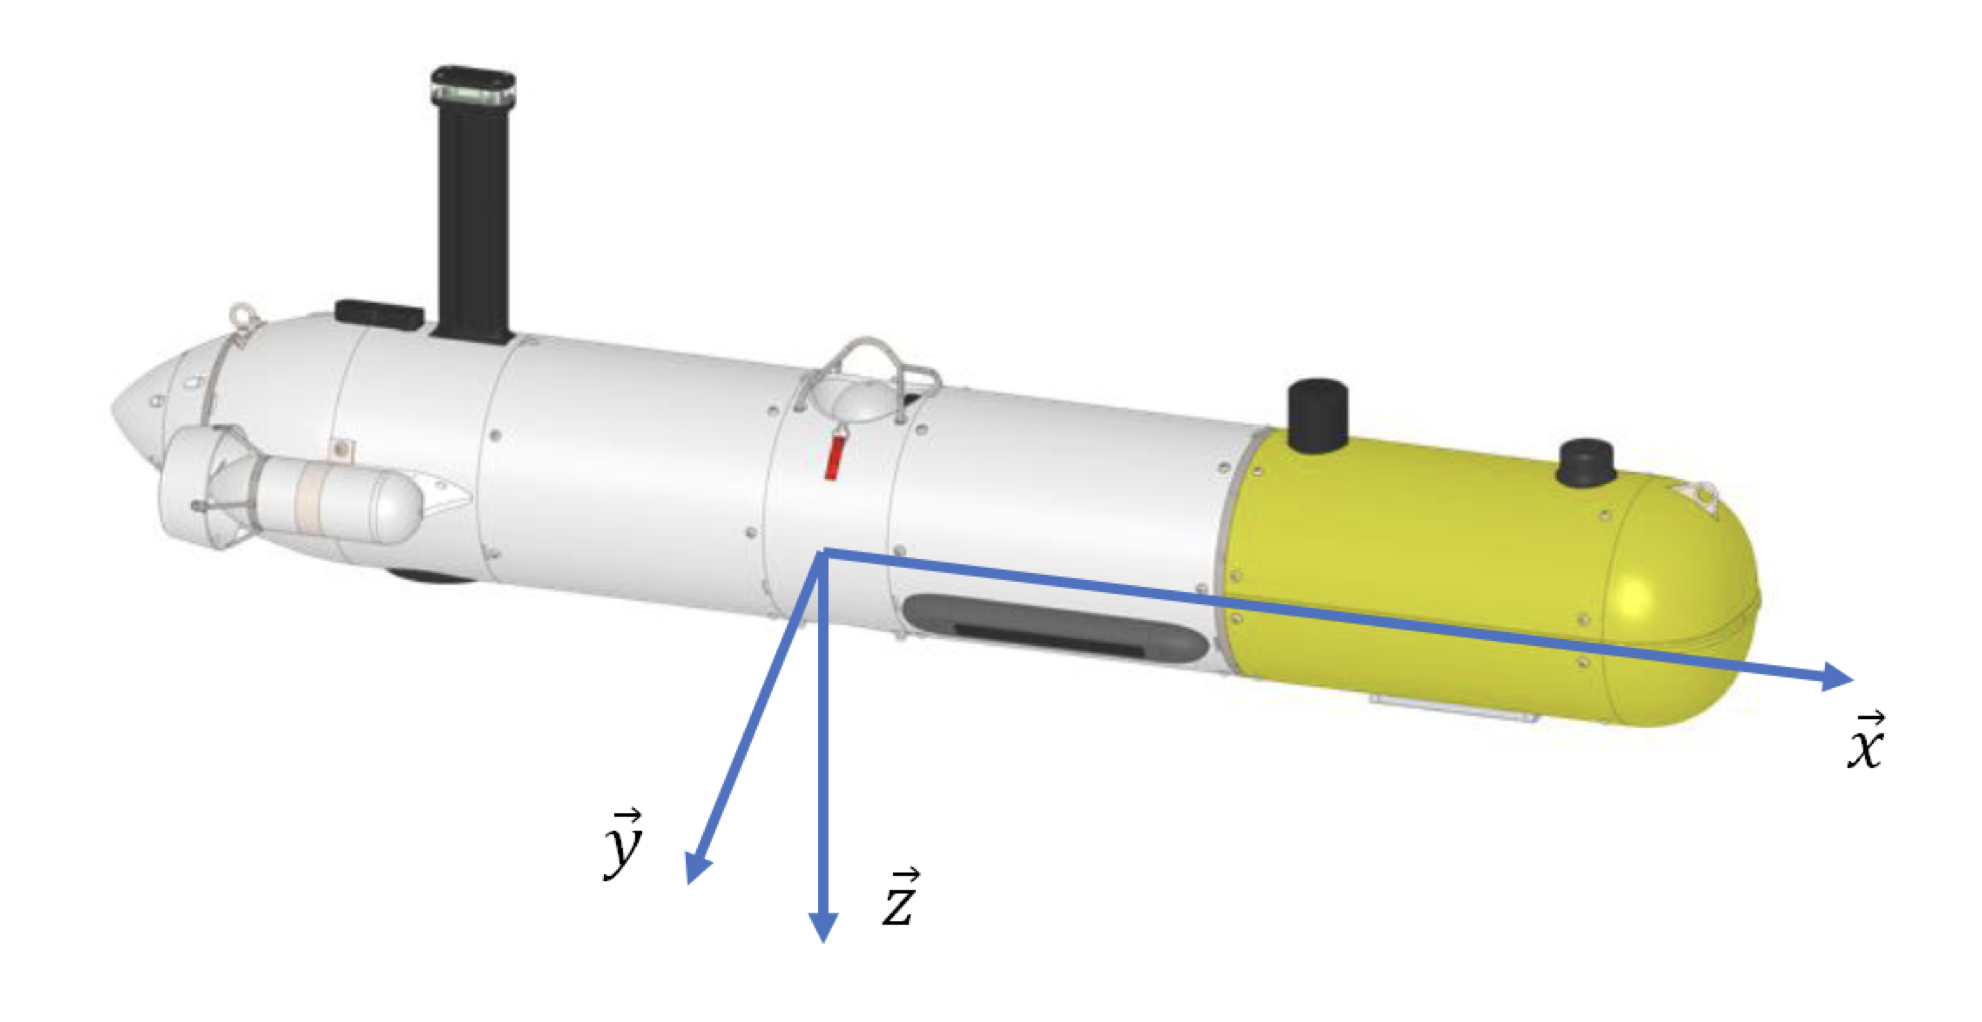
The Sparus AUV
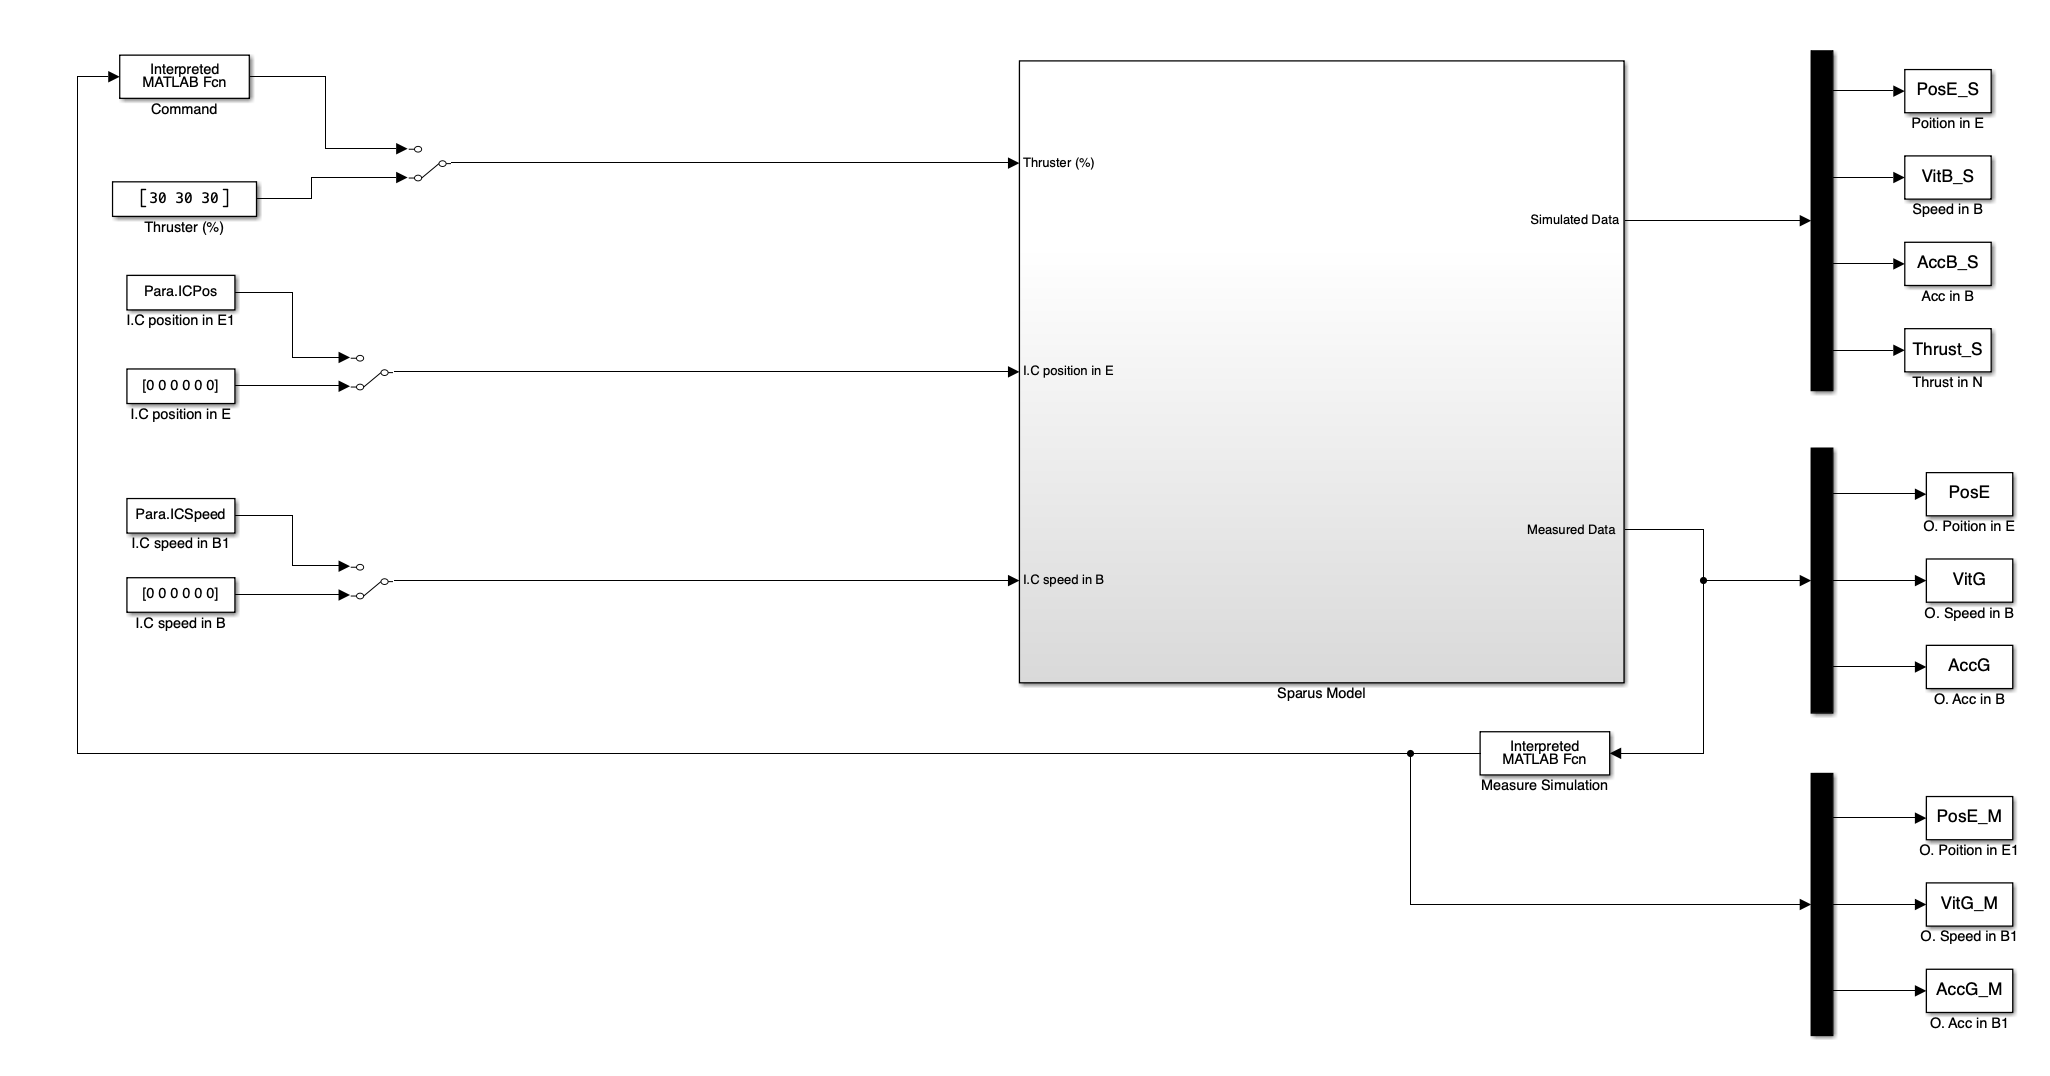
Results
Final added Mass matrix calculated at the center of boyouncy of the AUV. The added Mass consist of added masses of hull, antenna and thrusters. The effects of USBL has been considered non significant.
The objective is to calculate the drag matrices for each component of an AUV in its centre of gravity. This involves computing individual drag matrices for each component initially expressed in the component’s buoyancy centre and then transferring them to the AUV’s centre of gravity. Additionally, the following assumption is used for calcualting drag :
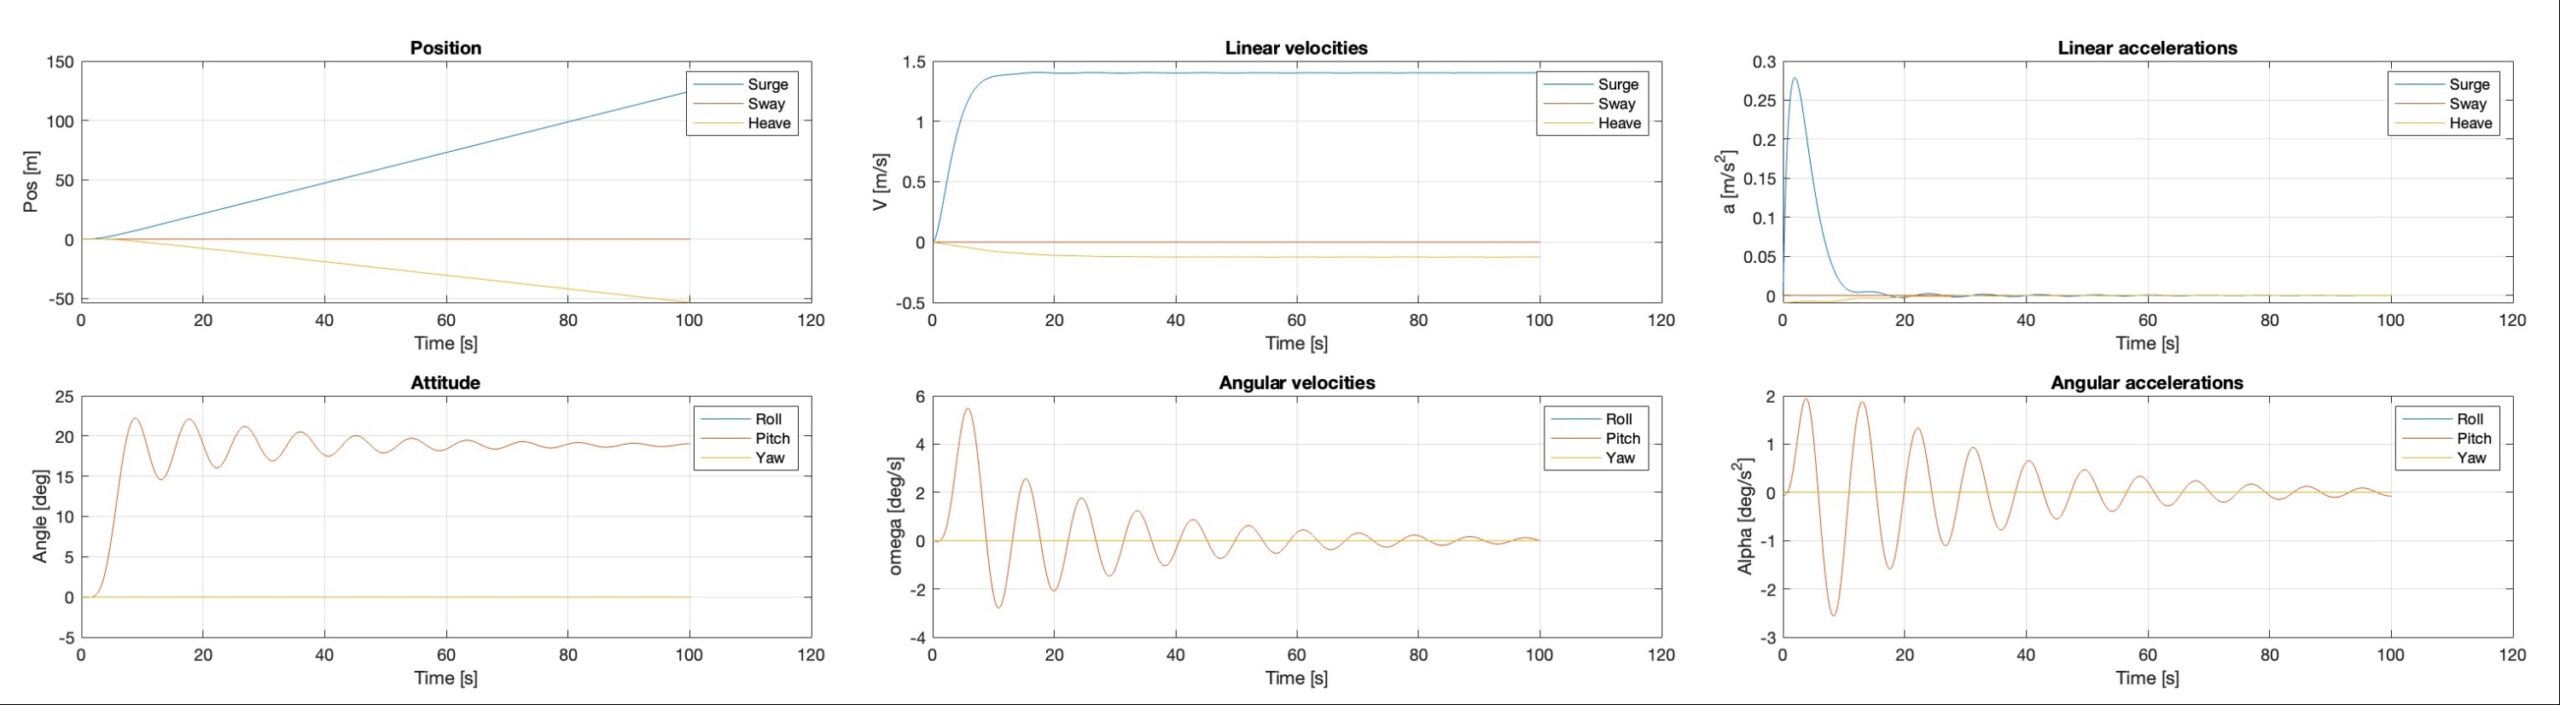
Surge motion, a fundamental movement, should exhibit stability during execution. By activating the right and left thrusters at 30% power in the positive x-axis direction, the craft moved forward.
Simulation Results for Case I
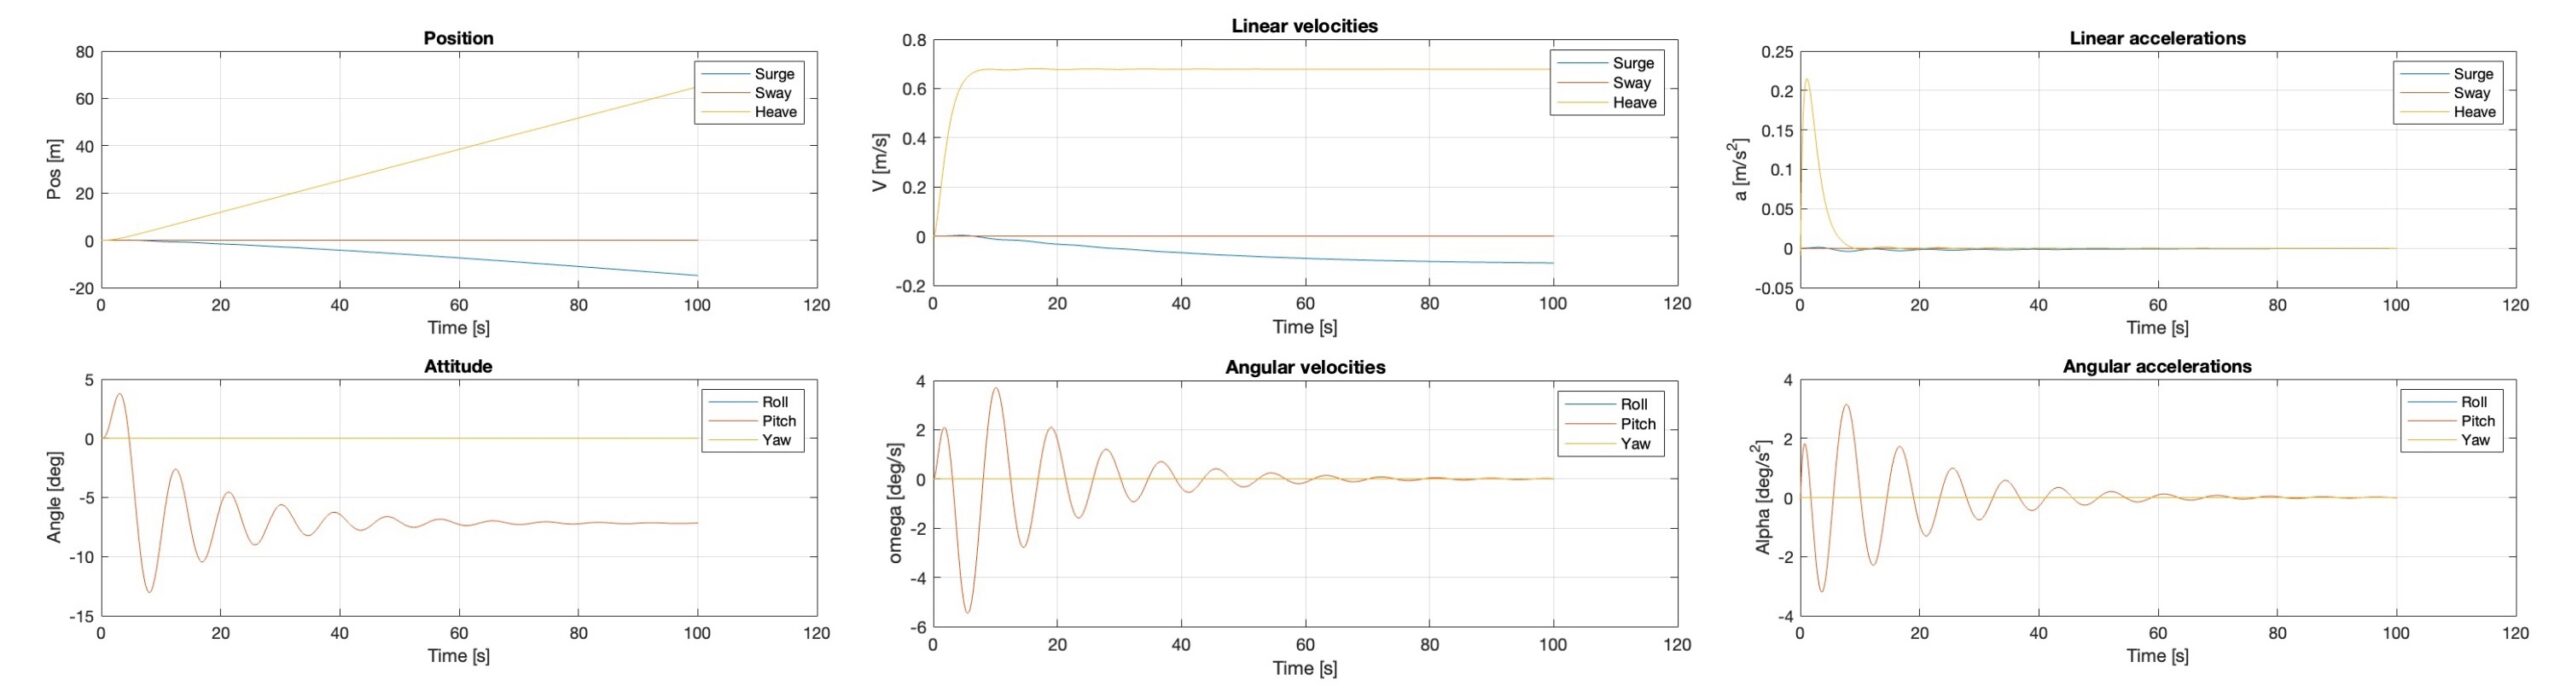
CASE 2: Heave motion (along z-axis)
During our analysis, heave motion, considered a fundamental movement of the craft, should ideally demonstrate stability during execution. By activating the vertical thruster at 30% power in the positive z-axis direction, the craft dived into the water.
Simulation Results for Case II
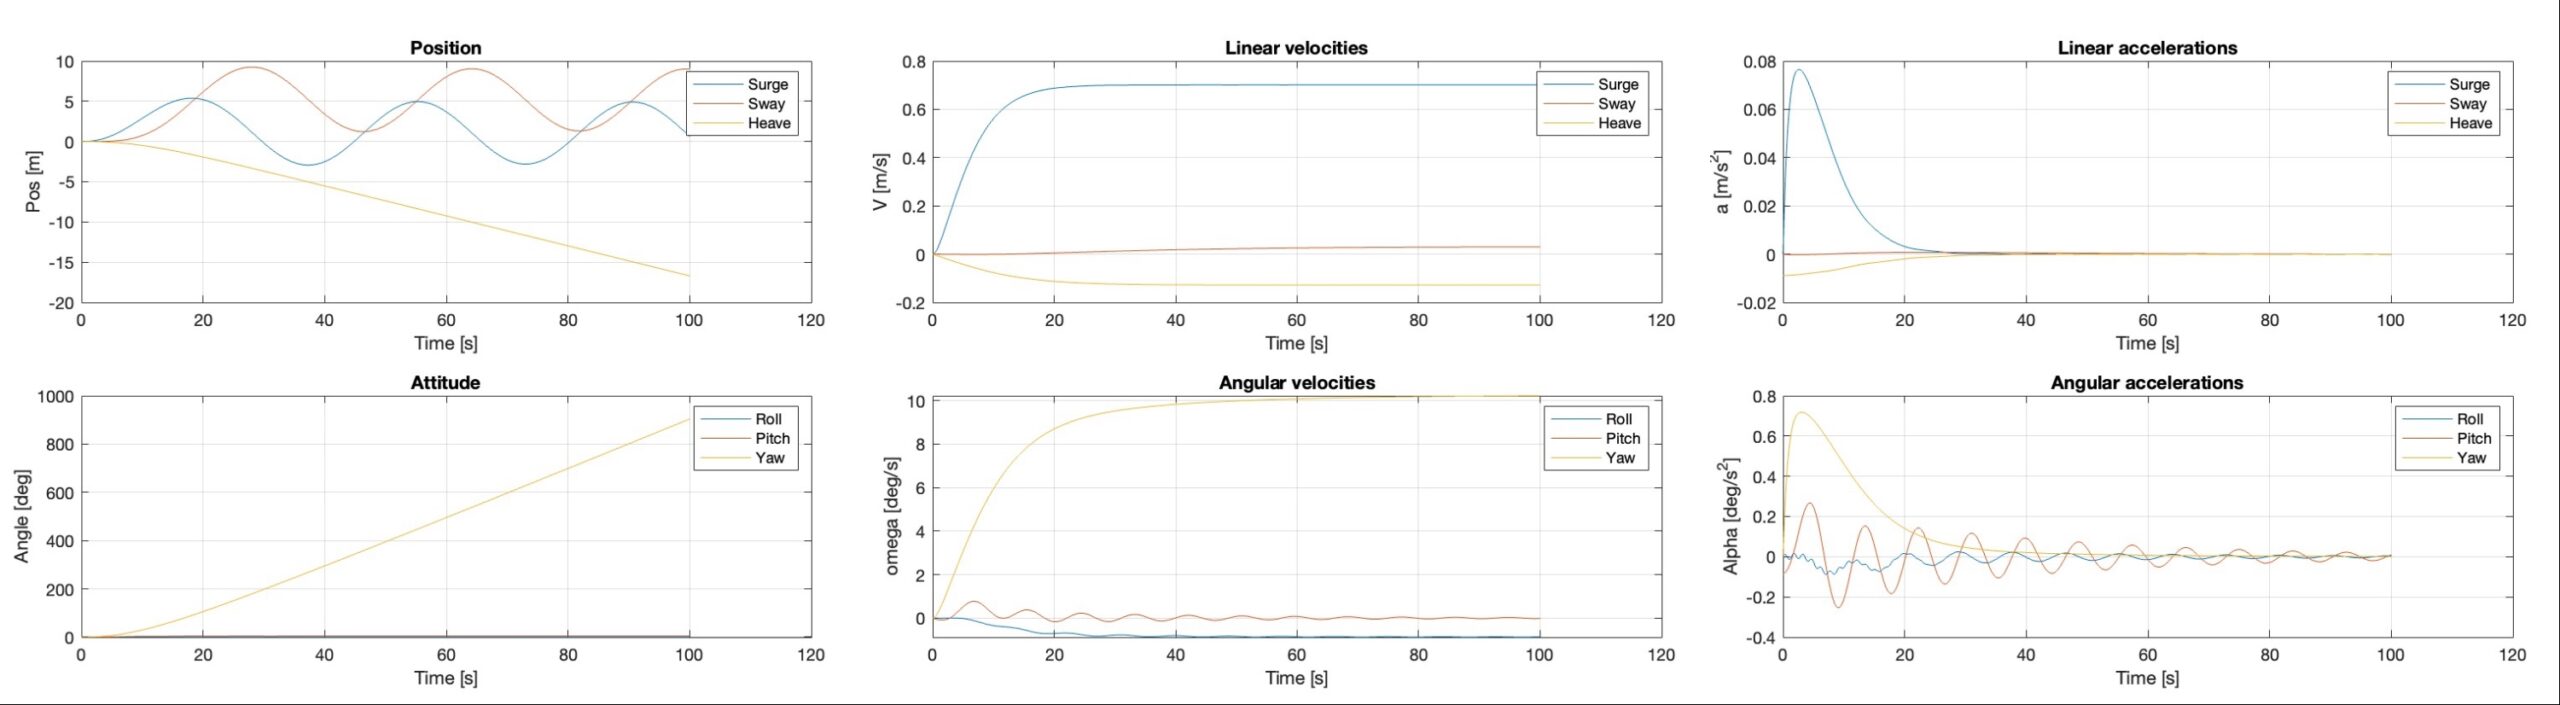
CASE 3: Yaw motion (around z-axis)
Executing yaw motion, another fundamental movement, should ideally demonstrate stability. By activating the right thruster at 5% power in the positive x-axis direction and the left thruster at 10% power, the craft initiates a left turn.
I just shared the example project on Expo, simply run on your device to check what it is:
via Expo OR
check the code, and yes! 🙂 all of the images, screenshots are directly taken
from the this example. Of course, you can simply clone the project and run the example on your own environment.
Configuration – Props
BottomBar:
Property
Type
Default
Description
style
style
container
use this to change the main BottomBar’s style
shapeStyle
style
bottom:89
use this to change the main BottomBar’s Shape style
shapeColor
color
#FBFBFD
use this to change the unique shape’s color
mainIcon
component
icon
changes the main big button’s icon type
mainIconColor
color
#FFFFFF
changes the main big button’s icon color
mainIconGradient
array
blue gradient
changes the main big button’s gradient color
mainIconComponent
component
MainIconButton(Gradient Icon based button)
Make your own button on the main one
miniButtonsColor
color
null
changes the mini buttons color with a single prop
firstIconComponent
component
MiniButton(simple icon button)
renders your own component as a first button
secondIconComponent
component
MiniButton(simple icon button)
renders your own component as a second button
thirdIconComponent
component
MiniButton(simple icon button)
renders your own component as a third button
fourthIconComponent
component
MiniButton(simple icon button)
renders your own component as a fourth button
disableFirstIcon
boolean
false
disable the first icon button
disableSecondIcon
boolean
false
disable the second icon button
disableThirdIcon
boolean
false
disable the third icon button
disableFourthIcon
boolean
false
disable the fourth icon button
Credits
Thank you RN Typography Team for the ShowcaseScreen 🙂 It has a great design.
Professors Martins and Ning have published a new text book on multidisciplinary design optimization, and they’ve generously decided to give the digital version away for free!
There are good lessons on Problem formulation (Section 1.2), comparisons of gradient-based and gradient-free algorithms (Sections 1.4.1-1.4.3), and overview of numerical solver algorithms (Section 3.6), and a great introduction to various MDO concepts (Section 13) — including an introduction to the MAUD equations that underpin OpenMDAO (Section 13.2.6). If you want to learn more about some of the various techniques for taking derivatives of your numerical models, I highly recommend Chapter 6.
They’ve provide code and examples from the textbook in a companion github repo. You can learn more about how AD works, test out surrogate modeling methods, or try out a 10 bar truss example.
They also have a set of lectures based on the content of the book free on youtube
This package set for the SILE typesetting
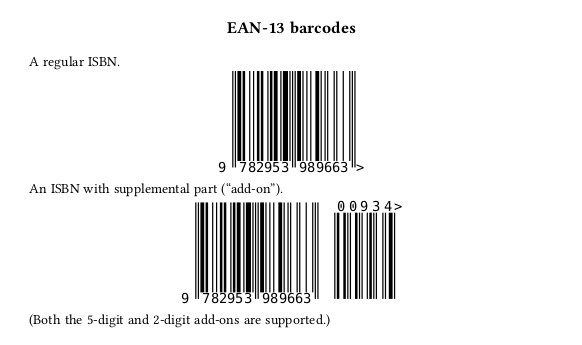
system aims at providing barcode support.
It currently provides the barcodes.ean13 package, which allows printing out an EAN-13 barcode, suitable for an ISBN (or ISSN, etc.)
The “human readable interpretation” in this example uses the “Hack” font.
Any other monospace font may be used, and a better result is obtained with an OCR-B font.
A good recommendation is Matthew Skala’s “OCR B” version, which is considered public domain and is included in this package for mere convenience, see details.
On a slightly related topic, you might also be interested in the qrcode.sile package set.
Installation
These packages require SILE v0.15.12.
Installation relies on the luarocks package manager.
To install the latest version, you may use the provided “rockspec”:
luarocks install barcodes.sile
(Refer to the SILE manual for more detailed 3rd-party package installation information.)
The in-code package documentation may also be useful.
A readable version of the documentation is included in the User Manual for the resilient.sile collection of classes and packages.
License
All SILE-related code and samples in this repository are released under the MIT license, (c) 2022-2025 Omikhleia.
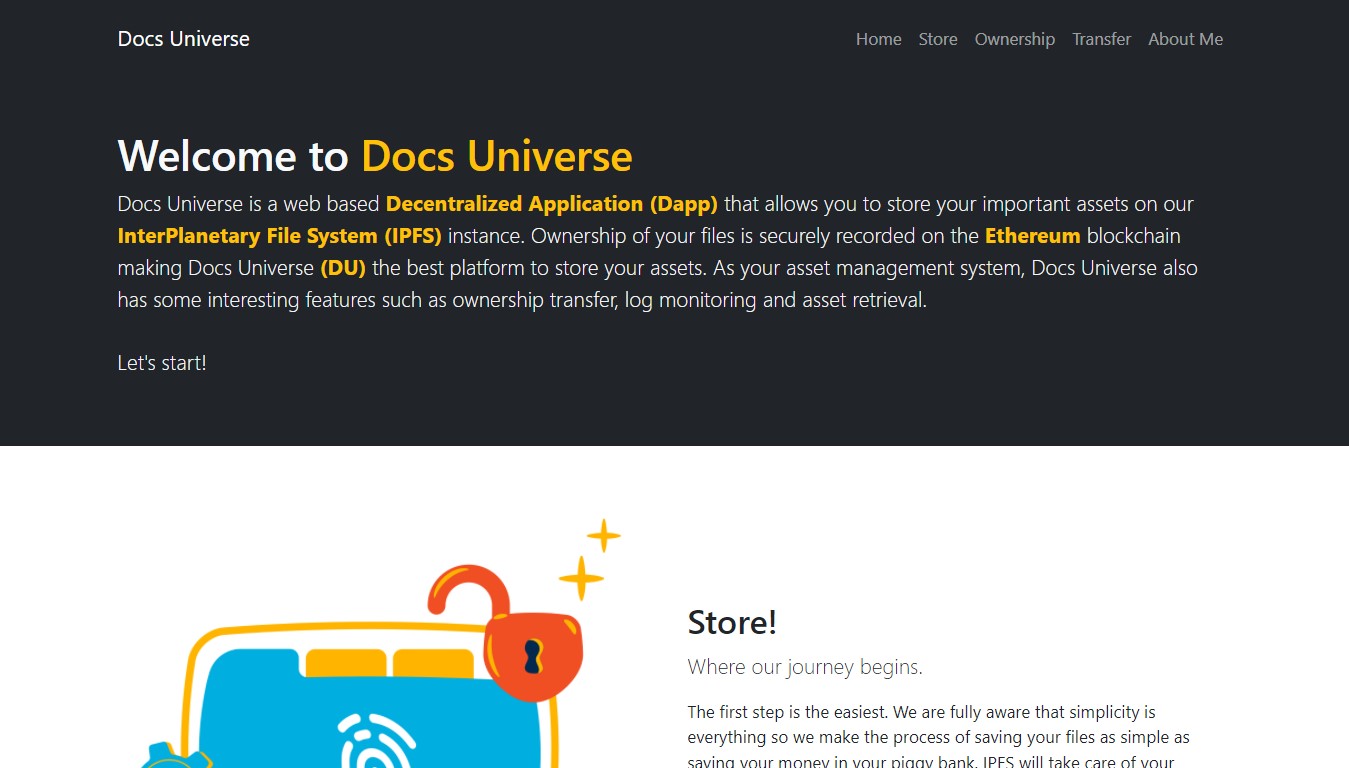
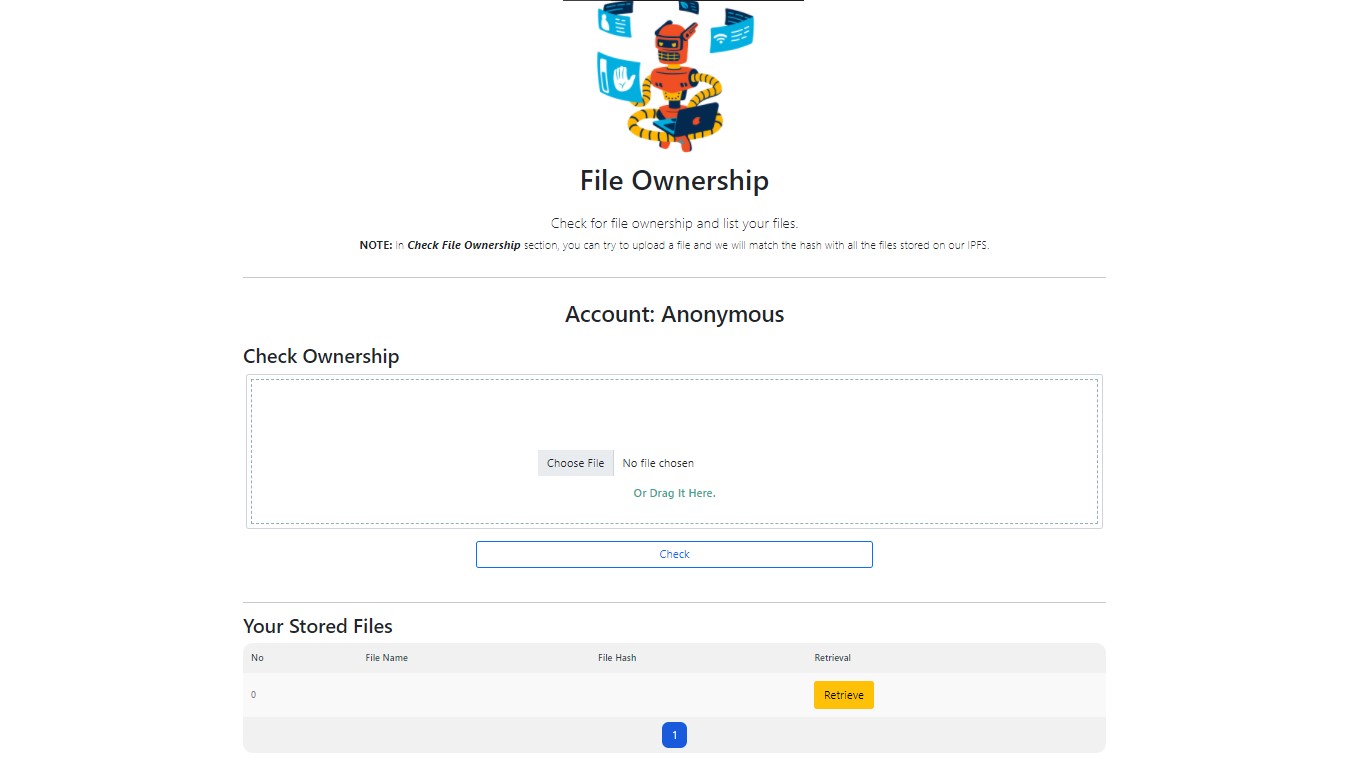
Docs Universe is a web based Dapp that allows to store important assets on IPFS instance. Ownership of files is securely recorded on the Ethereum blockchain making it the best platform to store assets
Features
The store feature is a feature for uploading
files to IPFS which is both a create operation on the application
and write operation on the blockchain. The ownership feature
can check the ownership of the uploaded file while allowing
users to be able to retrieve files that have been saved, this is an
implementation of read operations on the application and on
the blockchain. The transfer feature allows users to be able
to make ownership transfers of files that have been previously
stored, this illustrates the implementation of update operation on
the application and write operation on the blockchain.
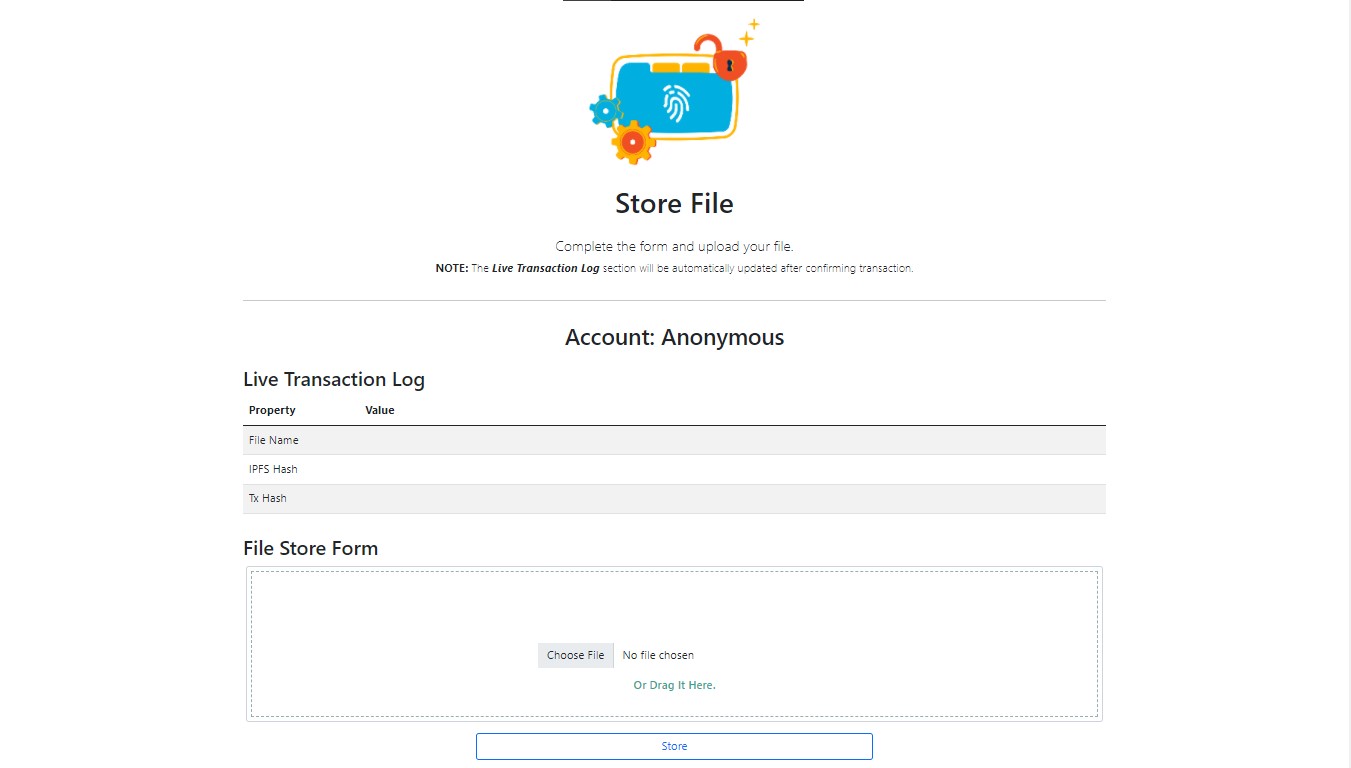
Store
In the Store feature, system flow starts from the Metamask
check for account selection. Furthermore, the user can perform
store operation by affixing the file to the form on the web
interface, the application then converts the file into a buffer,
user confirms the transaction and proceed with storing the
file to IPFS. As output, the user will get information in the
form of file hash and transaction hash.
Ownership
Furthermore, the functionality of the Ownership feature is
also started by checking the Metamask account. Followed by
the choice of whether the user wants to check the ownership
of a file or not. If so, the user can add the file that he wants to
find out the owner of, but if the user does not want to check
the ownership then the user can continue with the file retrieval
feature. In the file retrieval feature, users only need to click
the “Retrieve” button to retrieve the files they own.
Transfer
As in the previous featurse flow, the Transfer feature also
starts with a Metamask account check. Then users who wish to
transfer ownership of their files can provide information on the
destination account to be transferred, followed by confirming
the transaction. The end result of this feature is the loss of
the file entry that has been transferred and the receipt of the
transfer transaction hash as proof that the ownership has been
transferred.
Tech Stack
Blockchain: Ethereum
Smart Contract: Solidity ^0.8.0
Front-end: React Truffle Box + web3.js + Boostrap
IPFS: ipfs-api + Infura
Deployment
Execute the steps below sequentially.
npm
From client directory: npm install
Truffle Compile and Migrate
Modify truffle-config.js as per your requirement
Then from root folder:
Ganache Deploy: truffle migrate --network ganache --reset --compile all
Rinkeby Deploy: truffle migrate --network rinkeby --reset --compile all
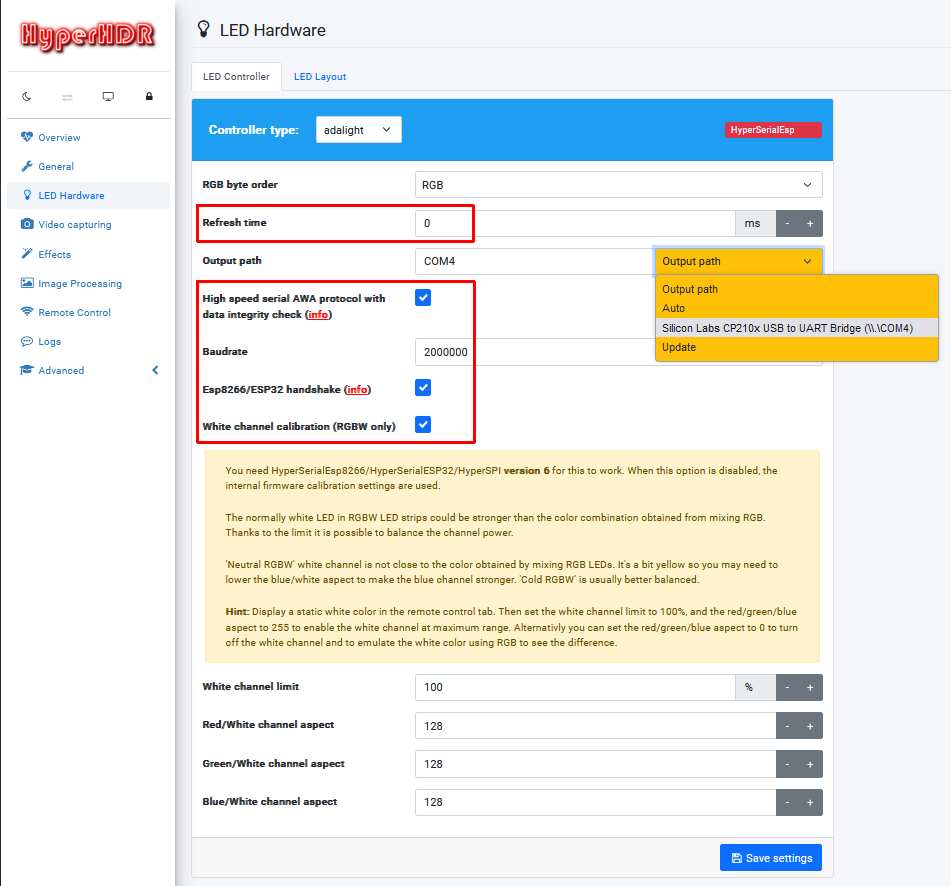
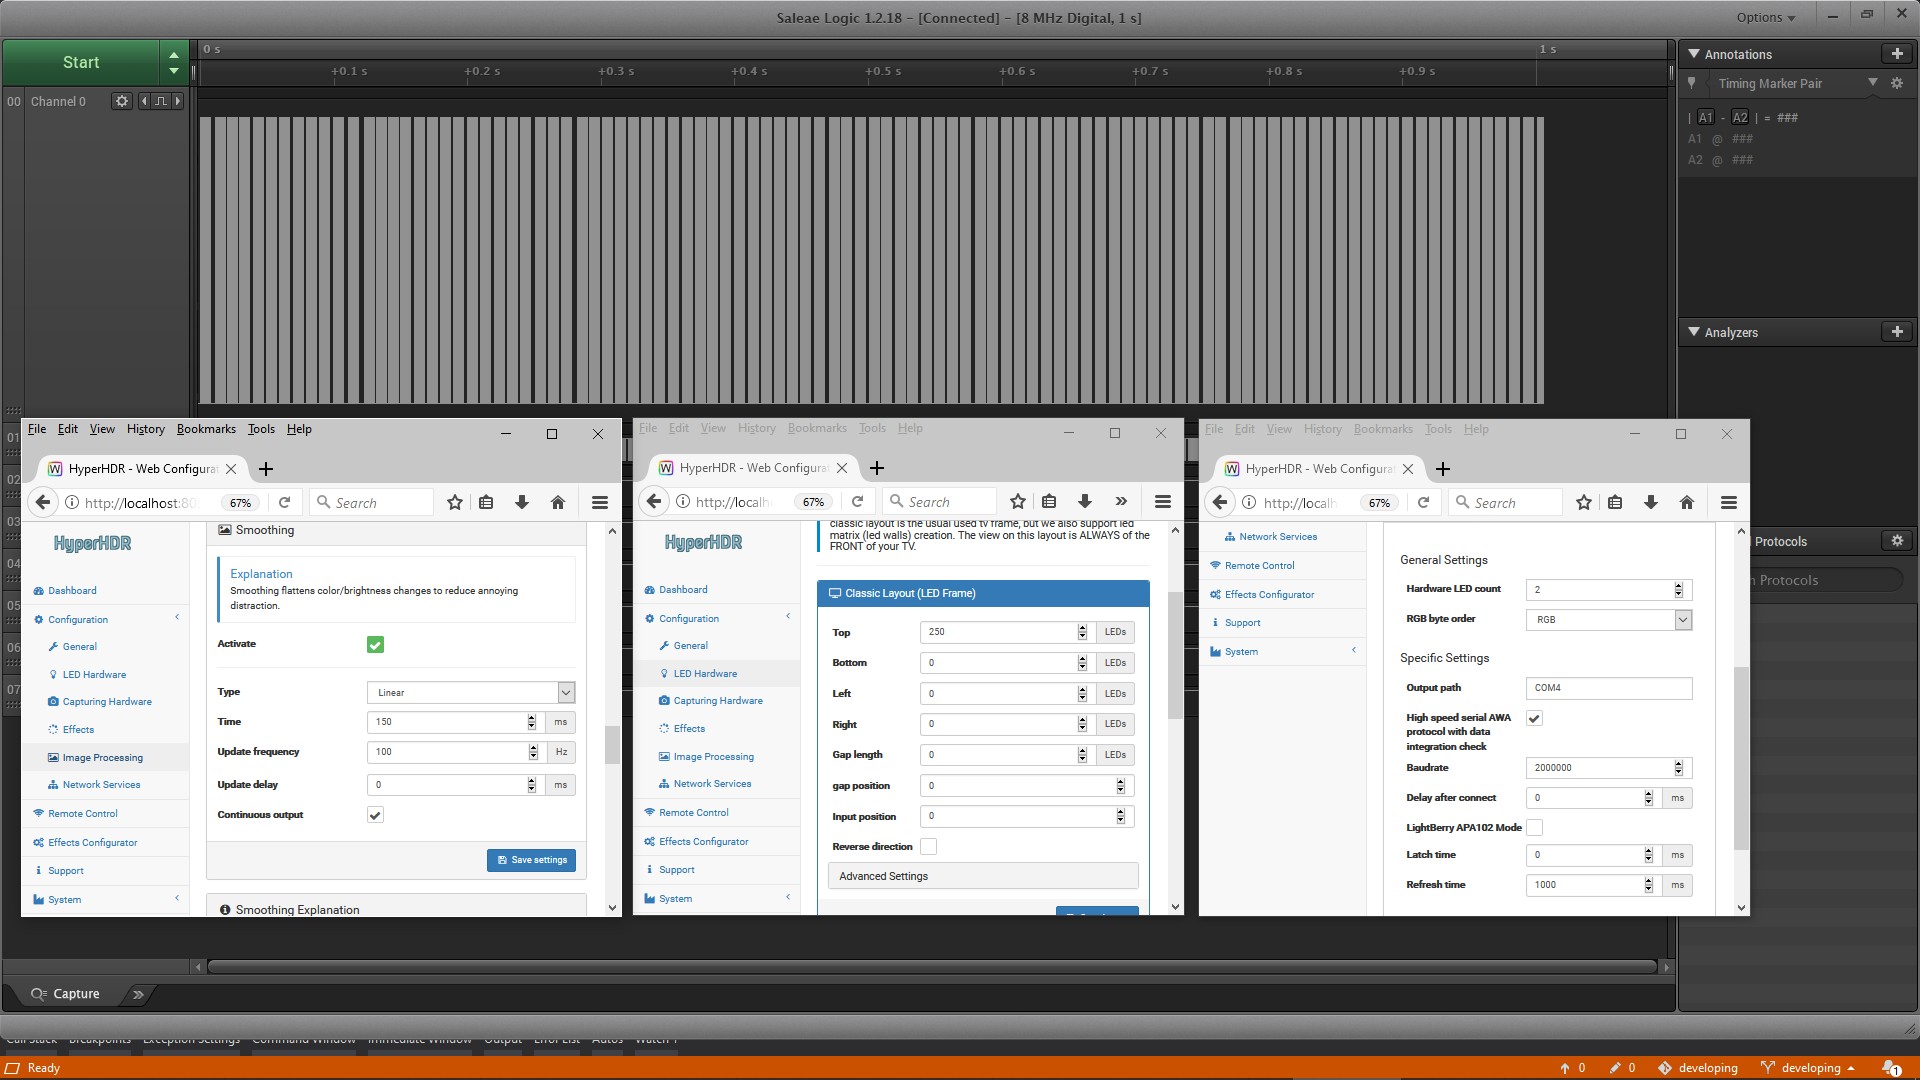
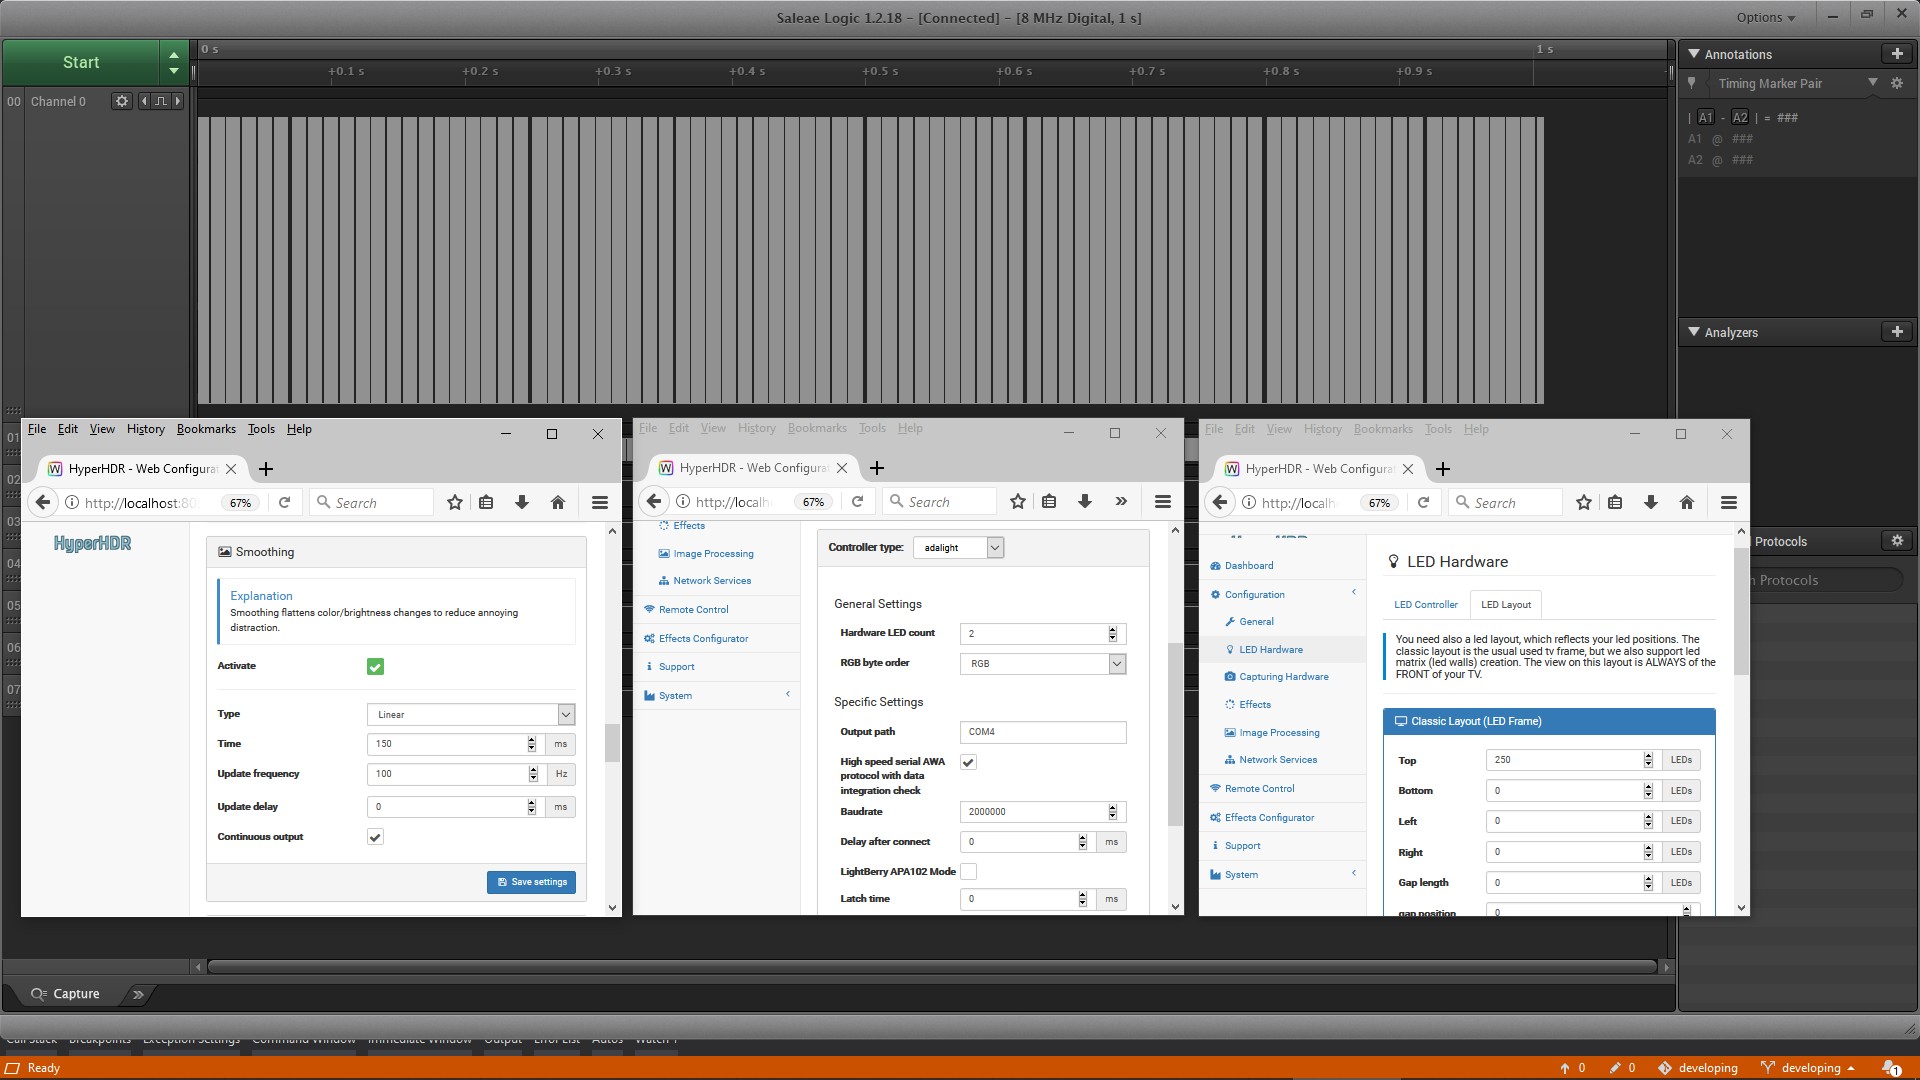
Exposes USB high speed serial port at 2Mb baud for driving led strip using NeoPixelBus library. It’s intended to replace slow Arduino solutions (level shifter 3.3V to 5v may be required). Data integrity check (Fletcher’s checksum) included in new ‘Awa’ protocol for HyperHDR. So no more random flashing caused by serial transmission errors. That option must be checked in HyperHDR to make system works as on the screen below.
Make sure that your serial chip on the ESP8266 can handle 2Mb speed: for example CP2102 can’t as its max speed is 1Mb and you can compile a version for that speed but I think that’s not the point, cheap CH340G can do it without any problems. CH9102x also should work for you, even at 4Mb speed.
There is also my new fork named HyperSerialWLED available with the support for the AWA serial protocol at @2Mb speed for both ESP8266 and ESP32: https://github.com/awawa-dev/HyperSerialWLED Can’t guarantee it will work as stable as HyperSerialEsp8266 because WLED has a lot of other things to do in the backgrounds (ex. handling Wifi) and timing control for the serial port could be at danger for larger number of LEDs. But you don’t need to abandon all the benefits offered by the WLED which can be a big advantage for some users.
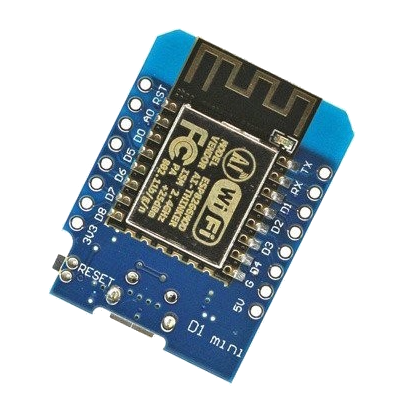
Tested with SK6812 RGBW and cheap 1.75$ noname clone of Wemos ESP8266 d1 mini CH340G. The data output is on the GPIO2 (D4 pin for Wemos mini d1), just like WLED for example. Should work with 3-channel RGB led system like WS8212b also.
RGB to RGBW conversion is calibrated for the neutral white channel BTF SK6812 but it can be easily changed (for cool and warm temperature) in the code. Search for “color calibration”. In HyperHDR use “1.5” gamma for red, blue and green for best effect in the “Image Processing” tab.
LED strip / Device
HyperSerialEsp8266
SK6812 cold white
yes
SK6812 neutral white
yes
WS281x
yes
SPI (APA102, SK9812, HD107…)
yes
Example of supported boards
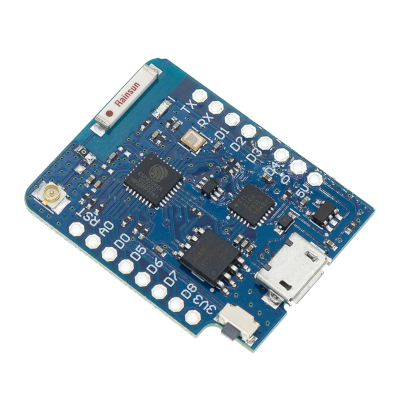
Esp8266 Wemos D1 mini (CH340) and Wemos D1 mini pro (CP2104)
Data integrity check
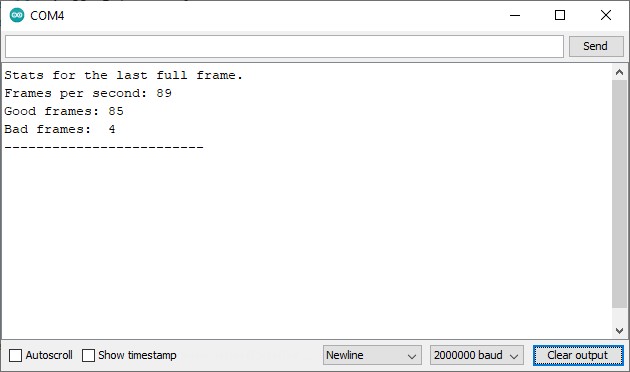
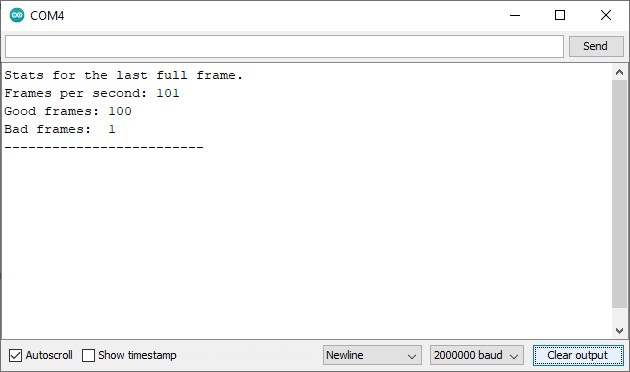
Why the data integrity check was introduced which causes incompatibility with other software? Because at 2Mb speed many chip-makers allow few percent error in the transmission. And we do not want to have any distracting flashes. Broken frames are abandon without showing them. At 100Hz for 250 leds approximately 1-5% of the frames are broken.
Why not Arduino, Raspberry Pi or WLED
Because Arduino is slow, really slow even at @500000 baud. And no data integrity checking so random flashing may occure… Increasing serial port speed leads to problems with the LED library as most ATMega are at 16MHz only (for comparision Esp8266 is at 80/160MHz). For over 200leds and RGB channel we have merely ~20 frames. For RGBW is even worse. The only advantage of Arduinos is logic at 5V. For Esp8266 level shifter 3.3V to 5V may be required. You can find example of simply and efficient one here: Level shifter for 3.3V logic level
Rpi is very powerful device but for the SK6812 and WS2812b protocol timing of transmission is crucial. It’s hard to maintain it in the multitasking environment.
WLED is a brilliant app and it’s preffered solution in most cases. But sometimes Wifi is not an option: there is a problem with the signal strenght/stability caused by EM interference or obstacles which results in disturbing effects from the LED strip.You can also try https://github.com/awawa-dev/HyperSerialWLED if you don’t want to abandon WLED benefits or you are looking for a version for ESP32.
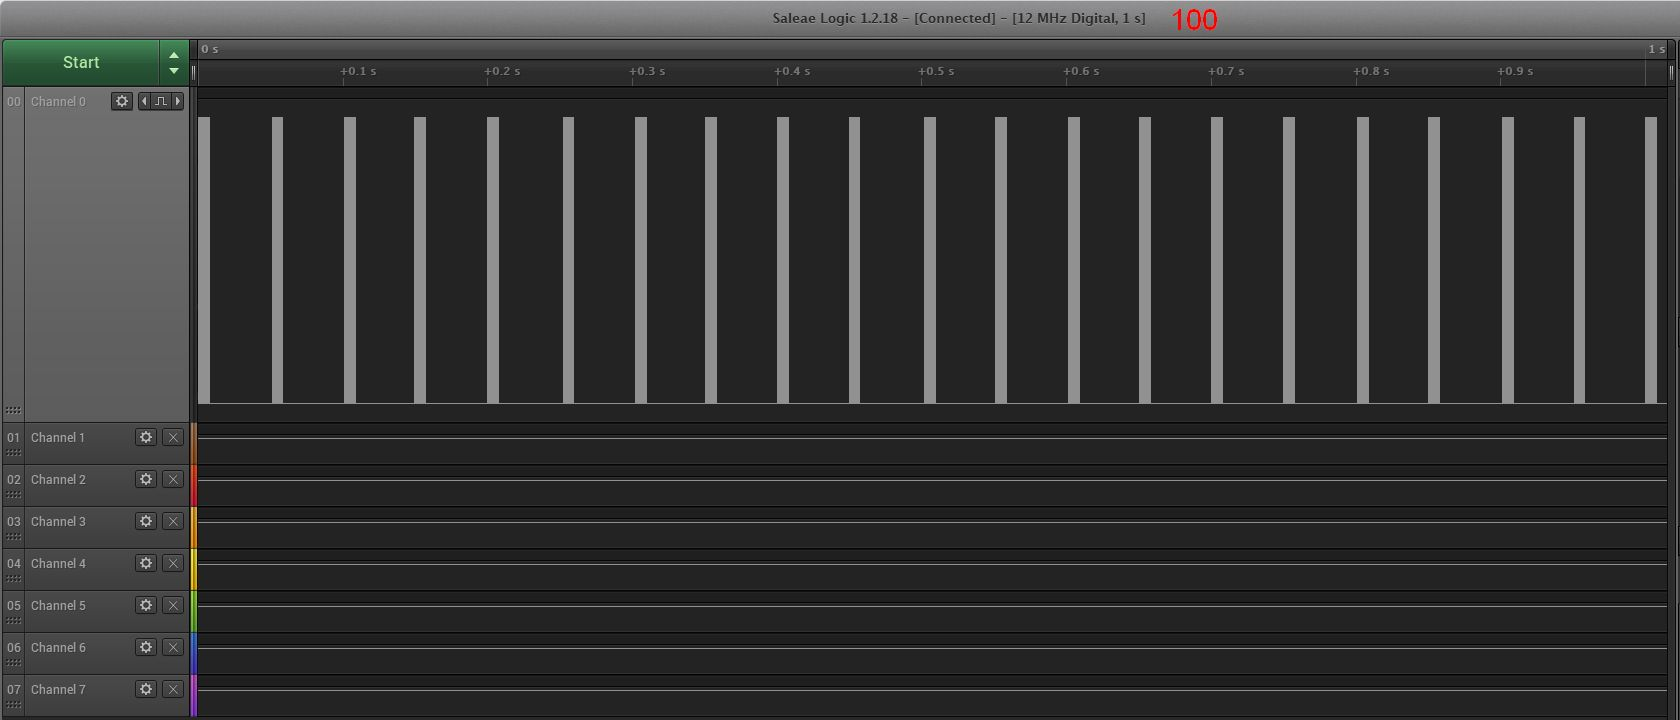
Arduino: 250 RGB leds, 500000 baud, 100 Hz output from HyperHDR, real output for the LED strip is around 20Hz. With such slow hardware driver you don’t even need 30FPS from the grabber really:
With HyperSerialEsp8266 you can have over 100Hz refresh rate for 250 RGB and over 80HZ for 250 RGBW LED strips.
Statistics are sent to serial port monitor when there is no data incoming. You can read it with any serial port client. This driver is not hiding any information from you.
For RGBW LED strip like RGBW SK6812 NEUTRAL white choose: firmware_SK6812_RGBW_NEUTRAL.bin
For RGBW LED strip like RGBW SK6812 COLD white choose: firmware_SK6812_RGBW_COLD.bin
For RGB LED strip like WS8212b or RGB SK6812 variant choose: firmware_WS281x_RGB.bin
For SPI driven RGB LED strip APA102: firmware_SPI_APA102_SK9822_HD107.bin, WS8201: firmware_SPI_WS2801.bin
If you want to disable your first LED because it’s used as a sacrificial level shifter, please use HyperHDR v19
For the RGBW firmware the white channel is automatically calculated and R,G,B channels are corrected.
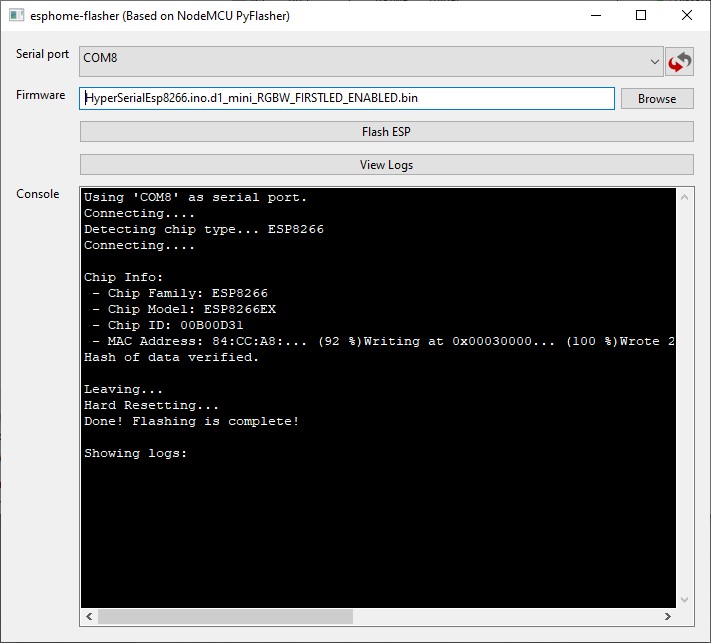
Using esphome-flasher:
Usage in HyperHDR
Set Refresh time to zero, Baudrate to 2000000 and you enabled HyperHDR's AWA protocol.
Enabling White channel calibration is optional, if you want to fine tune the white channel balance of your sk6812 RGBW LED strip. ESP8266/ESP32 handshake could help you to properly initialize the ESP device and enables statistics available in the logs (you must stop the LED device first to get them).
Benchmarks
Refresh rate depending on requested refresh rate/LED strip length:
But there is also an alternative and an easier way. Just fork the project and enable its Github Action. Use the online editor to make changes to the platformio.ini file and save it. Github Action will compile new firmware automatically in the Artifacts archive. It has never been so easy!
ESP8266:
For non-SPI LED strip data pin is GPIO2 (usually D4).
For SPI LED strip is: GPIO13 (MOSI, usually D7) and GPIO14 (SCLK/CLOCK, usually D5).
Disclaimer
You use it on your own risk.
Don’t touch these firmwares if you don’t know how to put the device in the programming mode if something goes wrong.
As per the MIT license, I assume no liability for any damage to you or any other person or equipment.


 https://github.com/Madhushree2000/Modelling_of-Marine_System