quotes : Correction of quotes: “” becomes «». inquot (needs quotes) : Nested quotes: «„“» (otherwise — duplicate quotes stashing). dashes : If necessary replace hyphens with dashes and minus signs. angles : Replace asterisks and quotes with degrees, feet, inches. dblspace : Fix duplicate spaces in the text. specials : Insert special characters (from the symbol table). mathchars : Insert mathematical symbols (from the same table). punctuation : Fix punctuation, such as spaces before commas. specialspaces : Fix the wrong skip special characters with spaces. nbsp : Attach short words to following words in the text. hellip : Replace repeating dot symbols with ellipsis. paragraphs : Puts paragraphs (<p>) when converting to HTML (with empty string as a delimeter). safehtml : Don’t process text inside of <code> and <pre> blocks. entities : Replace special chars with HTML entities.
If the list of actions was skiped in constructor, all of them will be performed.
Beside defining in the object constructor, you can change configuration by method actions:
engine.actions(['punctuation', 'dblspace']);
console.log(engine.process('К  чёрту орфографию ,главное   все понимают !Ведь так  ?..'));
// > К чёрту орфографию, главное все понимают! Ведь так?..
Modes
plain : Just plain text. html : Safe HTML processing.
The mode could be defined in the constructor:
var engine = new Typographie(['quotes', 'dashes'], input, output);
Or by method mode:
engine.mode('html', 'plain');
Default congifuration is plain mode for both input and output.
This work is aimed at simulating a real process of preparing a technical-economic offer for the construction of some parts of an industrial plant (building and a processing line for motor vehicle heads), as part of a tender for international procurement. The offer will consist of graphic and descriptive drawings according to the specifications provided.
The exercise (carried out in teams) intends to simulate a real professional situation: each group must imagine being a proposal team operating within a construction engineering & contracting company.
During the final evaluation of the exercise, the teachers will represent the client who requested the offer and who must award the order to the best contractor according to the most economically advantageous offer according to the criteria set out in the RFP.
Proposal
In the folder Proposal there are the following files for the proposal:
Kavlan – Bootstrap 5 HTML Responsive Admin Template
Overview
Kavlan is the perfect dark admin panel template to make your administration system a breeze to navigate and maintain. Clean, responsive, and easy-to-use, Kavlan delivers a user experience that will help you create a successful interface. And above all, it’s free!
If you do not intend to work with the template source code (and that means you will not be compiling it or running the Webpack dev server), you do not need to install anything. You can simply navigate to the dist folder and start editing the files.
Most developers will be editing the source code and will also be running Webpack to recompile the template files. If that’s the case, then ensure that you have Node.js installed. You can download it from here
Quick Start
Download the latest release OR clone the repo: git clone https://github.com/PixelRocket-Shop/kavlan-html-bootstrap.git
Install Node.js if you don’t already have it on your system.
Open the project root in your command line.
run npm install in your command line.
run npm start to start Webpack devserver.
if you want to recompile the template files (which output to the dist folder), run npm run build
Template Pages
The template consists of 6 pages:
Dashboard
Login Page
Register Page
Forgot Password Page
404 Page
Blank Page
To keep code repetition to a minimum, we’ve used Handlebars.js as the templating engine and partials to quickly add the same code to different pages. We also use a Handlebars plugin for JSON data – this allows us to use loops and output a single HTML code block instead of repeating the same HTML.
Please note that this is an HTML template only. It does not connect to a database, and will not automatically work in a content management system (WordPress etc). You will need to incorporate our code into your application.
Template Key Features
Chart.js integration with 3 different chart types
Built with Bootstrap 5
Fully responsive
Latest orders component
Collapsible sidebar (auto collapses on browser resize)
Notifications component
Avatar component
Login/register component
Template File structure
📁 dist – Generated version of the template. Go here if you do not want to work with the template source code. But be warned: if you customise anything in this folder directly, and then later recompile the template using webpack, unless you move the dist folder out of the template, your changes will be overridden.
📁 node_modules – Directory where NPM installs dependancies. You will not see this folder until you complete the template installation. You do not need to create this folder.
📁 src – Template source code. Go here to customise your template.
📁 src/assets – Template assets such as CSS, JS, Images etc.
📁 src/data – Template JSON Data files. We use these JSON files to make your job easier to insert content into the template.
📁 src/html – Template pages. Go here to edit existing pages or add new pages.
📁 src/partials – Handlebars partial templates.
Handlebars
Handlebars is a template engine that allows us to keep our template source code as organised and as clean as possible. It cuts down on code duplication and through the use of helper functions, allows template developers to very quickly output large amounts of data with minimal code. You can read more about it here.
Example Handlebars Partial
Open the following file in our template: src/html/index.html.
Around line 21 you’ll see the following code:
{{> content/breadcrumbs }}
That’s a Handlebars partial. That code tells Handlebars to look inside a folder called content (located in the partials folder) and then to find a file called breadcrumbs and insert it into the index.html file when it is compiled.
There are a few important notes about our use of Handlebars partials:
All of our partials are stored inside src/partials. Do not place partials anywhere else.
We use .html as our partial file extension. We have also added .svg as a valid partial file extension.
If you have folders within folders inside your partial folder, only reference the folder the partial resides in. So “partials/header/navbars/navbar.html” would be referenced as “navbars/navbar”.
Do not include the partial file extension. Note in the example above that we output “breadcrumbs” and not “breadcrumbs.html”
Template JSON Data
The Webpack Handlebars plugin that we use comes with a very handy utility that allows us to pass in JSON files as template data.
Please navigate to: src/data. Here is where our template data JSON files reside. You can edit, remove or add your own to this folder.
Customise Template Styles
All of the template’s source CSS/SASS files are kept inside the template’s assets folder. Navigate to src/assets/scss. Open up theme.scss with your editor.
This is the main entry point for all other SASS/CSS files.
Create New Pages
To create a new page, navigate in your code editor to: src/html. To make it easier to get the correct HTML in place, clone an existing page. Rename the newly-created file to whatever URL you require. And that’s it. You are now free to open the new page with your code editor, make your changes, and then save the file. Quit Webpack devserver and restart it for the page to show up.
Bootstrap Documentation
Bootstrap already has a comprehensive documentation site that will guide you in setting up and using all default Bootstrap features. Bootstrap 5 is fully integrated to our template’s source code. Please refer to Bootstrap’s doc site first for any default Bootstrap features: Visit Bootstrap’s Doc Site
install-minimal-packages : Installs some bare bones apt-packages
create-new-user: Creates a new user called {{ username }} (specified inside the defaults/main.yml) and copies the host’s .ssh/id_rsa over to the new user’s .ssh dir and adds this user to the sudoers list
specify your hashed password inside the file roles/create_new_user/defaults/main.yml
services.AddJsonLocalization(options =>{options.ResourcesPath=Configuration.GetAppSetting("ResourcesPath");options.ResourcesPathType=ResourcesPathType.TypeBased;// by default, looking for resourceFile like Microsoft do// options.ResourcesPathType = ResourcesPathType.CultureBased; // looking for resource file in culture sub dir see details follows});
This is a Node.js client for the unofficial Character AI API. It is not affiliated with Character AI in any way. It is a community project. TS typings are included.
You can use it to start building projects powered by your CharacterAI entitites, like chatbots, websites, etc.
Installation
npm install node-character.ai
Usage
// You can find this test script in the src folderimportCharacterAIfrom'node-character.ai';exportclassTest{publicstaticasyncsendMessage(message: string): Promise<void>{constcharacterAi=newCharacterAI();// accessToken is required; keep reading for details.awaitcharacterAi.authenticate(process.env.CHARACTERAI_TOKEN);// you can find your characterId in the URL of a Character's chat page. Keep reading for details.constchat=awaitcharacterAi.continueOrCreateChat(process.env.CHARACTERAI_CHARID,);// send a message and wait for the responseconstresponse=awaitchat.sendAndAwaitResponse({
message,singleReply: true,// if you want just what would show up in the chat, set this to true});// response can be either an array of possible responses or a single responseconsole.log(response);}}Test.sendMessage('Greetings! What are your plans for today?');
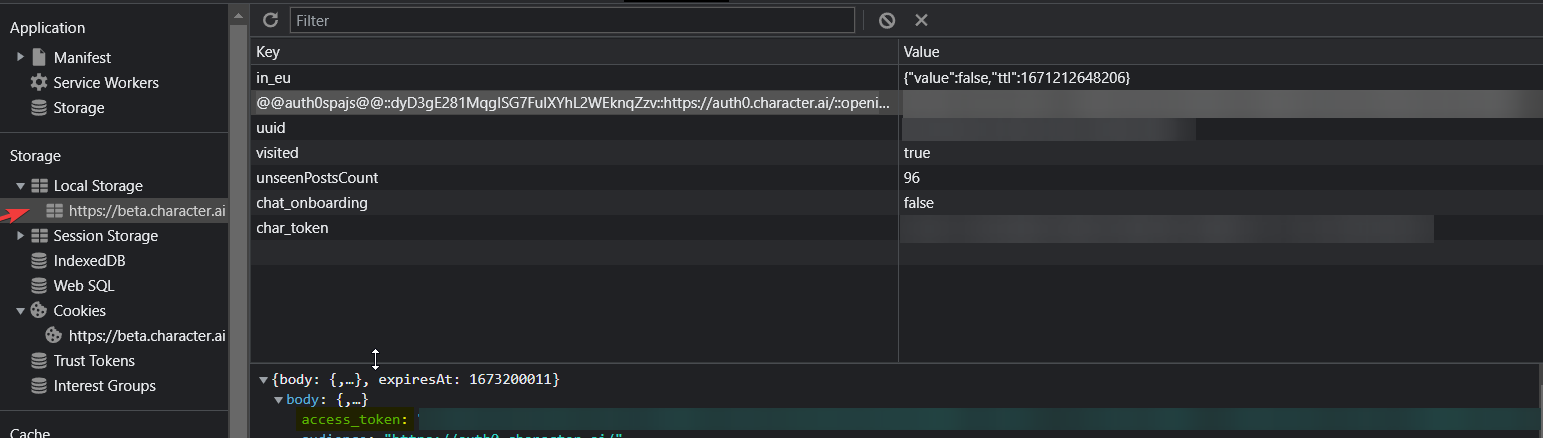
Access Token
This package requires a valid session token from Character AI. You can get one by logging in to your Character AI account and copying the value of the accessToken in the localStorage of your browser.
Open the Character AI website in your browser
Open the developer tools F12 and go to the Application tab.
Go to the Storage section and click on Local Storage.
Look for the @@auth0spajs@@::dyD3gE281MqgISG7FuIXYhL2WEknqZzv::https://auth0.character.ai/::openid profile email offline_access key.
Open the body and copy the access token.
Character ID
You can find your character ID in the URL of a Character’s chat page. For example, if you go to the chat page of the character Test Character you will see the URL https://character.ai/chat/chat?char=5f7f9b9b9b9b9b9b9b9b9b9b. The last part of the URL is the character ID:
Скорректированная и оптимизированная юзер-френдли сборка mega-usb – утилиты управления картриджем Mega EverDrive (стоковый исходный код на сайте разработчика Mega EverDrive).
Плюшки:
Встроена справочная легенда по формату использования и параметрам (/?);
Детализированы сообщения по ходу работы утилиты;
Исправлены недочеты, добавлены дополнительные проверки;
Исходник сформатирован «по-красоте» 😉
При подключении Mega EverDrive к ПК (Windows-система) соединение организуется в виде виртуального USB-COM-порта (требуется драйвер). Когда Mega EverDrive уже включен и загружен с подготовленной карты памяти в нем (на экране Сеги “меню”) – игры загружаются в одну команду, для загрузки другой игры нужно вернуться обратно в меню (напр. по сбросу). Если SD-карты в Mega EverDrive нет, то сначала загружаем (через USB, данной утилитой) конфигурацию FPGA (*.rbf), потом ОС контроллера (MEGA.BIN) или одной командой враз, а лишь затем игру – далее можно загружать игры также только после сброса “ресетом” (до цикла питания).
Конфигурация SVP.rbf самодостаточна (можно использовать вместо MEGA.rbf для любых игр) – но после ее применения будут также работать загружаемые программы, использующие сопроцессор SVP эмулируемый в FPGA (даже заголовок ROM не учитывается, в то же время при загрузке программы с карты памяти для активации SVP по адресу 0x000150 должно быть написано «Virtua Racing»). Рекомендую использовать комплект версии 3.13 (последняя – 3.14 работает некорректно, т.е. не работает).
По-умолчанию (без опций) образ ROM загружается и запускается как «обычный» (т.е. без маппера – размер до 4МБ); при наличии в заголовке указания на маппер «SSF», он активируется и на Mega EverDrive (вне зависимости от размера образа); если ROM больше 4МБ и не содержит указания SSF в заголовке – то будет активирован режим «M10» («сквозная адресация», которая может быть несовместима с подключенными перманентно Mega-CD или встроенными играми, а также с 32X; режим «M10» используется самоделками и хаками). Указание опций превалирует над указанным порядком. Максимальный размер загружаемого ROM (даже в режиме SSF) – 15МБ (аппаратное ограничение Mega EverDrive).
Использовать так:
mega-usb <имя_файла> [-опции]

Упрощенное использование (без опций):

*.RBF		- Загрузка конфигурации в FPGA
MEGA.BIN	- Загрузка образа ОС 68k в Mega EverDrive v2(x7), x3 ,x5
MEGAOS.bin	- Загрузка образа ОС 68k в Mega EverDrive v1 (не для v2)
*.SMS		- Загрузка программы (игры) в режиме MasterSystem
*.*		- Загрузка программы (игры) в режиме MegaDrive (SMD, М10, SSF - см. выше)

Опции (не применяются к фиксированным маскам, указанным выше):

-smd		- Загрузка файла как SMD, обычный ROM (зачастую избыточно, т.к. по-умолчанию)
-m10		- Загрузка файла как SMD "big-ROM" (10MB без маппера)
-ssf		- Загрузка файла как SMD ROM с маппером SSF (исп. также для доступа к функциям EverDrive, см. ниже)
-cd		- Загрузка файла как Mega-CD addon ROM BIOS (требуется соотв. оборудование)
-32x		- Загрузка файла как 32X addon ROM (требуется соотв. оборудование)
-sms		- Загрузка файла как MasterSystem ROM
-os		- Загрузка файла как EverDrive приложения
-o		- Загрузка образа ОС в Mega EverDrive v1 (не для v2)
		  (Аналогично MEGAOS.bin без опций)
-fo		- Загрузка образа в т.ч. Прошивки в Mega EverDrive v1 (не для v2)
		  (Часть MEGAOS.bin прошивается, часть загружается)
PS. Не забываем, что Mega EverDrive для разработчиков SMD-приложений предоставляет также следующий функционал:
Связь с внешней системой (ПК или другой USB-хост) через виртуальный COM-порт (на стороне хоста) и регистры в адресном пространстве на стороне SMD (необходимо включать режим SSF);
Возможность хранения контента на SD-карте Mega EverDrive (необходимо включать режим SSF) и его энергонезависимой памяти («на батарейке»);
Возможность использования адресного пространства памяти ROM картриджа Mega EverDrive как ОЗУ (необходимо включать режим SSF);
(см. примеры разработчика)
Есть аппаратно-эмулируемый графический сопроцессор SVP (в режиме SVP недоступны регистры SSF, а вместе с этим и функционал EverDrive по работе с USB-соединением и пр.);
Есть аппаратно-эмулируемый синтезатор YM2413;
Есть сопроцессор умножения/деления чисел (MEGA.rbf до версии 3.03 включительно).
After login, ~/.clasprc.json will be generated. If you want to deploy Google
Apps Script from GitHub Actions, paste the contents of ~/.clasprc.json into
your repository secrets with the name CLASPRC.
A Boilerplate free RecyclerView adapter.
Gencycler uses annotation processing to analyze your code and generates the Recyclerview adapter for you,
which means you only need to worry about your logic and not about the adapter
Written in Kotlin <3, for Kotlin and Java
Generates human readable code(plus comments, minus the human errors)
Clean and optimized code – Generates only what is required
Click / Long-Click listeners
Multi view types
Expandable items
Swipe to delete
Headers
Footers
Simple Drag and drop
Filter
Easily extensible
Custom variable naming
Parses your layout file so no more findViewById
Comes with useful Helpers
No runtime cost – everything happens at compile-time
Multi flavor support
Butterknife R2 support
Gencycler works in compile time so no runtime performance impact,
Gencycler will generated a readable multi view type RecyclerView Adapter with a thread-safe accessing mechanism.
Gencycler eliminates The need to write all of the boilerplate code needed for writing an adapter and
leaves you with only the bare minimum needed to write your business logic.
Just create a class which implements the GencyclerModel and annotate it with @GencyclerViewHolder
Each class represents a ViewHolder & Data model. In order to associate the class with a layout we place the layout id of what the item should look like inside the annotation as shown below.
Kotlin
@GencyclerViewHolder(R.layout.item_simple)
data class SimpleModel(val name: String, val description: String) : GencyclerModel
Java
@GencyclerViewHolder(R.layout.item_simple)
public class SimpleModel implements GencyclerModel {
    private String name;
    private String description;

    public SimpleModel(String name, String description) {
           this.name = name;
           this.description = description;
    }
}
2. Implement your adapter
Just create a class and annotate it with @GencyclerAdapter
place every model you want the adapter to use inside the annotation as shown below.
Kotlin – Single view type
@GencyclerAdapter(SimpleModel::class)
class SimpleAdapter
Kotlin – Mutli view type
@GencyclerAdapter(SimpleModel::class, AnotherModel::class) //for multiple view types just seperated each model by a comma
class SimpleAdapter
Java – Single view type
@GencyclerAdapter(SimpleModel.class)
public class SimpleAdapter {}
Java – Multi view type
@GencyclerAdapter({SimpleModel.class, AnotherModel.class})  //for multiple view types just provide an array
public class SimpleAdapter {}
3. Compile
Compile your project and when the compilation finishes your adapters and view holders will be generated.
The generated adapter will be named Generated + Your adapter class name and will be an abstract class with a bind function for every model you provided
The ViewHolder we be Generated and implemented automatically
4. Implementing the generated adapter
Now that we have the generated code all we need to do is implement it
The generated adapter will require 3 parameters
context: Context | Used to inflate the layout of the ViewHolder
elements: MutableList with the type of the provided model or GencyclerModel when multiple models wer’e provided. Default: ArrayList() | Each element represents a Generated ViewHolder
updateUi: Boolean Default: true
The generated adapter comes with many helper methods (add, remove, etc…) each action will update the elements in the adapter but if updateUi is True the adapter will also run a UI Thread check and call the appropriate notify method of the adapter (notifyItemInserted, notifyItemRemoved, etc…) whenever one of those function is called
And a onBind abstract function
The complete adapter will look like this
Kotlin
@GencyclerAdapter(SimpleModel::class)
class SimpleAdapter(context: Context, elements: ArrayList<SimpleModel>) : GeneratedSimpleAdapter(context, elements) {

    	override fun onBindSimpleModelViewHolder(
        	simpleModelViewHolder: SimpleModelViewHolder, //Generated ViewHolder, all the views from your layout are here
        	simpleModel: SimpleModel,
        	position: Int) {

            	//Your logic here
    }
}
Java
@GencyclerAdapter(SimpleModel.class)
public class SimpleAdapter extends GeneratedSimpleAdapter {

    public SimpleAdapter(Context context, ArrayList<SimpleModel> elements) {
        super(context, elements);
    }

    @Override
    public void onBindSimpleModelViewHolder(
                @NotNull SimpleModelViewHolder simpleModelViewHolder,
                @NotNull SimpleModel simpleModel,
                int position) {

                    //Your logic here
    }
}
Advance/Extras
Custom naming
Gencycler provides renaming options to the adapter and the variables inside the ViewHolder
Adapter
By default the generated adapter will be named Generated + Your adapter name but you can select a custom name for your adapter by specifying it inside the @GencyclerAdapter as shown below
Kotlin
@GencyclerAdapter(SimpleModel::class, customName = "CustomNameAdapter")
class SimpleAdapter
Java
@GencyclerAdapter(value = SimpleModel.class, customName = "CustomNameAdapter")
public class SimpleAdapter {}
Variables
By default the processor turns the id of every view in the xml layout to variable name and converts it to lower camel-case
You can change the names of the variables by specifying a naming adapter inside the @GencyclerViewHolder as shown below
Kotlin
@GencyclerViewHolder(R.layout.item_simple, NamingCase.NAMING_CASE_SNAKE)
data class SimpleModel(val name: String, val description: String) : GencyclerModel
enum class NamingCase {
    NAMING_CASE_NONE,
    NAMING_CASE_CAMEL,  //Default
    NAMING_CASE_SNAKE
}
Event listeners
For now Genecycler supports two listeners but if you want to create one for yourself just create and send pull request
Click / Long Click
1. Annotate your adapter with @Clickable or @LongClickable
To add listeners for item click all you need to do is annotate your adapter with @Clickable or @LongClickable (You can both at the same time) as shown below
Kotlin
@GencyclerAdapter(SimpleModel::class)
@Clickable
@LongClickable
class SimpleAdapter
Java
@GencyclerAdapter(value = SimpleModel.class)
@Clickable
@LongClickable
public class SimpleAdapter {}
2. Compile
Once the compilation completes an interface will be added to the generated adapter constructor
OnItemClickedListener<T> for @Clickable
OnItemLongClickedListener<T> for @LongClickable
T a generic type
Your model for single type
GencyclerModel for multi view types
Simple gestures(Drag and Drop, Swipe to delete)
Create a new SimpleGesturesHelper and provide it your generated adapter
Kotlin
val gesturesHelper = SimpleGesturesHelper(adapter)

gesturesHelper.setSwipeEnabled(enabled: Boolean, vararg directions: Int) //ItemTouchHelper.START or ItemTouchHelper.END
gesturesHelper.setDragAndDropEnabled(enabled: Boolean, longPressOnly: Boolean = false)

gesturesHelper.attachToRecyclerView(recyclerView)
Gencycler provides you with a way to filter your items in order to that you need to do the following
1. Annotate your adapter with @Filterable
Kotlin
@GencyclerAdapter(SimpleModel::class)
@Filterable
class SimpleAdapter
Java
@GencyclerAdapter(value = SimpleModel.class)
@Filterable
public class SimpleAdapter {}
2. Compile
3. Implement the performFilter method
Kotlin
@GencyclerAdapter(SimpleModel::class)
@Filterable
class SimpleAdapter(context: Context, elements: ArrayList<SimpleModel>) : GeneratedSimpleAdapter(context, elements) {

	//other methods

	override fun performFilter(constraint: CharSequence, simpleModel: SimpleModel): Boolean {
	    //return true if the item should be retained and false if the item should be removed.
	}
}
Java
@GencyclerAdapter(SimpleModel::class)
@Filterable
class SimpleAdapter : GeneratedSimpleAdapter {

	//other methods

	@Overrides
  	public Boolean performFilter(CharSequence constraint, SimpleModel simpleModel) {
  		//return true if the item should be retained and false if the item should be removed.
    }
}
To filter the items, inside your Activity/Fragment call
Call this in onQueryTextSubmit() & onQueryTextChange() when using SearchView
Kotlin
adapter.filter("yourSearchTerm")
Java
adapter.filter("yourSearchTerm");
Custom view recycling
Gencycler generates functions for binding and recycling of ViewHolders
The amount of functions will be the same for binding and recycling functions
Binding function are abstract because the system does not provide a default option
Recycling on the other hand do have a default option which you should edit in order to improve performance
The generated functions look as shown below
Kotlin
override fun onRecycledSimpleModelViewHolder(simpleModelViewHolder: SimpleModelViewHolder,
                                             position: Int) {

	super.onRecycledSimpleModelViewHolder(simpleModelViewHolder, position) //remove this line
	//apply your custom recycleing logic
}
Java
@Override
public void onRecycledSimpleModelViewHolder(SimpleModelViewHolder simpleModelViewHolder,
                                            Integer position) {

	super.onRecycledSimpleModelViewHolder(simpleModelViewHolder, position); //remove this line
	//apply your custom recycleing logic
}
Miscellaneous(Optional)
Gencycler supports number of custom options regarding customized build/flavors
All of the option are inputed as shown below
android {
    //your project configuration
    defaultConfig {
        //your project default config

        //Add this section
        javaCompileOptions {
            annotationProcessorOptions {
                arguments = [
                    "androidManifestFile": Providing specific file path to the manifest
                    "rClassPackage": Providing R class package - Just like when you do import but with the .R at the end (example: com.example.app.R = com.example.app)
                    "androidUseR2": true / false if you want to use Butterknife's R2 instead of R
                    "resourcesFolder": In case you use multi flavor layouts you need to use getCurrentFlavor()
                ]
            }
        }
    }
}
This only applies if you have duplicate layouts for multi flavors here is a function to get the current flavor
If you want to contribute to this project check if there are any open issues
or just send a pull request and I’ll do my best to look at it
License
MIT License

Copyright (c) 2018 Gil Goldzweig Goldbaum

Permission is hereby granted, free of charge, to any person obtaining a copy
of this software and associated documentation files (the "Software"), to deal
in the Software without restriction, including without limitation the rights
to use, copy, modify, merge, publish, distribute, sublicense, and/or sell
copies of the Software, and to permit persons to whom the Software is
furnished to do so, subject to the following conditions:

The above copyright notice and this permission notice shall be included in all
copies or substantial portions of the Software.

THE SOFTWARE IS PROVIDED "AS IS", WITHOUT WARRANTY OF ANY KIND, EXPRESS OR
IMPLIED, INCLUDING BUT NOT LIMITED TO THE WARRANTIES OF MERCHANTABILITY,
FITNESS FOR A PARTICULAR PURPOSE AND NONINFRINGEMENT. IN NO EVENT SHALL THE
AUTHORS OR COPYRIGHT HOLDERS BE LIABLE FOR ANY CLAIM, DAMAGES OR OTHER
LIABILITY, WHETHER IN AN ACTION OF CONTRACT, TORT OR OTHERWISE, ARISING FROM,
OUT OF OR IN CONNECTION WITH THE SOFTWARE OR THE USE OR OTHER DEALINGS IN THE
SOFTWARE.


 https://github.com/asleepwalker/typographie.js