Blog

  • kobiton-sample

    Automated Website Testing using Appium on Kobiton

    I. Setup Environment on Mac

    Prerequisites

    Homebrew

    • Homebrew is a package manager for the Mac.
    • To install Homebrew, open terminal and type the following command:
      ruby -e "$(curl -fsSL https://raw.githubusercontent.com/Homebrew/install/master/install)"
    • This will install Homebrew on your Mac. To check the version type the following command:
      brew -v

    Node and npm

    • To install Node via Homebrew, type the following command to install Node.
      brew install node
    • To check if you have Node.js installed, run this command in your terminal:
      node -v
    • To confirm that you have npm installed you can run this command in your terminal:
      npm -v
    • To update your npm, type this into your terminal:
      npm install npm@latest -g

    II. Creating Automated Tests for Android web

    Test Scenario

    In this tutorial, we create a test case to test the following flow:

    • Go to Google page on Chrome browser on Android device
    • Enter Kobiton into Search field
    • Click Search button
    • Check the title contains Kobiton keyword

    To start using Node/npm-based packages on your projects, you need to set up your project directories as npm projects. This is easy to do.

    For example, let’s first create a test directory to allow us to play without fear of breaking anything.

    • Create a new directory somewhere sensible with using your file manager UI, or by navigating to the location you want and running the following command:

        mkdir kobiton-test
    • To make this directory an npm project, you just need to go inside your test directory and initialize it, with the following:

        cd kobiton-test
        npm init
    • This second command will ask you many questions to find out the information required to set up the project; you can just select the defaults for now.

    • Once all the questions have been asked, it will ask you if the information entered is OK, type yes and press Enter/Return and npm will generate a package.json file in your directory.

    This file is basically a config file for the project. You can customize it, like this:

    {
      "name": "kobiton.test",
      "version": "1.0.0",
      "description": "This a sample test",
      "main": "index.js",
      "scripts": {
        "test": "mocha --compilers js:babel-core/register --no-timeouts *.js",
        "android-web-test": "mocha --compilers js:babel-core/register --no-timeouts android-web-test.js"
      },
      "keywords": [
        "kobiton"
      ],
      "author": "Khanh Do",
      "license": "ISC",
      "dependencies": {
        "babel-core": "^6.26.0",
        "babel-plugin-add-module-exports": "^0.2.1",
        "babel-plugin-transform-decorators-legacy": "^1.3.4",
        "babel-plugin-transform-flow-strip-types": "^6.22.0",
        "babel-polyfill": "^6.26.0",
        "babel-preset-es2015": "^6.24.1",
        "babel-preset-stage-0": "^6.24.1",
        "babel-register": "^6.26.0",
        "chai": "^4.1.2",
        "colors": "^1.1.2",
        "mocha": "^4.0.1",
        "wd": "^1.4.1"
      }
    }

    Note: We need to run npm install to update all packages in package.json file.

    With this, you are ready to move on.

    Inside your project directory, create a new file called android-web-test.js. Give it the following contents, then save it:

    import 'babel-polyfill'
    import 'colors'
    import wd from 'wd'
    import {assert} from 'chai'
    
    const username = ''
    const apiKey = ''
    
    const kobitonServerConfig = {
      protocol: 'https',
      host: 'api.kobiton.com',
      auth: `${username}:${apiKey}`
    }
    
    const desiredCaps = {
      sessionName:        'Automation test session',
      sessionDescription: 'This is an example for Android web', 
      deviceOrientation:  'portrait',  
      captureScreenshots: true, 
      browserName:        'chrome', 
      deviceGroup:        'KOBITON', 
      deviceName:         'Galaxy',
      platformName:       'Android'
    }
    
    let driver
    
    describe('Android Web sample', () => {
    
      before(async () => {
        driver = wd.promiseChainRemote(kobitonServerConfig)
    
        driver.on('status', (info) => {
          console.log(info.cyan)
        })
        driver.on('command', (meth, path, data) => {
          console.log(' > ' + meth.yellow, path.grey, data || '')
        })
        driver.on('http', (meth, path, data) => {
          console.log(' > ' + meth.magenta, path, (data || '').grey)
        })
    
        try {
          await driver.init(desiredCaps)
        }
        catch (err) {
          if (err.data) {
            console.error(`init driver: ${err.data}`)
          }
        throw err
        }
      })
    
      it('should return the title that contains Kobiton', async () => {
        await driver.get('https://www.google.com')
        .waitForElementByName('q')
        .sendKeys('Kobiton')
        .sleep(3000)
        .waitForElementByName('btnG')
        .click()
        
        let msg = await driver.title()
        assert.include(msg, 'Kobiton - Google Search')
      })
    
      after(async () => {
        if (driver != null) {
        try {
          await driver.quit()
        }
        catch (err) {
          console.error(`quit driver: ${err}`)
        }
      }
      })
    })

    Inside your project directory, create a new file called .babelrc. Give it the following contents, then save it:

    {
      "presets": ["es2015"],
      "plugins": [
        "add-module-exports",
        "syntax-async-functions",
        "syntax-flow",
        "transform-regenerator",
        "transform-function-bind",
        "transform-object-rest-spread",
        "transform-decorators-legacy",
        "transform-class-properties",
        "transform-export-extensions",
        "transform-flow-strip-types",
        "transform-do-expressions"
      ]
    }

    III. Getting started with Kobiton

    • Let’s get started with a Kobiton Trial.

    • Create a Kobiton trial account.

    • Sign in. This should happen automatically after you verify your email address.

    • When you first sign in, you should be on Devices page.

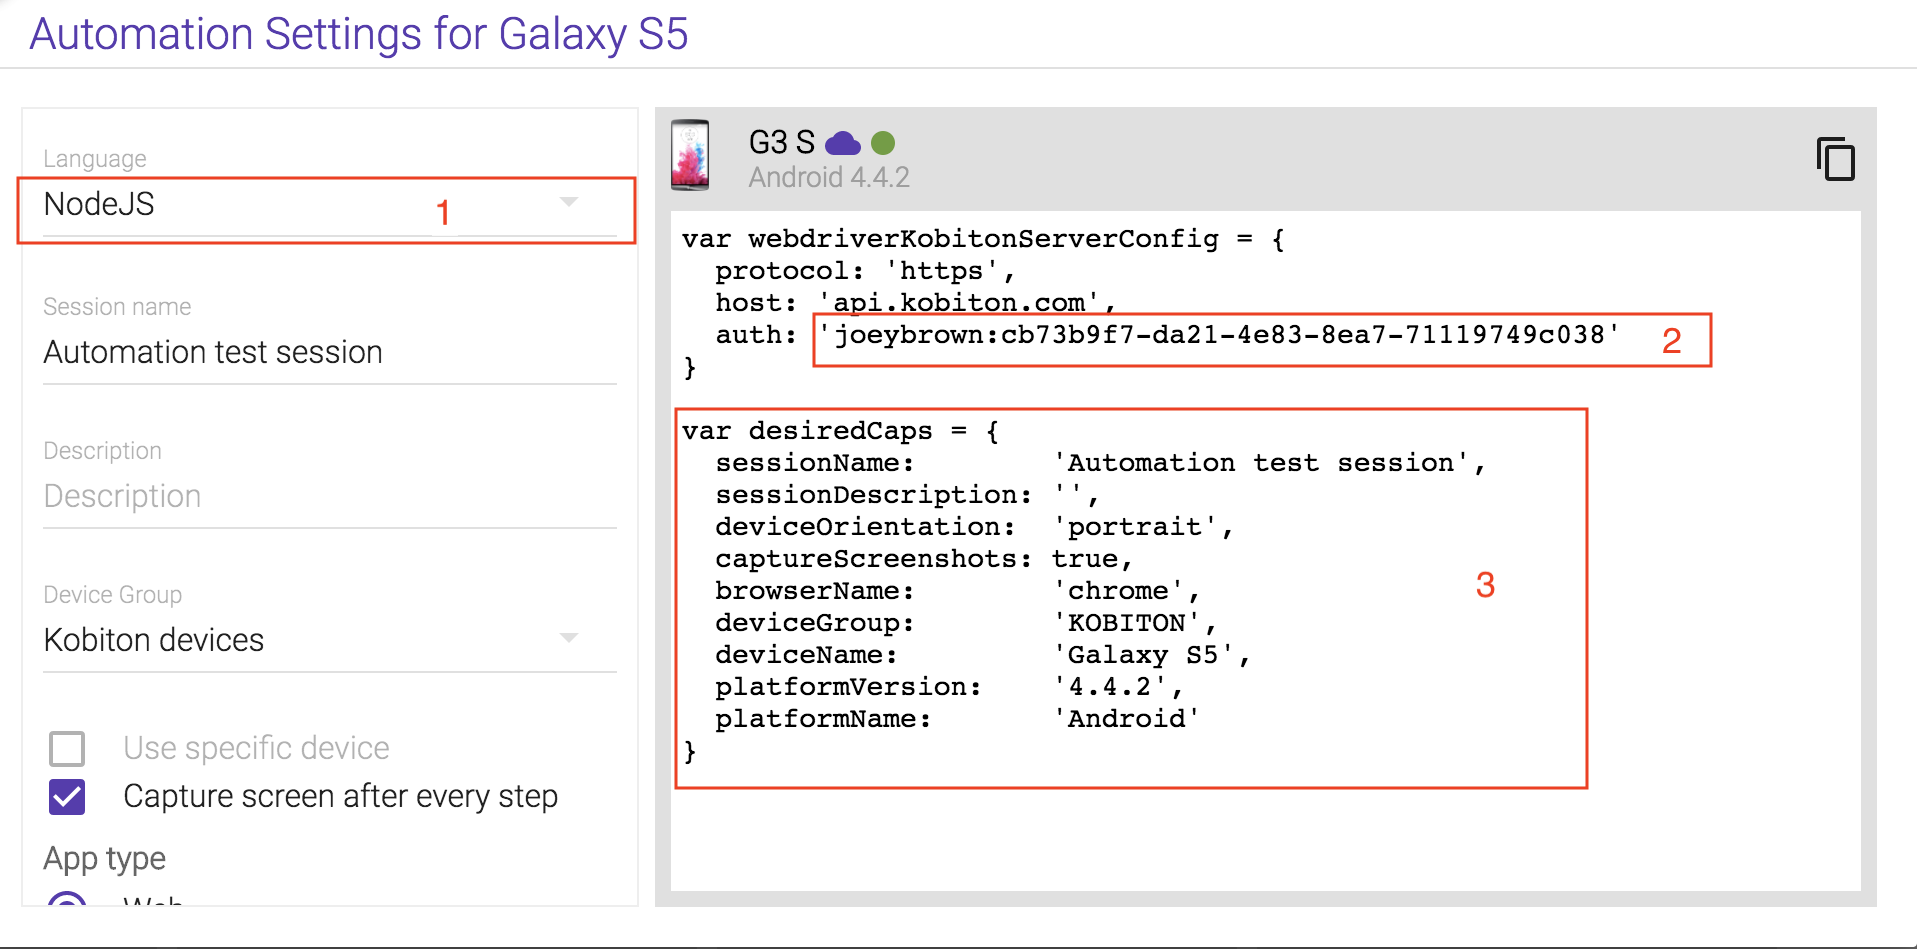
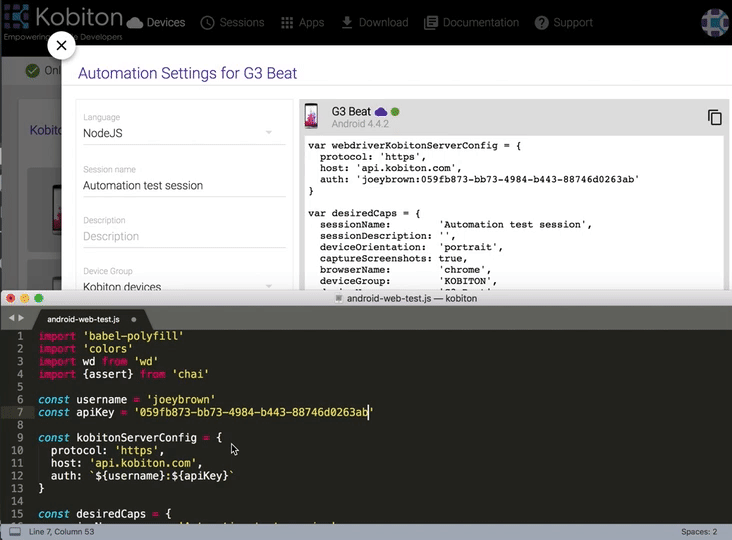
    • Hover over the device you want to test and select Show automation settings.

      automation-settings.png

    • Select Language = NodeJS.

    • Replace username & apiKey in the sample script

    const username = ''
    const apiKey = ''

    auth.gif

    • Replace the desiredCaps to indicate your exptected testing device.
    const desiredCaps = {
      sessionName:        'Automation test session',
      sessionDescription: 'This is an example for Android web', 
      deviceOrientation:  'portrait',  
      captureScreenshots: true, 
      browserName:        'chrome', 
      deviceGroup:        'KOBITON', 
      deviceName:         'Galaxy',
      platformName:       'Android'
    }

    IV. Executing the Sample Tests

    Once you have everything set up, you can run the example test simply by running the following command:

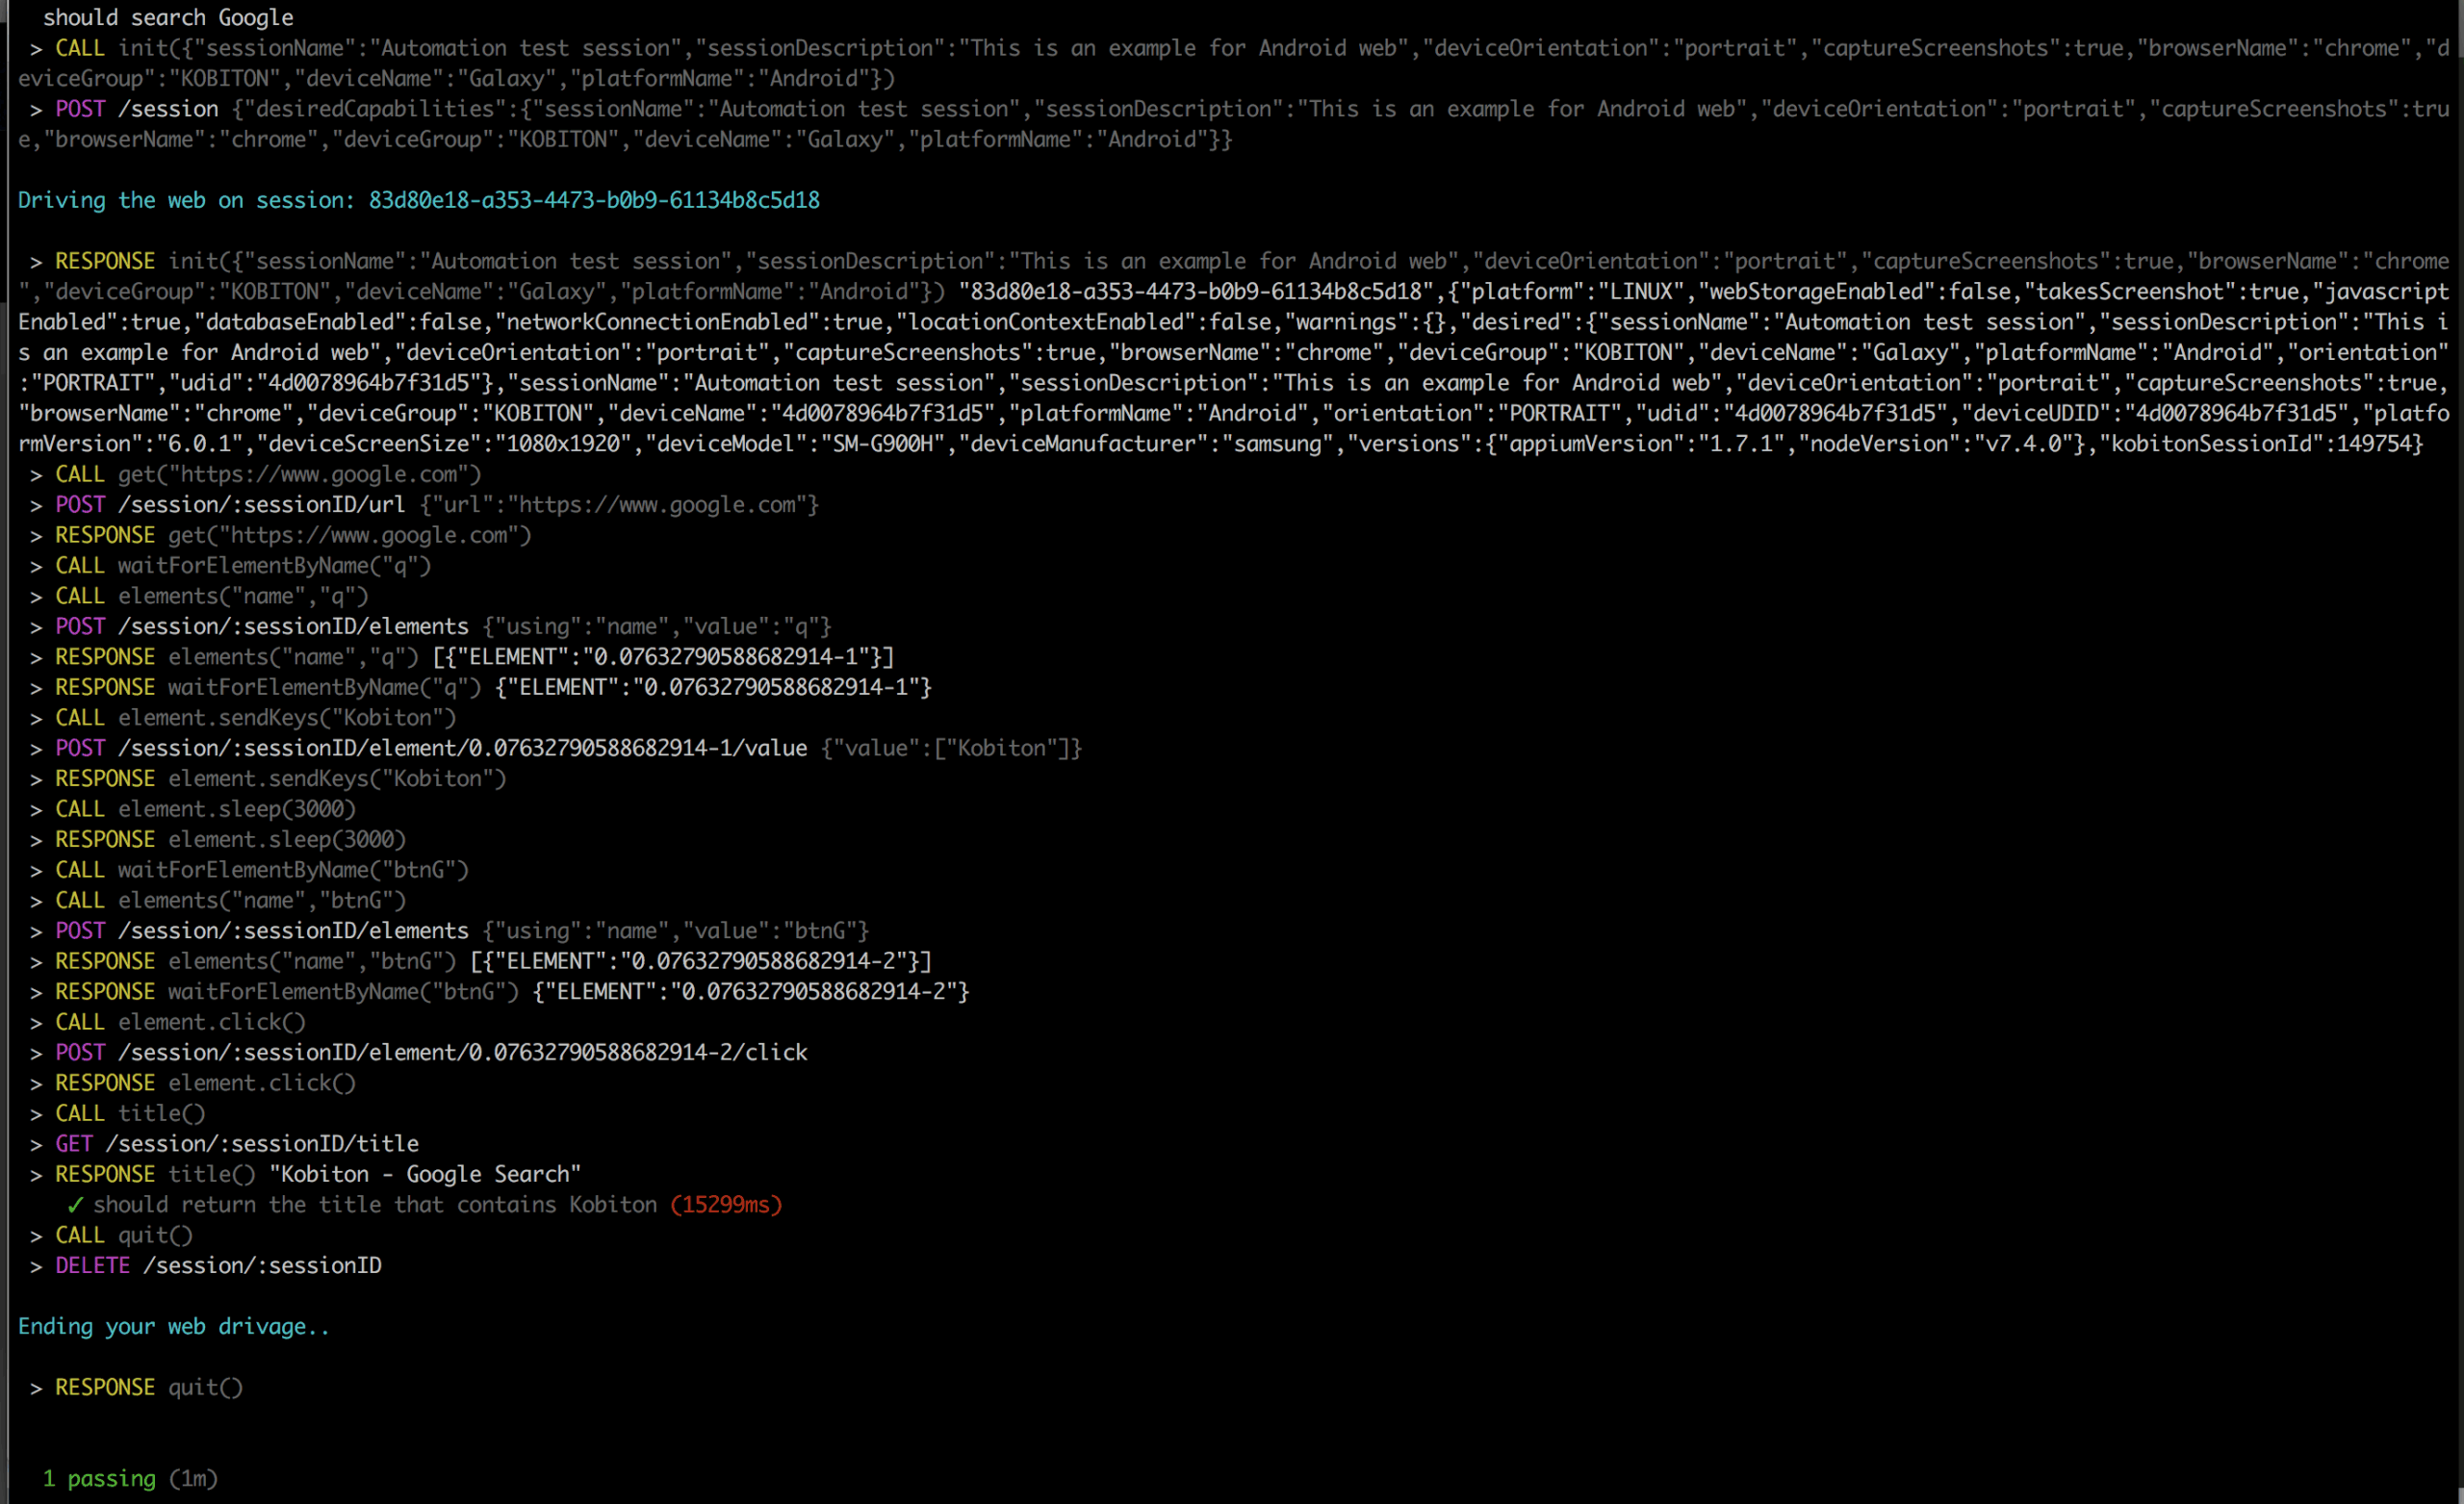
    npm run android-web-test

    V. Reporting on Test Results

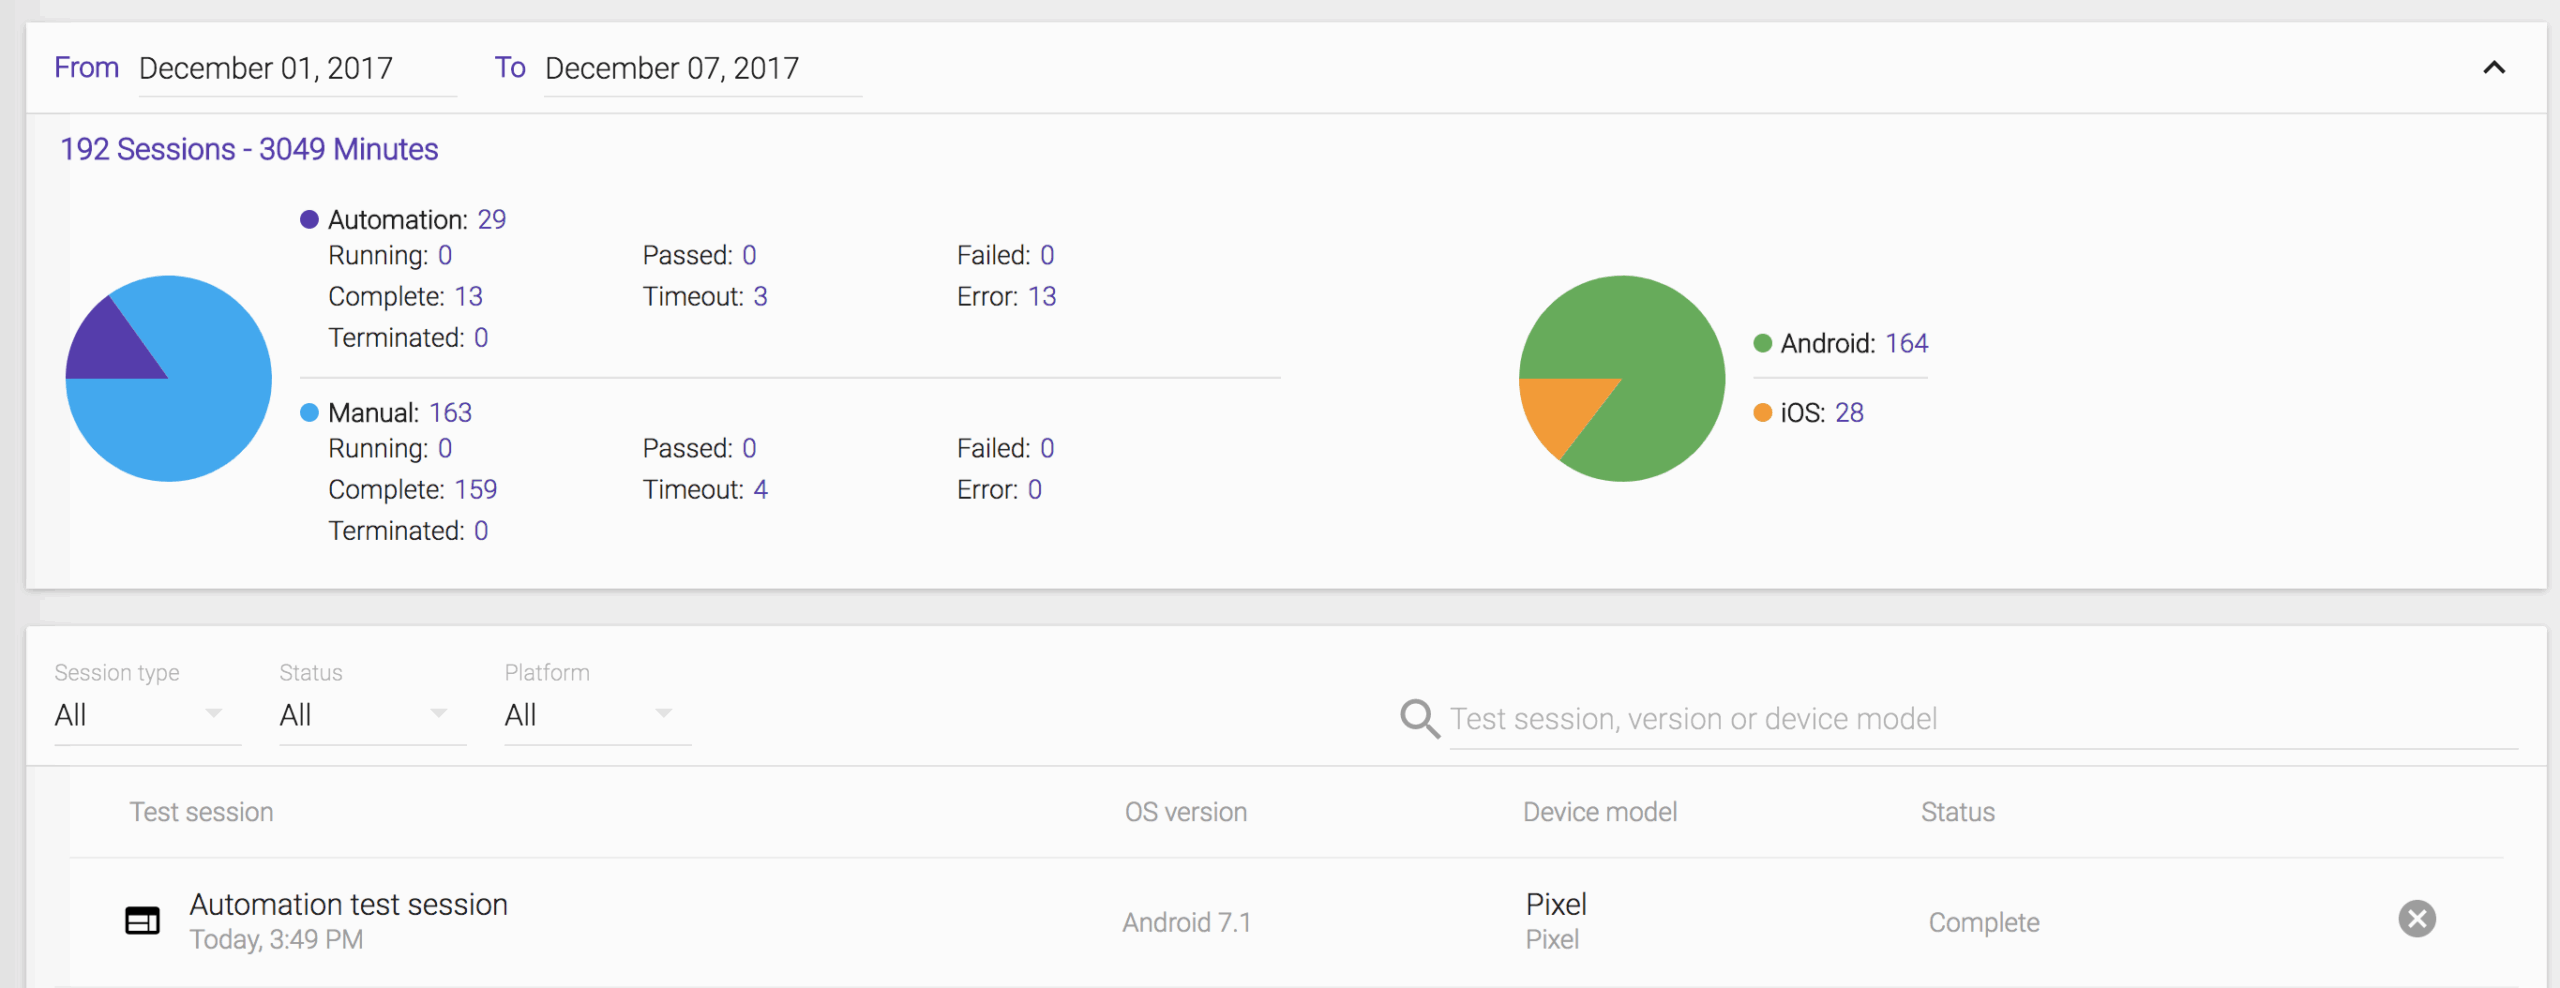
    • When you see your test ‘Complete’ on Terminal, you can access https://portal.kobiton.com/sessions to get your test results.

      terminal_results.png

      session-dashboard.png

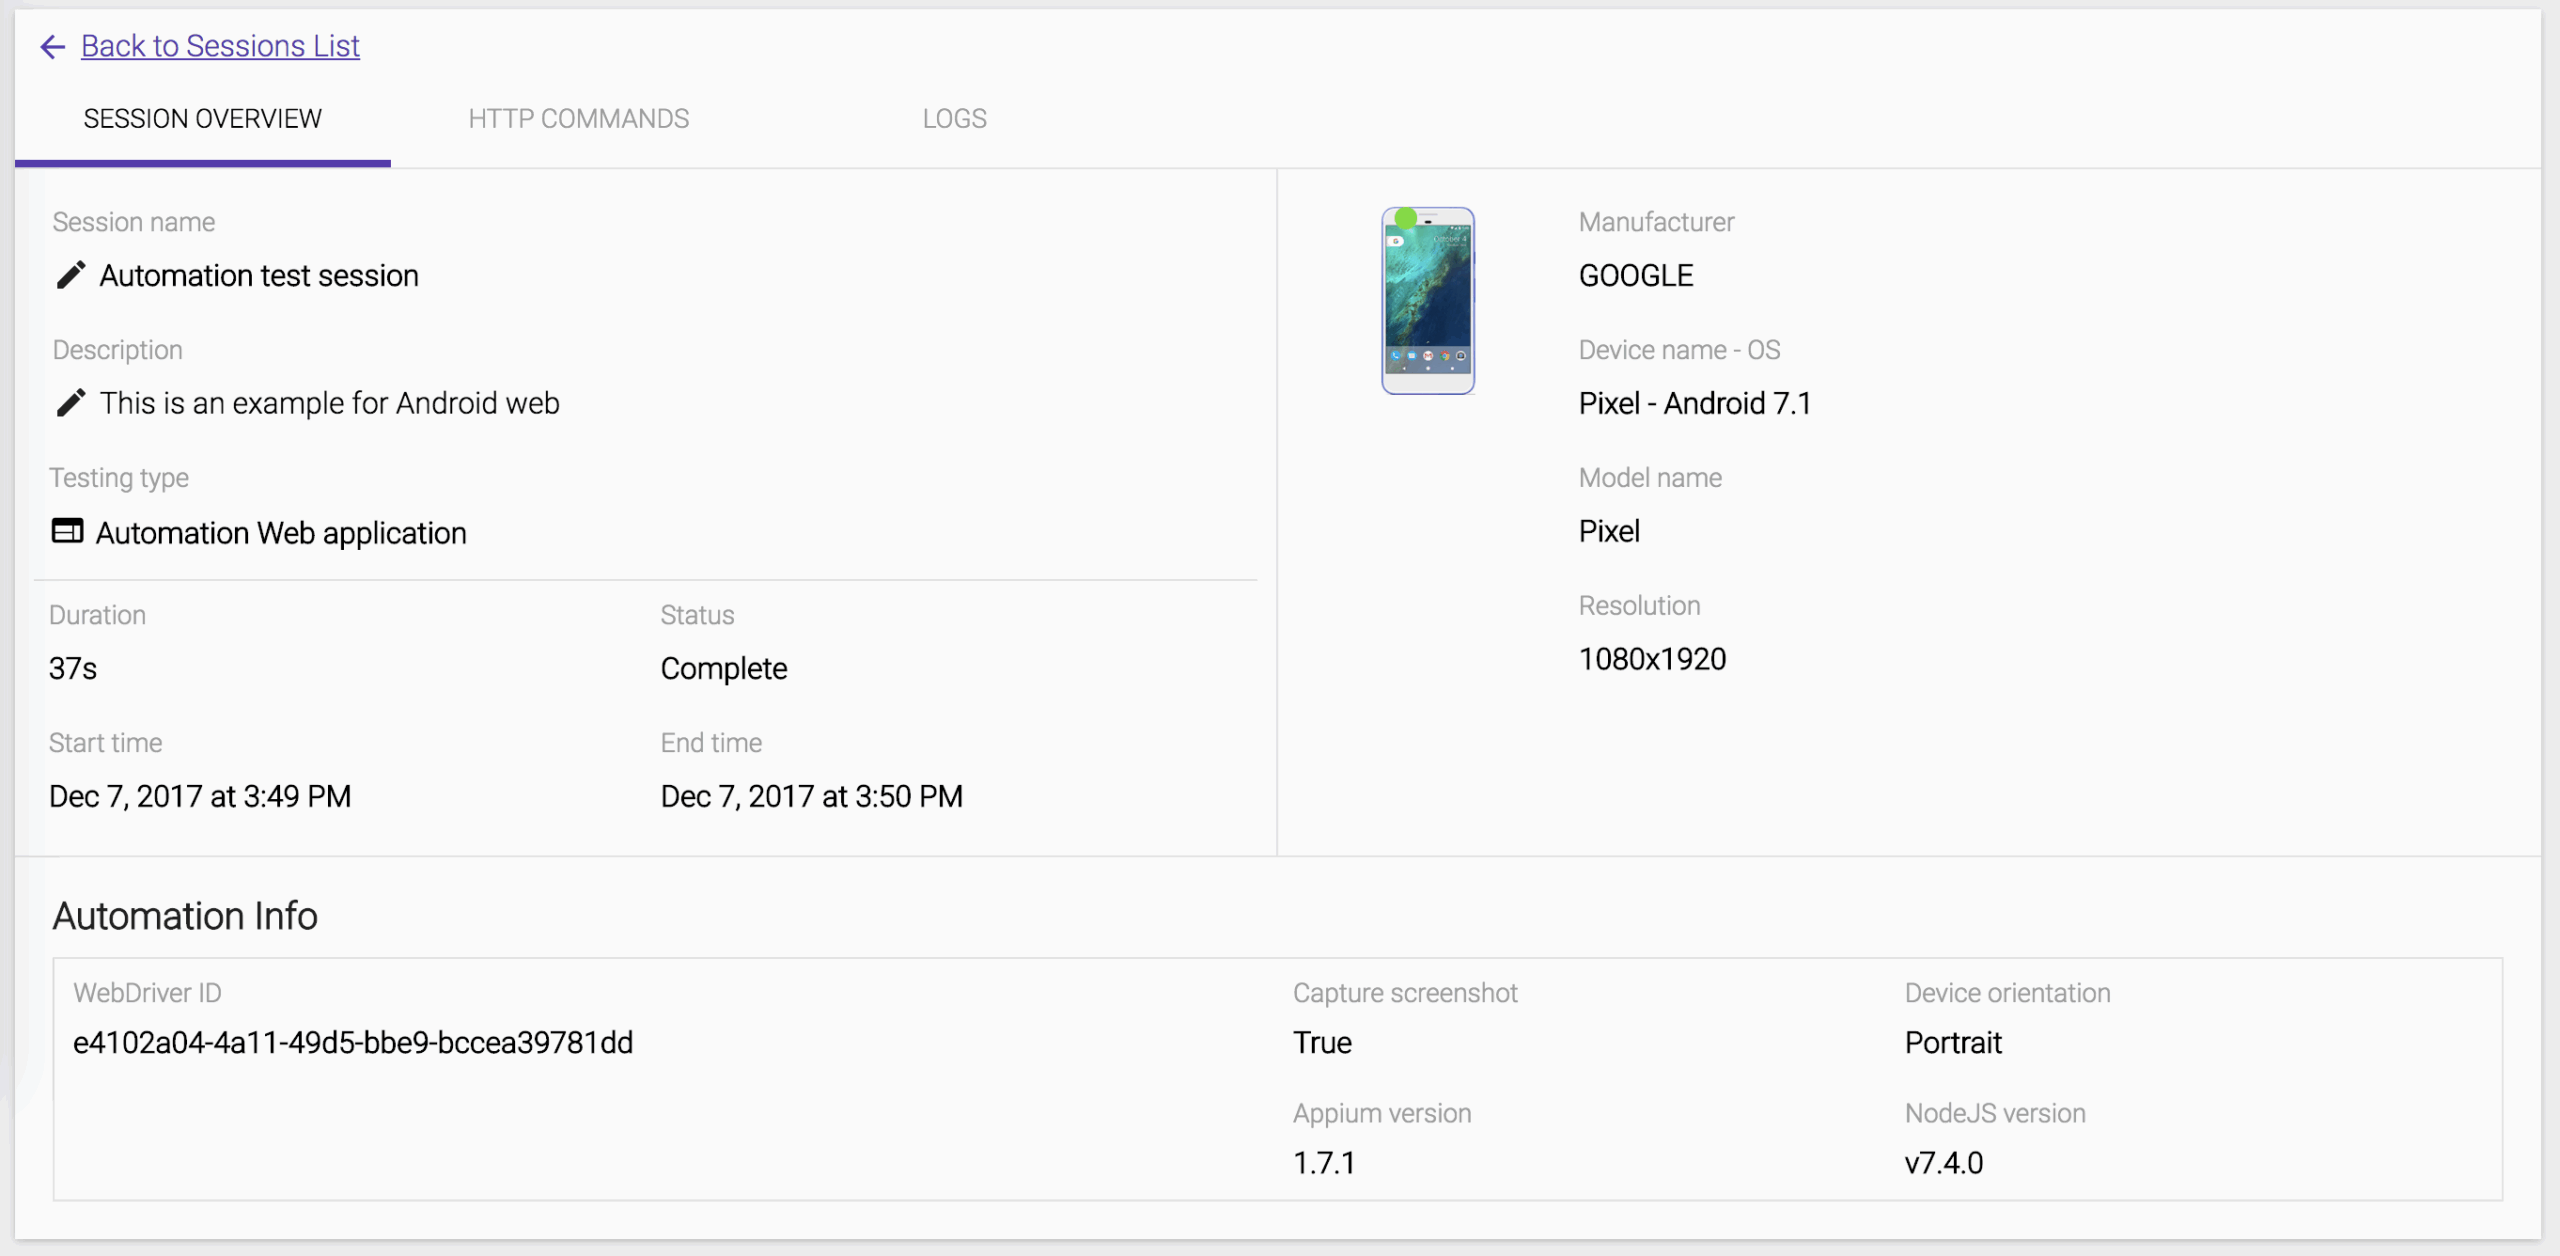
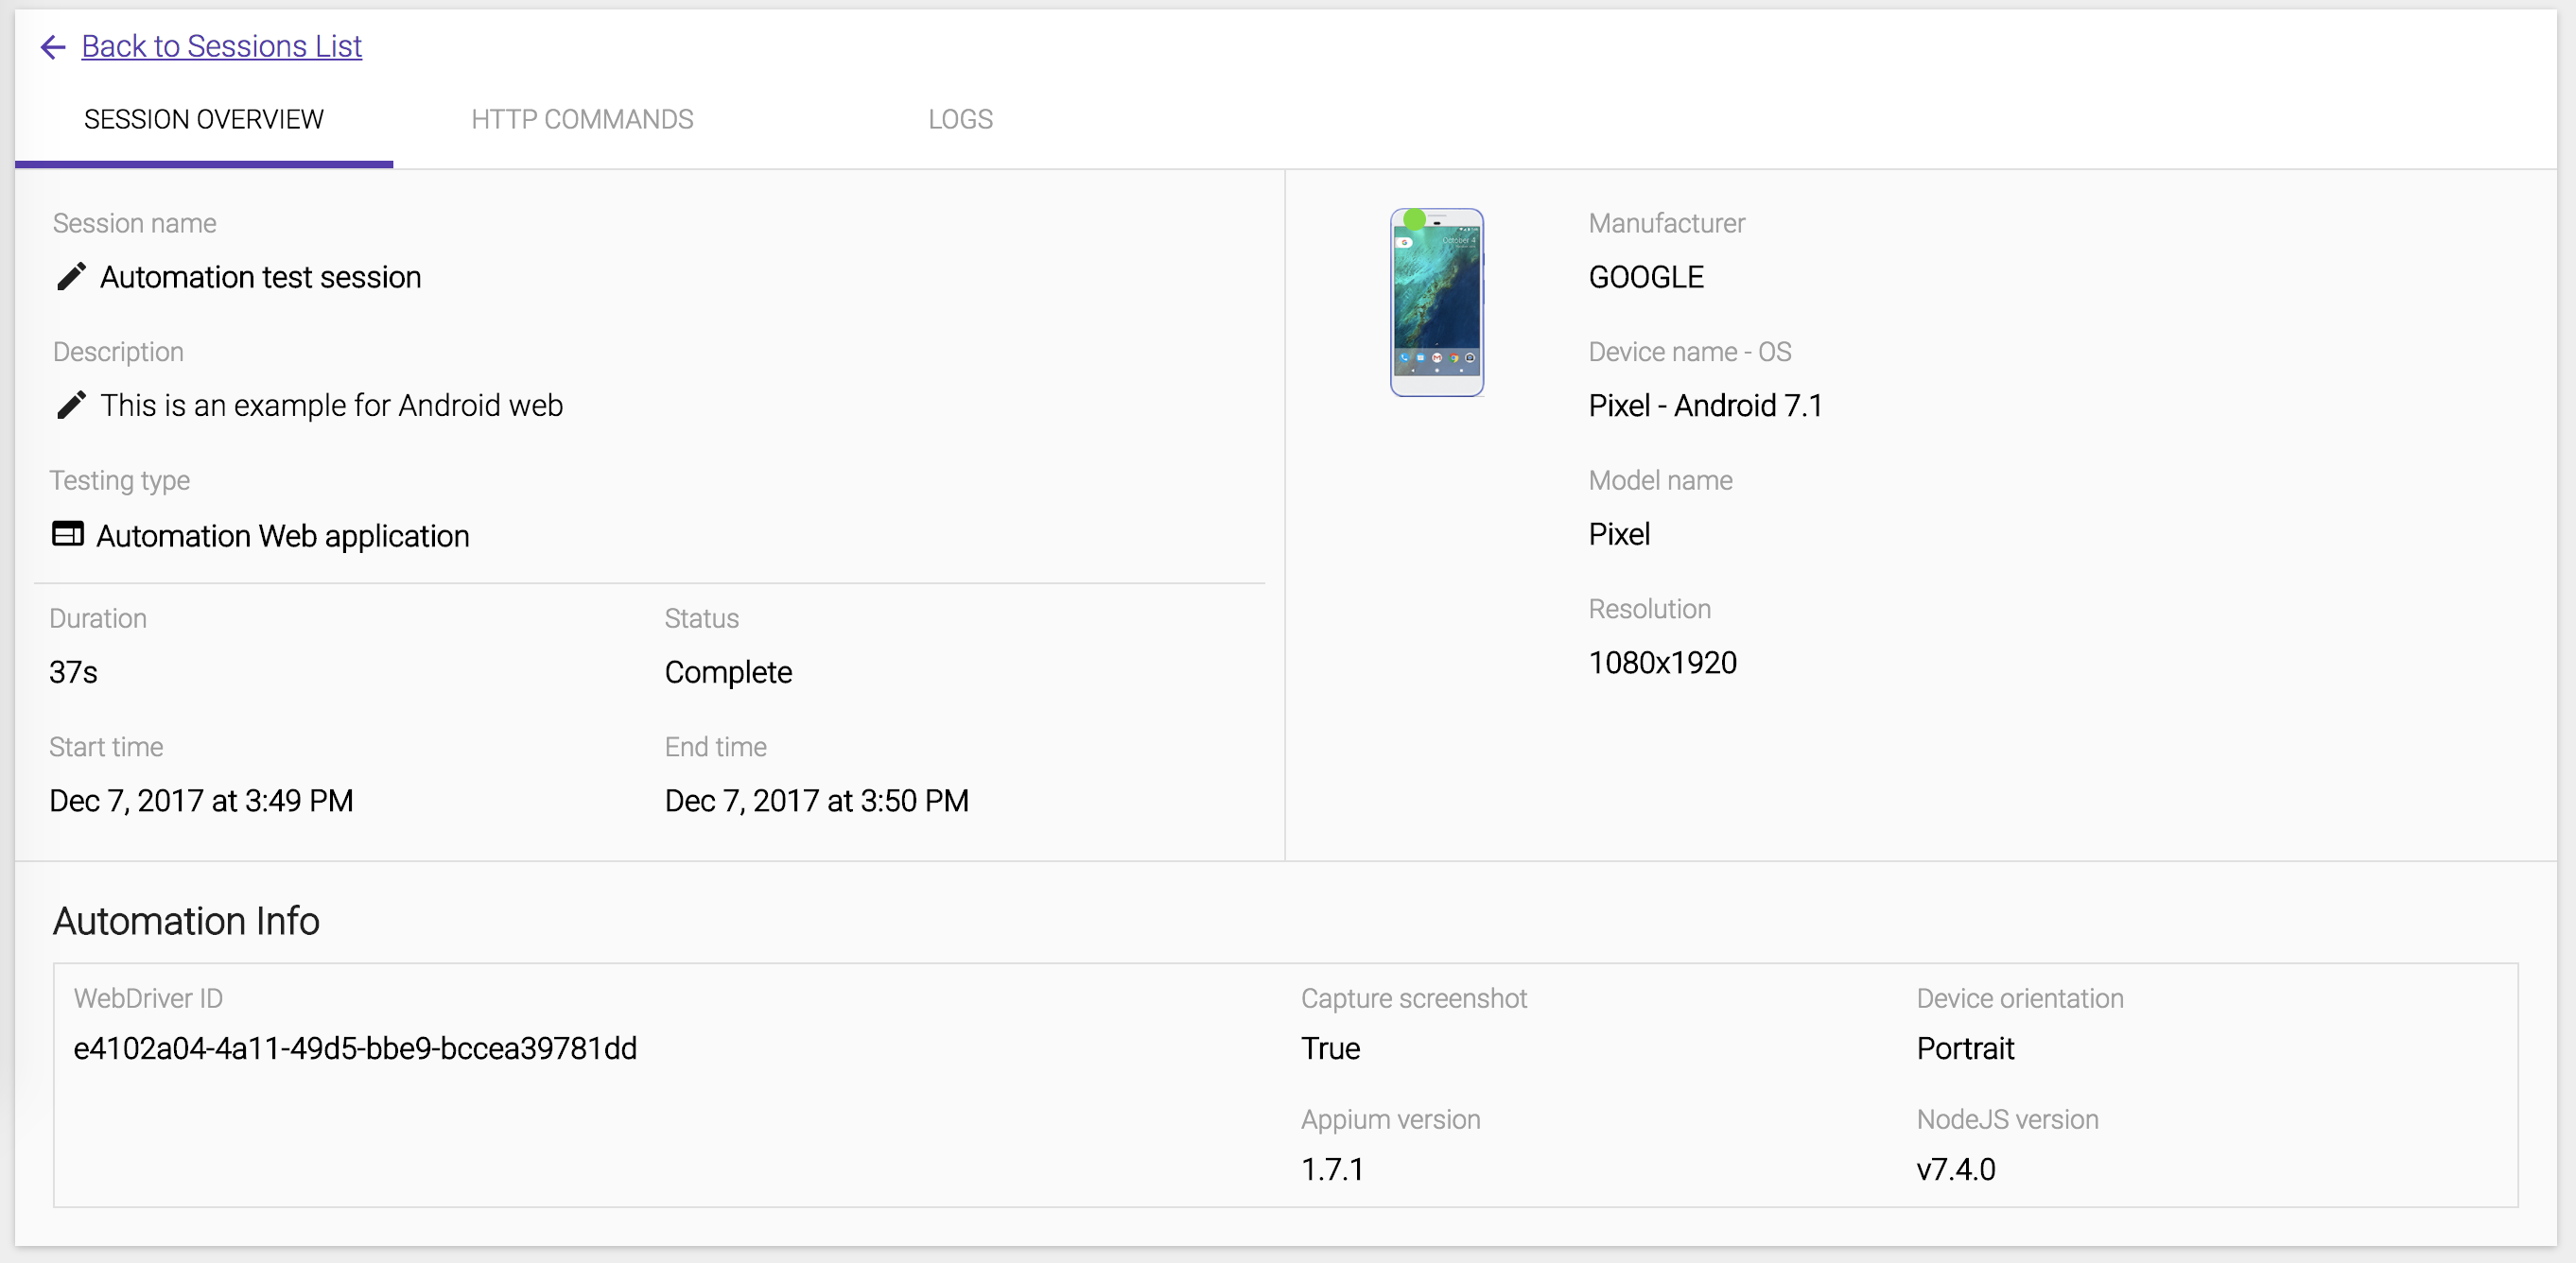
    • We can see the session overview for the latest test session.

      session-details.png

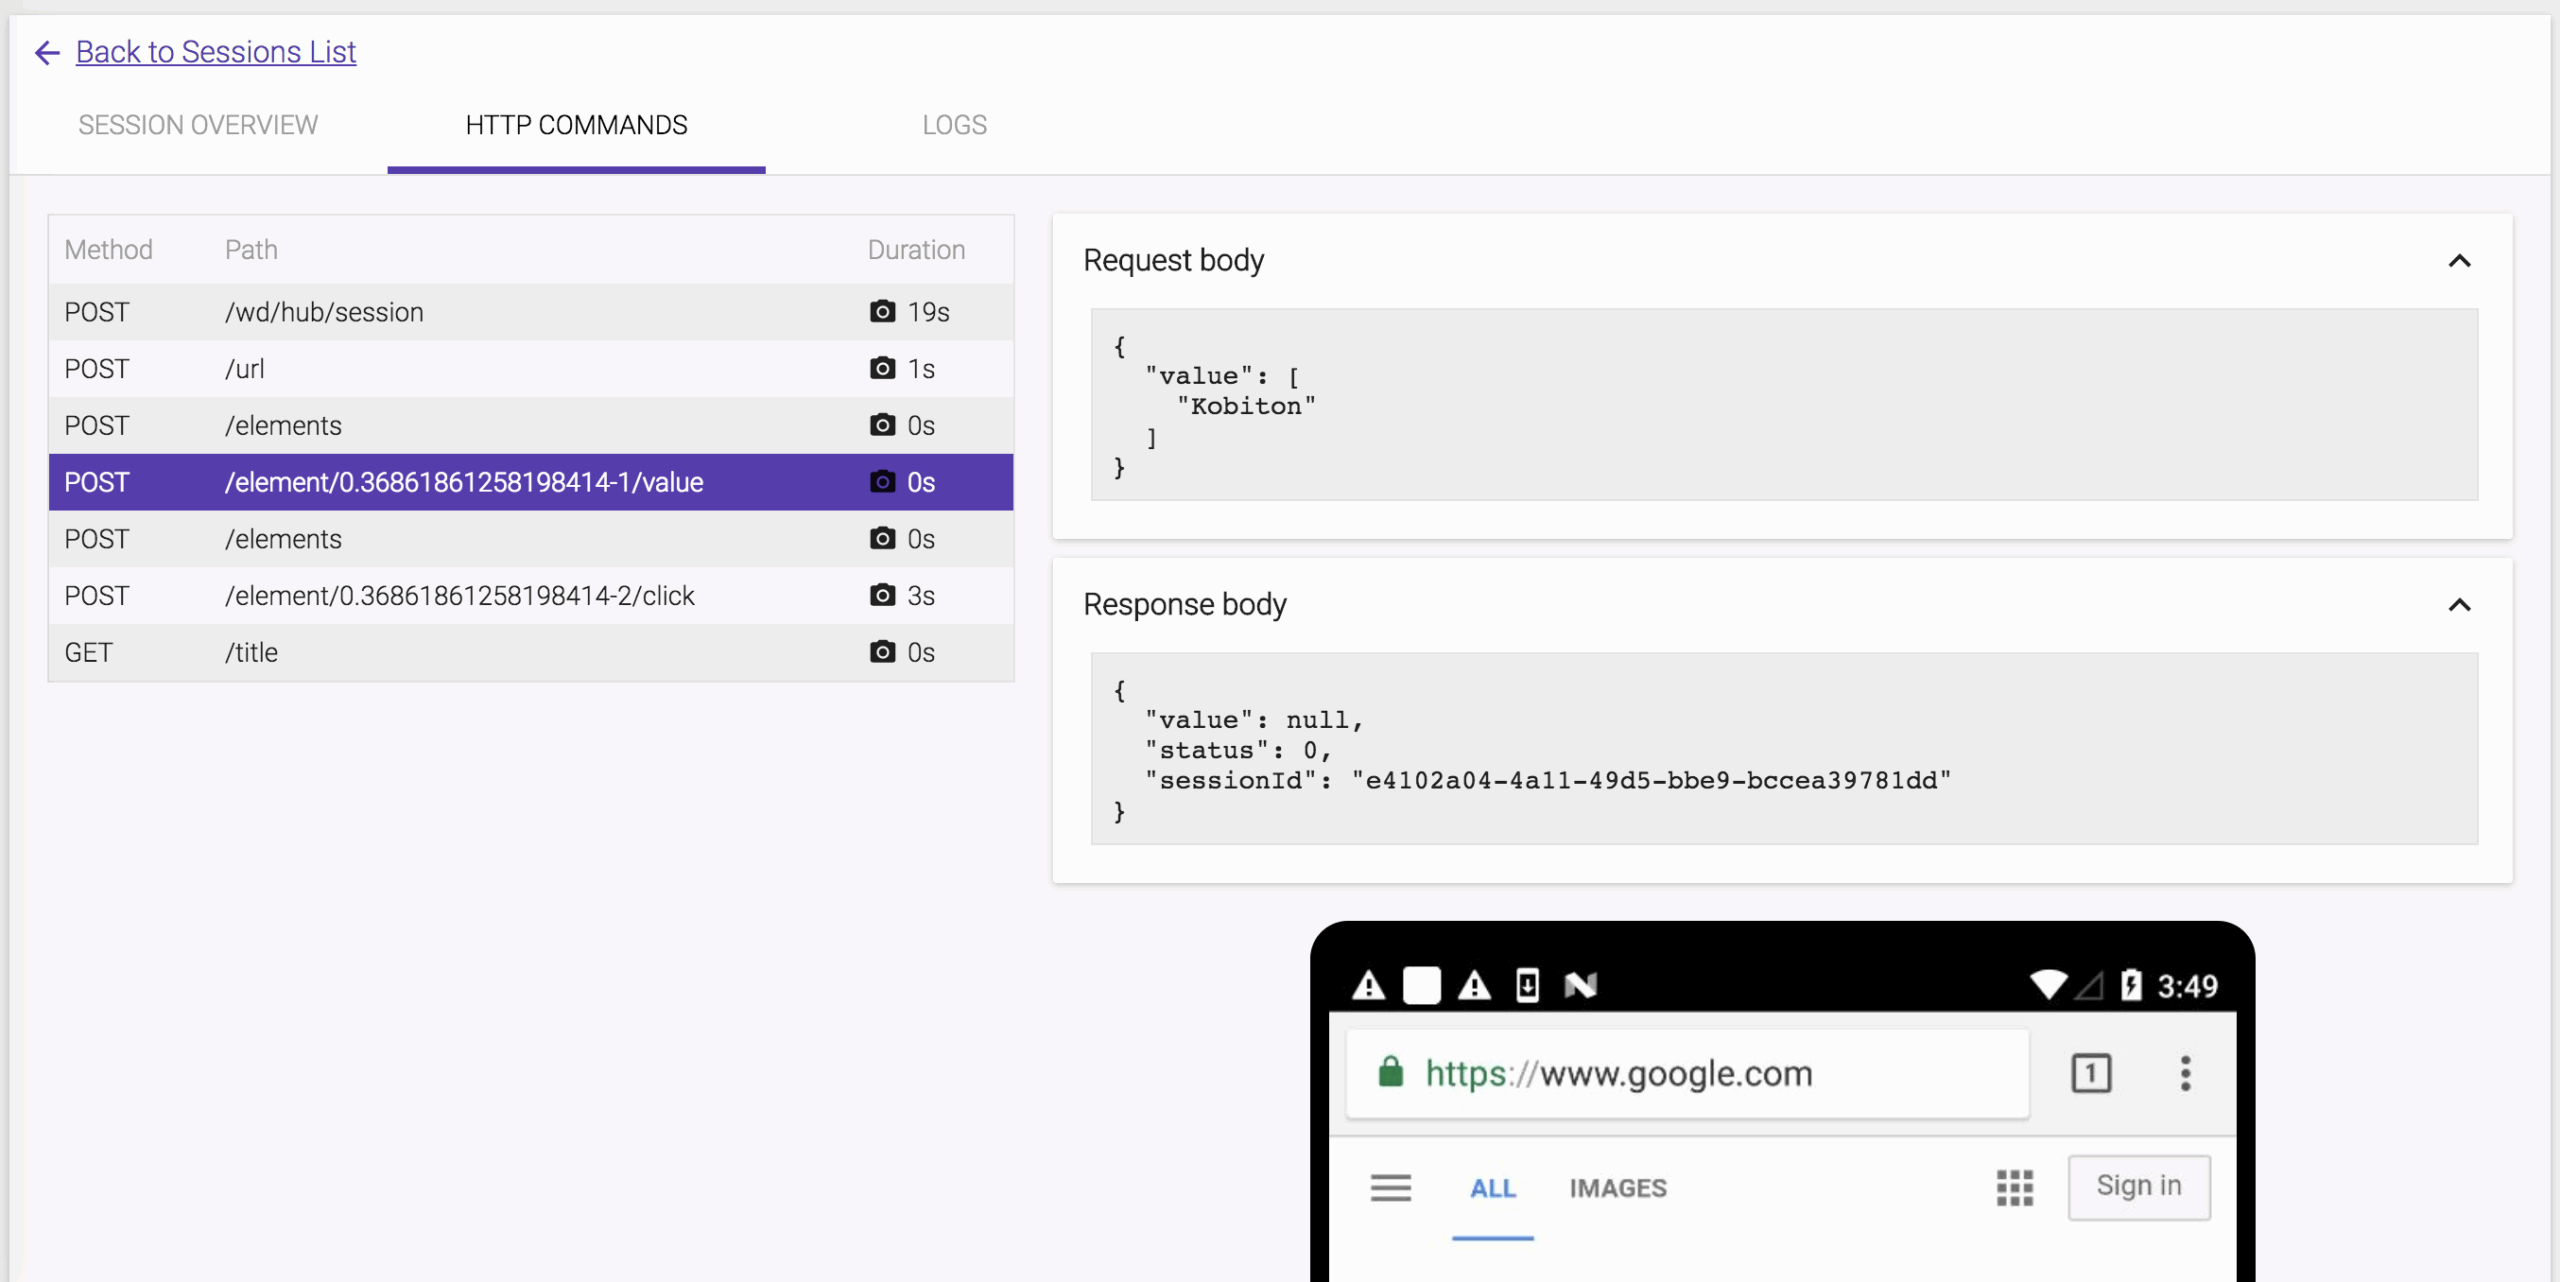
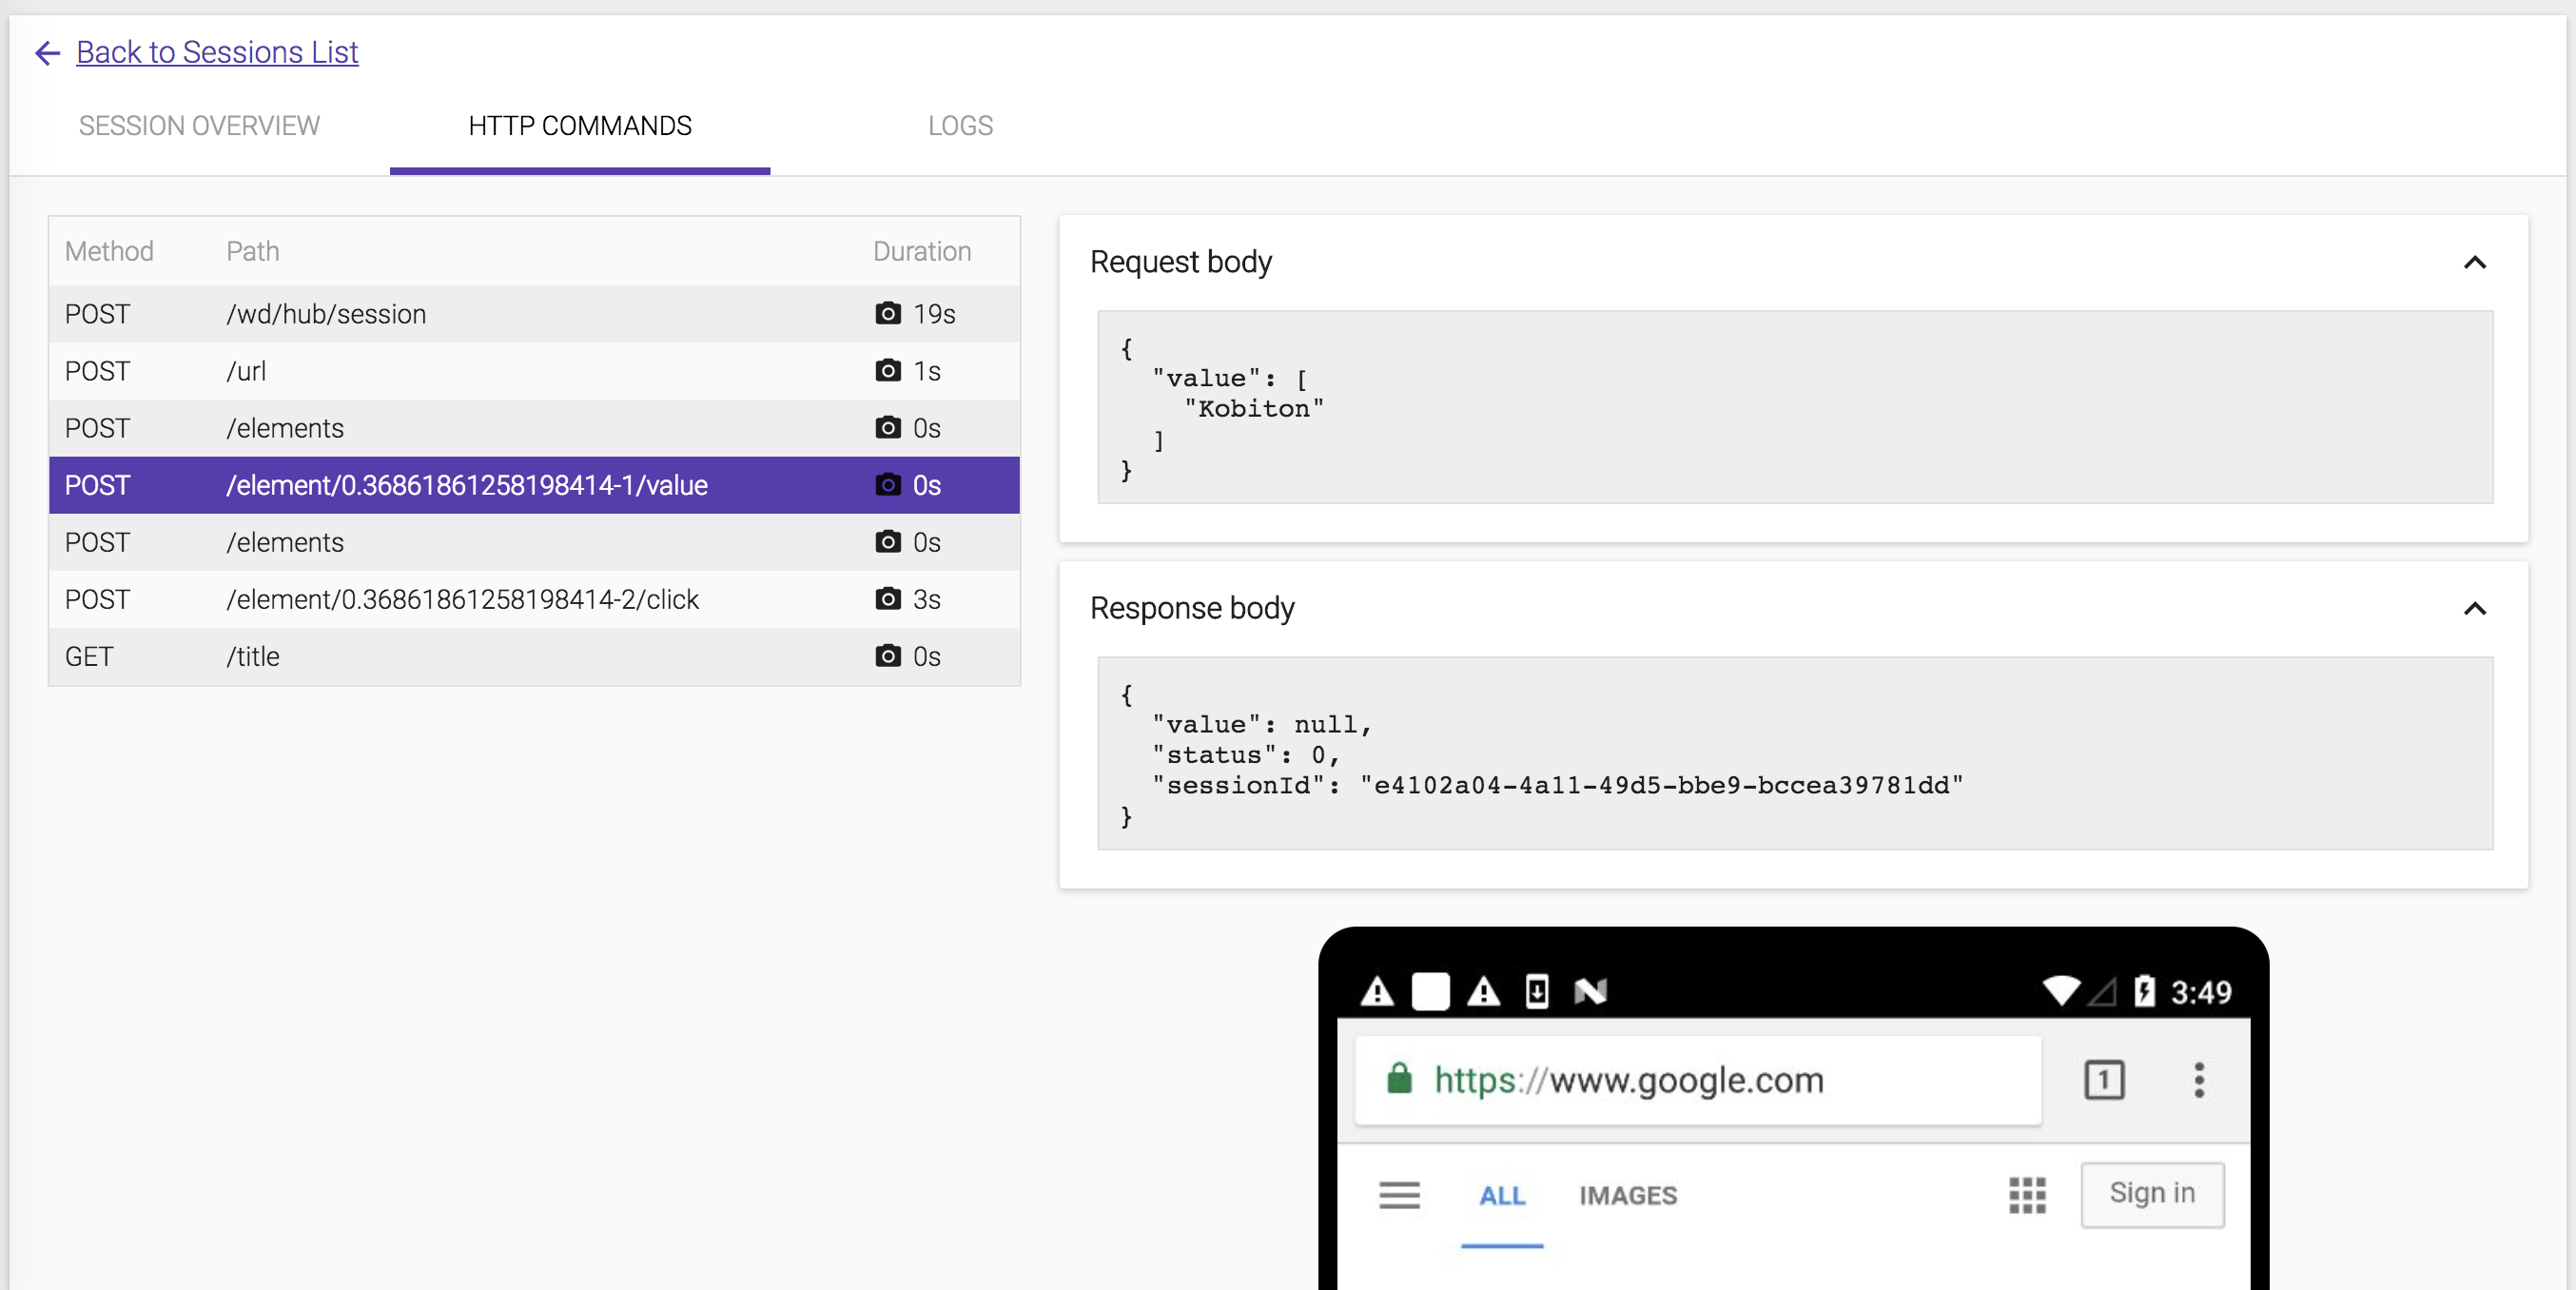
    • The HTTP Commands details are also included the test result.

      session-details-http-commands.png

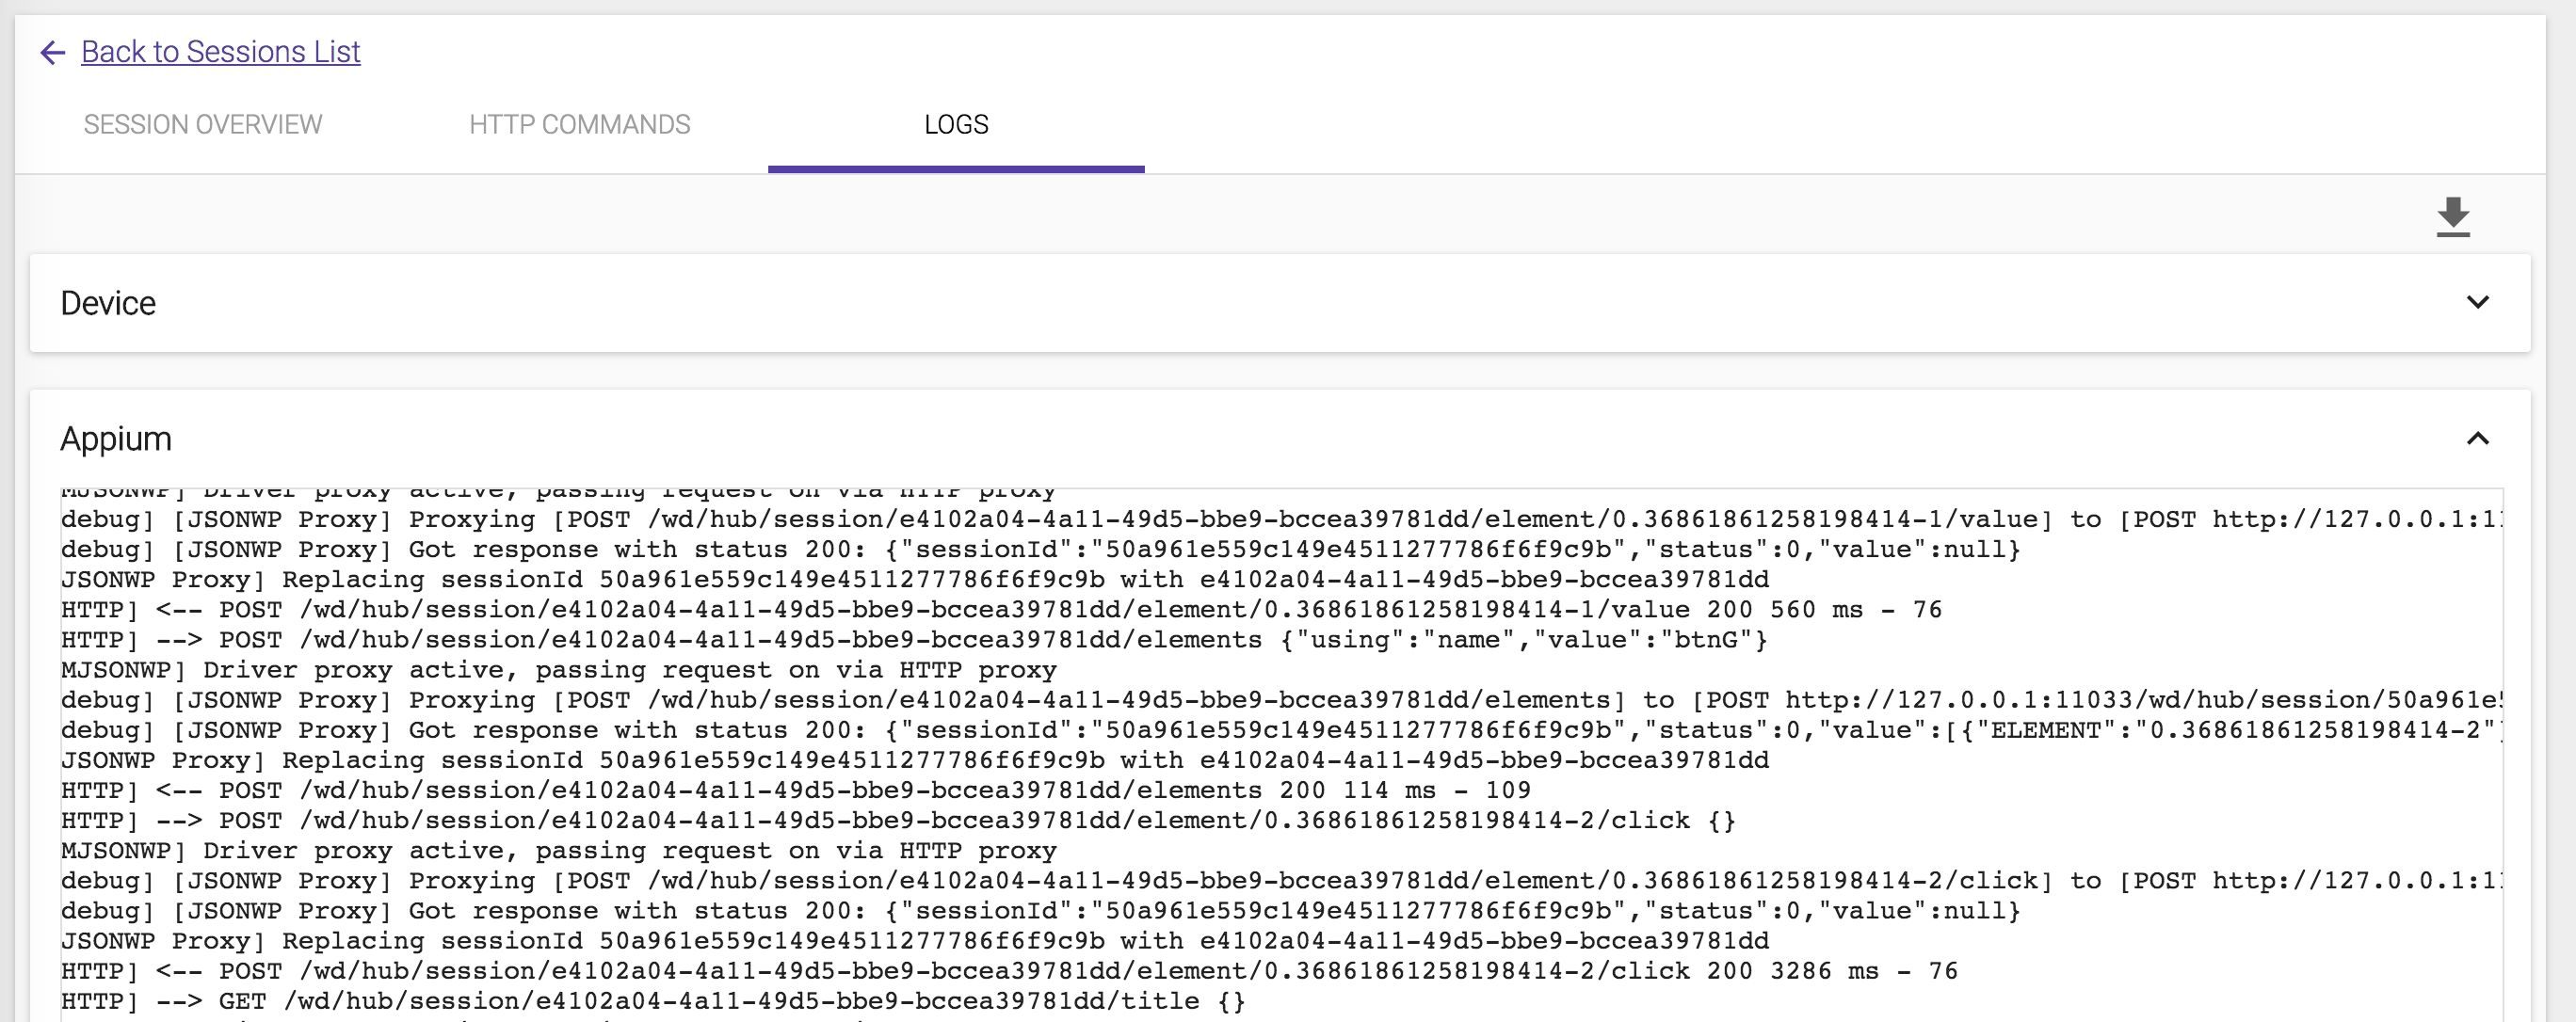
    • The log report includes device log and Appium log as well.

      session-details-http-logs.png

    Visit original content creator repository https://github.com/khanhdodang/kobiton-sample
  • markdeep-thesis

    markdeep-thesis

    Write your (under)graduate thesis with Markdeep and typeset it right in your browser.

    • Supports all features Markdeep has to offer – diagrams, math, fancy quotes, footnotes, citations, admonitions, and all the standard Markdown stuff.
    • Fills in page numbers, generates a nice-looking table of contents and supports footnotes courtesy of Bindery.
    • A highly readable layout – but if you don’t like it or want to adjust things: Style your thesis with CSS! LaTeX is great, but things can get tricky if you really want to make a documentclass your own.
    • Your browser’s built-in print tools allow you to export your thesis to a PDF file ready for printing – see “Exporting to PDF” below for more information.

    💻 Try out a demo thesis, see the exported PDF and take a look at its Markdeep source code.

    Also, check out markdeep-slides and markdeep-diagram-drafting-board!

    Pages of my own Master’s thesis, which provided the impetus for building this tool. (In case you’re curious as to how this image was generated, you’ll surely be delighted to know that I’ve written a blog post about it.)

    Getting started

    Setup

    This repository contains copies of all dependencies (Markdeep, Bindery, MathJax, and the webfonts used in the default layout) by design – it’ll work offline just fine.

    📦 Clone this repository or download a ZIP.

    Then simply…

    1. navigate to demo.md.html,
    2. open it in your text editor and browser of choice,
    3. fill in your data in the titlePage variable, and
    4. start writing your thesis. Easy!

    Options

    At the bottom of demo.md.html, smack in the middle of where a bunch of essential JavaScript files are loaded, you’ll find a set of options. Their default values (each of which is automatically applied if you omit the corresponding option) are:

    <script>
    markdeepThesisOptions = {
    
        // Default view during authoring: "print", "preview", or "flipbook".
        view: "print",
    
        // Let `markdeep-thesis` know about the `titlePage` variable set during
        // step 3 of the setup instructions above.
        titlePage: titlePage,
    
        // Base font size, in `pt`. Everything is defined relative to this value.
        fontSize: 10.5,
    
        // Page/paper size: the default is A4.
        pageSize: {width: '21cm', height: '29.7cm'},
    
        // Margins between content and edge of paper. A bit wide, but in the spirit
        // of (La)TeX, I guess.
        pageMargins: {top: '2.5cm', inner: '3.5cm', outer: '2.5cm', bottom: '2.5cm'},
    
        // Extra rules passed to Bindery's `Bindery.makeBook` function. Useful for
        // preventing page breaks: `Bindery.PageBreak({selector: '.someClass',
        // position: 'avoid'})`. See
        // https://evanbrooks.info/bindery/docs/#flowing-content
        // for more info.
        extraBinderyRules: [],
    
        // Definition of running header, see:
        // https://evanbrooks.info/bindery/docs/#runningheader
        runningHeader: (p => `${p.number}`),
    
        // Scale factor for markdeep diagrams.
        markdeepDiagramScale: 1.0,
    
        // A number of hooks that you can utilize for custom pre- or postprocessing
        // steps. No-ops by default.
        hookAfterMarkdeep:               Function.prototype,
        hookAfterMarkdeepPostprocessing: Function.prototype,
        hookAfterMathJax:                Function.prototype,
        hookAfterMathJaxPostprocessing:  Function.prototype,
        hookAfterBindery:                Function.prototype
    };
    </script>

    Modify them to your liking, but don’t decrease the font size too much (your advisor won’t appreciate having to use a magnifying glass). Additionally, you can tweak the layout by overriding CSS definitions or modifying markdeep-thesis/style.css in-place.

    Exporting to PDF

    It’s best to use Chrome for generating a PDF version of your thesis – it respects the page size that you’ve configured (unlike all other browsers). In Chrome’s print window, set “Margins” to “None” and make sure to keep the “Background graphics” option enabled.

    In my experience, once you’ve dialled in this print configuration, you can run Chrome headlessly for future exports (you may need to boost the --virtual-time-budget depending on the complexity of your thesis):

    chrome --headless --disable-gpu --print-to-pdf=demo.md.html.pdf --no-margins --virtual-time-budget=10000 demo.md.html
    

    Contributing

    Got an idea on how to improve something? Ran into unexpected behavior? Found a bug? (Maybe even fixed that bug?)

    Please file an issue or send a pull request! I’ll be glad to take a look at it.

    I’d love to hear from you (or take a peek at your thesis) if you’ve used this tool in practice.


    Notes

    • The first two pages of the document – the title page and the empty page after it – are intentionally lacking page numbers. Page numbers commence with “1” on page 3 of the document.
    • A horizontal rule --- forces a page break or two: The content will continue on the next odd-numbered page. (<span class="pagebreak"></span> forces a simple page break.) If you want to insert a visible horizontal rule that does not result in any page breaks, type <hr class="ignore">.
    • This tool converts Markdeep’s endnotes into footnotes. Multiple references to an endnote turn into multiple, distinct footnotes.
    • Similarly, the target URLs of links specified using Markdown are shown in footnotes.
    • Note that Markdeep’s insert functionality does not play well with this tool.
    • Also note that this tool includes no fancy (e.g. BibTeX-style) way of managing references – it doesn’t extend Markdeep’s capabilities in this respect. You’ll need to manually make sure that your formatting is consistent if that’s something you or your advisor cares about. (This is certainly a feature that would be neat to integrate!)
    • It would also be neat (although Markdeep should ideally include this functionality) to have a way of linking to sections such that the link markup is automatically replaced with section numbers.

    License

    You may use this repository’s contents under the terms of the BSD 2-Clause “Simplified” License, see LICENSE.

    However, the subdirectory markdeep-thesis/lib/ contains third-party software with its own licenses:

    • Morgan McGuire’s Markdeep is also licensed under the BSD 2-Clause “Simplified” License, see here.
    • Markdeep includes Ivan Sagalaev’s highlight.js with its BSD 3-Clause License, see here.
    • Bindery is used in accordance with its MIT License, see here.
    • MathJax is licensed under the Apache License 2.0, see here.
    • All included webfonts (PT Serif, Poppins, Iosevka, PT Sans Narrow, Aleo) are licensed under the SIL Open Font License, see here.
    Visit original content creator repository https://github.com/doersino/markdeep-thesis
  • store-manager

    Store Manager

    Sistema de gerenciamento de vendas construído através de uma API RESTful.

    Habilidades

    Nesse projeto foi desenvolvido as seguintes capacidades:

    • Conectado uma aplicação ao banco de dados MySQL;
    • Estruturado a aplicação em camadas MSC (Models, Services e Controllers);
    • Delegado corretamente a responsabilidade de cada camada;
    • Escrito código reutilizável;
    • Aplicado padrões REST;
    • Escrito testes unitários para a aplicação.

    Funcionalidades

    Nessa aplicação é possível:

    • Listar todos os produtos;
    • Cadastrar um novo produto;
    • Cadastrar uma nova venda;
    • Listar todas as vendas;
    • Atualizar um produto;
    • Deletar um produto;
    • Deletar uma venda;
    • Atualizar uma venda;
    • Pesquisar produtos através do nome;
      Essas Funcionalidades são feitas através dos endpoints explicados abaixo;

    Rodando a aplicação

    🐳 Rodando no Docker vs Localmente

    Com Docker

    Antes de começar, seu docker-compose precisa estar na versão 1.29 ou superior. Veja aqui ou na documentação como instalá-lo. No primeiro artigo, você pode substituir onde está com 1.26.0 por 1.29.2.

    1. Clone o repositório:
    git clone git@github.com:hgo19/store-manager.git
    1. Inicie os containers através do comando:
    docker-compose up -d
    1. Entre no container com node e instale as dependências:
    docker exec -it store_manager bash

    Dentro do Container:

    npm install
    npm run migration
    npm run seed
    1. A aplicação estará rodando na porta 3000, para acessála basta acessar o endereço: http://localhost:3000 e então utilizar os endpoints.

    Sem Docker

    1. Instale as dependências com:
    npm install
    1. Na aplicação tem um arquivo chamado .env.example, renomei e o configure para que consiga rodar localmente.

    2. Para rodar localmente você precisa ter instalado o Node.js na sua máquina, em que, a versão deve ser "node": ">=16.0.0" e a versão do "npm": ">=7.0.0".

    Endpoints

    Na aplicação foram usados os seguintes endpoints:

    products:

    • GET /products que retorna todos os produtos cadastrados;
    • GET /products/search?q=query que pesquisa o produto pelo nome;
    • GET /products/:id que retorna o produto pelo id passado, caso seja um id válido;
    • POST /products para postar um produto novo, o body deve ter a propriedade name;
    • PUT /products/:id para atualizar um produto em caso de id válido, no body da requisição deve ter as propriedades name;
    • DELETE /products/:id para deletar um produto em caso de id válido.

    sales:

    • POST /sales adicionará uma nova venda, o body da requisição precisa ter as propriedades: productId sendo o id válido de um produto existente na tabela, e quantity sendo um número maior que 0;
    • GET /sales retorna todas as vendas cadastradas;
    • GET /sales/:id em caso de id válido, retorna a venda cadastrada de acordo com o id passado;
    • DELETE /sales/:id deleta uma venda em caso de id válido;
    • PUT /sales/:id atualiza uma venda em caso de id válido, o body da requisição precisa ter as propriedades: productId sendo o id válido de um produto existente na tabela, e quantity sendo um número maior que 0;

    Projeto desenvolvido por: Hugo Leonardo.

    Visit original content creator repository
    https://github.com/hgo19/store-manager

  • dog-vs-cat-classification

    PyTorch 实战 Dog-Vs-Cat-Classification

    可参考 对应的markdown文件 理解代码细节。

    1 项目目录

    .
    ├── AllData  # 数据集存放
    ├── README.md
    ├── checkpoints  # 训练好的模型        【需要自己创建】
    ├── config.py  # 配置文件,如何创建见下  【需要自己创建】
    ├── data  # 自定义数据集处理包
    │   ├── __init__.py
    │   │   └── dataset.cpython-312.pyc
    │   └── dataset.py
    ├── logs  # 存放 tensorboard logs 文件 【需要自己创建】
    ├── main.py  # 主程序
    ├── models  # 网络模型定义
    │   ├── __init__.py
    │   ├── basic.py
    │   └── cnn.py
    ├── notes  # 一些笔记
    │   ├── kaggle_download.md
    │   └── note06_dog_vs_cat.md
    ├── requirements.txt  # 依赖包
    ├── result.csv  # 预测/测试结果
    └── utils  # 一些辅助包
        ├── __init__.py
        └── visualizer.py  # 封装可视化功能

    2 数据下载

    • 有关如何从 kaggle 下载的教程可见 zhihu
    • 解压后放入 AllData 文件下,或者自定义数据集的统一存放处【推荐】,文件目录大致为

    AllData/
    ├── competitions
    │   └── dog-vs-cat-classification
    │       ├── test
    │       │   └── test
    │       │       ├── 000013.jpg
    │       │       └── 000018.jpg
    │       └── train
    │           └── train
    │               ├── cats
    │               │   ├── cat.57.jpg
    │               │   └── cat.62.jpg
    │               └── dogs
    │                   ├── dog.12.jpg
    │                   └── dog.17.jpg
    └── readme.md

    3 安装

    • PyTorch 的安装和环境配置可见 zhihu
    • 安装指定依赖:【进入 requirements.txt 根目录下安装】
    pip install -r requirements.txt

    4 训练

    python main.py train

    可以指定相关参数,参数写在 config.py 文件夹里,需要自己创建

    # config.py 在根目录下
    import torch
    import warnings
    
    import os
    from datetime import datetime
    
    
    class DefaultConfig:
        model = 'AlexNetClassification'  # 选择模型
        root = './AllData/competitions/dog-vs-cat-classification'  # 填入数据集位置
    
        # 获取最新的文件
        param_path = './checkpoints/'  # 存放模型位置
        if not os.listdir(param_path):
            load_model_path = None  # 加载预训练的模型的路径,为None代表不加载
        else:
            load_model_path = os.path.join(
                param_path,
                sorted(
                    os.listdir(param_path),
                    key=lambda x: datetime.strptime(
                        x.split('_')[-1].split('.pth')[0],
                        "%Y-%m-%d%H%M%S"
                    )
                )[-1]
            )
    
        batch_size = 32
        if torch.cuda.is_available():
            use_gpu = True
        else:
            use_gpu = False
    
        num_workers = 0
        print_freq = 20
    
        max_epochs = 10
        lr = 0.003
        lr_decay = 0.5  # when val_loss increase, lr = lr*lr_decay
        weight_decay = 0e-5  # 损失函数
    
        tensorboard_log_dir = './logs'  # 存放 Tensorboard 的 logs 文件
    
        result_file = 'result.csv'
    
        def _parse(self, kwargs):
            """
            根据字典kwargs 更新 config参数
            """
            for k, v in kwargs.items():
                if not hasattr(self, k):
                    warnings.warn("Warning: opt has not attribute %s" % k)
                setattr(self, k, v)
    
            config.device = torch.device('cuda') if config.use_gpu else torch.device('cpu')
    
            print('user config:')
            for k, v in self.__class__.__dict__.items():
                if not k.startswith('_'):
                    print(k, getattr(self, k))
    
    
    config = DefaultConfig()

    可以在命令后中修改

    python main.py train --root=/Users/...

    5 测试

    python main.py test
    

    然后在根目录下会得到 result.csv 文件,可以上传到 kaggle

    6 友链

    1. 关注我的知乎账号 Zhuhu 不错过我的笔记更新。
    2. 我会在个人博客 isKage`Blog 更新相关项目和学习资料。

    Visit original content creator repository
    https://github.com/isKage/dog-vs-cat-classification

  • statecraft

    Statecraft

    Statecraft is a protocol and set of tools for interacting with data that changes over time. It is the spiritual successor to Sharedb.

    Statecraft sees the world as a series of stores. Each store has:

    • Some data (A single value or a set of key-value pairs)
    • A monotonically increasing version number

    The store guarantees that the data is immutable with respect to time. (So if the data changes, the version number goes up).

    Stores provide a standard set of methods to interact with the data:

    • Fetch: Run a query against the data
    • Mutate: Edit the data & bump the version
    • Subscribe: Be notified when the data changes, and optionally also fetch the current state of the data.
    • GetOps: (Optional) Get all operations in some specified version range. Stores can choose how much historical data to store and return.

    A Statecraft store is more than just a database abstraction. They can provide an interface to:

    • A file on disk
    • A single variable in memory
    • A computed view (eg rendered HTML)
    • An event log (eg Kafka)
    • A store which lives remotely over the network
    • Some other remote API

    And much more.

    Unlike traditional transactional databases, Statecraft stores compose together like LEGO. Stores wrap one another, adding functionality or changing the behaviour of the store living underneath in the process.

    For example:

    • The readonly store transparently provides access to the underlying store, but disallows any mutation.
    • A cache store caches all queries made to the underlying store, and can return subsequent queries directly
    • The map store runs all fetch and subscribe result values through a mapping function.
    • The network server and client allow you to use a Statecraft store living on another computer as if it existed locally. This works between servers or from a web browser over websockets.

    The philosophy of Statecraft is to “ship the architecture diagram”. You should be able to take your whiteboard diagram of your application and construct (almost) all of it directly out of Statecraft stores. No reimplementation or integration necessary. And because the stores are standard, we can have standard tools for debugging too.

    Queries

    Statecraft’s fetch and subscribe functions use queries to specify the data to return.

    Currently there’s 3 standard supported query types:

    • Single value query (Single). This is for stores which just expose a single value. Aka, fetch everything. Single value queries return a single value result.
    • Key-value queries (KV). These contain a list (or a set) of keys to fetch, and return a map of key-value pairs in response. There is also an AllKV variant which requests all key-value pairs in the store.
    • Range queries. These specify a list of ranges (start & end pairs) to fetch. They can optionally specify a limit and offset for the start and end of the range, although not all stores support all of these fields.

    I’ve made a proof-of-concept store which adds GraphQL schema & query support, but this is not yet fully merged.

    Ok that sounds great but how do I use it?

    Full developer API documentation is still in the works. Sorry.

    For now you can look through the type definitions (with documentation) for stores and queries in lib/interfaces.ts. The set of available core stores is in lib/stores/. And there are some demos showing different ways to use the API in demos/.

    Why is this written in Typescript?

    Javascript has been to make a proof of concept because it was easy and it demos well.

    Statecraft is language agnostic and my plan is to have implementations in many other languages too. Once async/await support is in rust proper, I would like to port Statecraft’s core into rust.

    The API is designed to make it easy to re-expose a statecraft store over the network. For this reason it should be easy to build applications on top of Statecraft which use a mixed set of languages. For example, you should be able to write your blog rendering function in Rust or Go but use the existing nodejs code to cache the results and expose it over websockets. This requires compatible Statecraft implementations in Go, Rails, Python, Rust, Swift, etc. These are waiting on a standardization push for the network API, which is coming but not here yet.

    Status

    Statecraft is in an advanced proof-of-concept stage. It works, but you and your application may need some hand holding. There are rough edges.

    If you want help building Statecraft, making stuff on top of Statecraft, or if you would like to help with Statecraft get in touch.

    License

    Statecraft is licensed under the ISC:

    Copyright 2019 Joseph Gentle
    
    Permission to use, copy, modify, and/or distribute this software for any
    purpose with or without fee is hereby granted, provided that the above
    copyright notice and this permission notice appear in all copies.
    
    THE SOFTWARE IS PROVIDED "AS IS" AND THE AUTHOR DISCLAIMS ALL WARRANTIES WITH
    REGARD TO THIS SOFTWARE INCLUDING ALL IMPLIED WARRANTIES OF MERCHANTABILITY AND
    FITNESS. IN NO EVENT SHALL THE AUTHOR BE LIABLE FOR ANY SPECIAL, DIRECT,
    INDIRECT, OR CONSEQUENTIAL DAMAGES OR ANY DAMAGES WHATSOEVER RESULTING FROM
    LOSS OF USE, DATA OR PROFITS, WHETHER IN AN ACTION OF CONTRACT, NEGLIGENCE OR
    OTHER TORTIOUS ACTION, ARISING OUT OF OR IN CONNECTION WITH THE USE OR
    PERFORMANCE OF THIS SOFTWARE.
    

    Visit original content creator repository
    https://github.com/josephg/statecraft

  • monkey_app

    🐵 Monkey is a smart expense management app built with Flutter, integrating AI-powered receipt scanning, currency conversion, and Firebase for data storage. To ensure high reliability, the app includes unit testing to validate its core functionalities, such as expense categorization, AI-based text extraction, and currency conversion.

    🚀 Technologies Used
    Flutter – Cross-platform mobile development framework.

    Firebase – For user authentication, cloud storage, and real-time database.

    AI (OCR + Llama) – To recognize text from receipt images and categorize transactions.

    Cloud Vision API – For advanced receipt text extraction.

    n8n – Automates workflows, notifications, and service integrations.

    Currency API – Fetches real-time exchange rates for currency conversion.

    Flutter Test & Mockito – Implements unit testing for key app functionalities.

    🛠 Key Features

    📸 AI-powered Receipt Scanning – Automatically extracts transaction details from receipts.

    📊 Expense Categorization – AI classifies expenses into categories like food, shopping, and utilities.

    📅 Budget Tracking – Users can monitor their spending and set limits.

    📈 Spending Insights & Reports – Visual analytics and spending trends for better financial management.

    🔄 Cloud Sync & Backup – Secure and accessible expense tracking across multiple devices.

    📲 Smart Notifications – Alerts for budget overages and upcoming payments.

    💱 Real-time Currency Conversion – Automatically converts expenses into the user’s preferred currency.

    🧪 Unit Testing – Ensures AI accuracy, reliable currency conversion, and seamless data processing.

    💡 What I Learned
    ✅ Developing AI-powered financial applications
    ✅ Implementing real-time currency conversion
    ✅ Using Firebase for cloud-based expense tracking
    ✅ Enhancing application stability with unit testing

    🎯 Looking Back
    Adding unit testing to Monkey significantly improved its reliability. By validating receipt scanning, categorization, and currency conversion, I ensured the app delivers accurate results and a seamless user experience.

    ✨ Future Plans: Expand AI capabilities and implement integration testing for enhanced accuracy! 🚀

    Visit original content creator repository
    https://github.com/catchmeifyoucan99/expense_personal

  • Multiplexed_Toric

    Multiplexed Toric Codes on Erasure Channel

    This is a C++ implementation of multiplexed toric codes simulator.

    Simulation Flow

    You can simulate the multiplexed quantum communication with surface code by g++ -O2 -std=c++20 *.cpp -o main && "your_path/multiplexed_toric/src/"main; and then you get result.json.

    Simulation flows are:

    • Multiplexing (assign qubits to photons)
    • Erasure error on a photon -> erasure errrors on multiple qubits
    • Replace erased qubits with mixed state -> erasure can be regarded as a random Pauli error.
    • X stabilizer measurement
    • Run peeling decoder
    • Determines if any Z logical errors remain after decoding. flow

    The default error model is erasure with main_with_loss_error();. Combined error model (random Z + Erasure + random Z) is also available in main_with_combined_error().

    You can visualize the result of the simulation as .png file with python python draw_toric.py LATTICE_SIZE_V LATTICE_SIZE_H "result.json"; with lattice sizes (python draw_toric.py 10 10 "result.json"; works for the default case).

    You will get something like this: vis_toric python draw_toric.py LATTICE_SIZE_V LATTICE_SIZE_H “result.json”;

    Requirements

    Citation

    ArXiv submission is available at HERE. For the citation of this work, please use this bibtex file.

    @misc{nishio2024multiplexed,
          title={Multiplexed Quantum Communication with Surface and Hypergraph Product Codes}, 
          author={Shin Nishio and Nicholas Connolly and Nicolò Lo Piparo and William John Munro and Thomas Rowan Scruby and Kae Nemoto},
          year={2024},
          eprint={2406.08832},
          archivePrefix={arXiv},
          primaryClass={id='quant-ph' full_name='Quantum Physics' is_active=True alt_name=None in_archive='quant-ph' is_general=False description=None}
    }
    
    Visit original content creator repository https://github.com/parton-quark/Multiplexed_Toric
  • Algorithms-Open-Source

    Algorithms-Open-Source

    This project is a collection of implementations of various algorithms in various programming languages. These algorithms are useful and relatively simple, and are recommended to be implemented by any computer science student.

    Motivation

    The motivation for this project is this reddit post

    Want to Contribute?

    • Have a look at the issues
    • Select an issue you want to work on
    • Comment with the language of choice, after which you will get assigned to that issue.
      • Only then start working on the task.
    • If the algorithm of your choice is already implemented, try to optimise it.
    • Make sure to add your algorithm to the README if it does not currently exist there.

    Note: It is encouraged to implement already implemented algorithms in different languages.

    Project Structure

    The repo is structured like

    • Algorithm Category
      • Algorithm Name
        • Language
          • Implementation – Source Code

    Currently implemented algorithms

    • Compiler

      • LALR parser
      • LL-1 Parser
    • Circle Drawing

      • Bresenham
    • Encryption

      • Diffie-Hellman
      • RSA
      • Shamir Secret Sharing Algorithm
    • Graph Algorithms

      • 0/1 BFS Traversal
      • BFS Traversal
      • Bidirectonal Dijkstra
      • Cycle Detection
      • DFS Traversal
      • MultiSource BFS
      • All Pairs Shortest Path (FloydWarshall)
      • Bellman Ford Algorithm
      • Bridge Finding Algorithm
      • Topological Sort
    • LeetCode Solutions

    • Markov Algorithms

      • Viterbi Algorithm
    • Page Rank

    • Polynomial Solver

      • Newton Method
    • Set Checking

      • Bloom Filter
      • Frequency
    • Sorting

      • Bead Sort
      • Bitonic Sort
      • Bubble sort
      • Recursive Bubble sort
      • Bucket Sort
      • Cocktail Sort
      • Comb Sort
      • Counting Sort
      • Gnome Sort
      • Heap sort
      • Insertion sort
      • Merge Sort
      • Odd-Even Sort
      • Pancake Sort
      • Quick Sort
      • Radix Sort
      • Selection Sort
      • Shell Sort
      • Stooge Sort
      • Tim Sort
      • Cycle Sort
    • Stable Matching

      • Gale Shapley
    • String Matching

      • Rabin-Karp
      • Z Algorithm
    • Tree Traversal

      • BFS
      • Inorder
      • Iterative Post order
      • Iterative Pre order
      • Post order
      • Pre order

    Maintainers

    Contributors

    CONTRIBUTORS

    Come talk to us

    Join our discord channel

    Visit original content creator repository
    https://github.com/yashasvi-goel/Algorithms-Open-Source

  • Inline SPIR-V & JIT SPIR-V

    Inline SPIR-V & JIT SPIR-V

    Crate Documentation

    inline-spirv and jit-spirv ease the way you write shaders. Although as game developers, we usually compile a permutation of shader stages for different objects and materials at runtime for the best flexibility; sometimes we do want to try out some new ideas and start up dirty. This crate helps you compile GLSL/HLSL shader in your Rust code, or in external files, into SPIR-V; and embed them right inside the binary, so you are freed from all the compilation hassle.

    How to Use

    To inline shader source:

    use inline_spirv::include_spirv;
    
    let spv: &'static [u32] = inline_spirv!(r#"
        #version 450 core
        void main() { gl_Position = vec4(0, 0, 0, 1); }
    "#, vert);

    To include a external shader source file:

    use inline_spirv::include_spirv;
    
    let spv: &'static [u32] = include_spirv!("assets/vert.hlsl", vert, hlsl, entry="Main");

    Note: File paths consumed by inline-spirv are relative to the crate, i.e., the container directory of the project Cargo.toml.

    To compile a runtime shader source just-in-time:

    use jit_spirv::{jit_spirv, CompilationFeedback};
    
    let feedback: CompilationFeedback = jit_spirv!(r#"
        #version 450
        layout(binding=0) writeonly buffer _0 { float data[]; };
        void main() {
            data[gl_GlobalInvocationID.x] = 1.0;
        }
    "#, comp).unwrap();
    let spv: &[u32] = &feedback.spv;

    To include a precompiled SPIR-V binary:

    use inline_spirv::include_spirv;
    
    let spv: &'static [u32] = include_spirv!("assets/vert.spv");

    For the full list of options please refer to the documentation.

    Tips

    The macro can be verbose especially you have a bunch of #includes, so please be aware of that you can alias and define a more customized macro for yourself:

    use inline_spirv::include_spirv as include_spirv_raw;
    
    macro_rules! include_spirv {
        ($path:expr, $stage:ident) => {
            include_spirv_raw!(
                $path,
                $stage, hlsl,
                entry="my_entry_pt",
                D VERBOSE_DEFINITION,
                D ANOTHER_VERBOSE_DEFINITION="verbose definition substitution",
                I "long/path/to/include/directory",
            )
        }
    }
    
    // ...
    let vert: &[u32] = include_spirv!("examples/demo/assets/demo.hlsl", vert);

    License

    This project is licensed under either of

    at your option.

    Visit original content creator repository https://github.com/PENGUINLIONG/inline-spirv-rs